Please Note: This article is written for users of the following Microsoft Word versions: 2007, 2010, 2013, 2016, 2019, and 2021. If you are using an earlier version (Word 2003 or earlier), this tip may not work for you. For a version of this tip written specifically for earlier versions of Word, click here: Creating Labels.
Word includes a handy utility that allows you to easily create labels containing any wording you would like. For instance, you might like to have some labels that contain your return address, or others that serve as labels for products or collection items.
The first step in creating labels, believe it or not, doesn't even require Word. It involves running down to your local office supply store (OK—you can use a catalog or shop online if you want) and picking up the labels you want to use. If you haven't looked lately, it seems there are hundreds of different types of labels, each designed for a different purpose.
To use labels with Word, it is a good idea to either purchase Avery labels or look for their equivalents. The numbers assigned by Avery to their labels have in some sense become a standard for labels. In fact, many other vendors produce labels that use the same part numbers as Avery labels. These numbers will come in very handy when you start using Word to create your labels.
Once you have the labels you are ready to sit down and become creative. Simply follow these steps within Word:
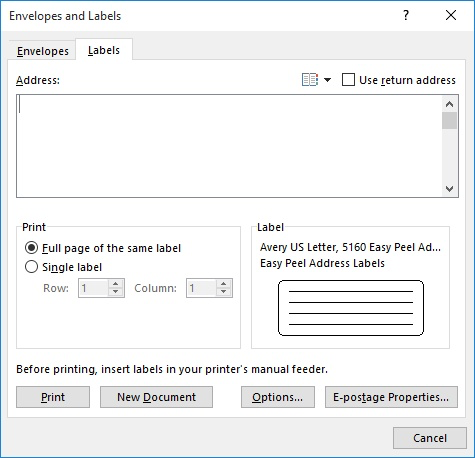
Figure 1. The Labels tab of the Envelopes and Labels dialog box.
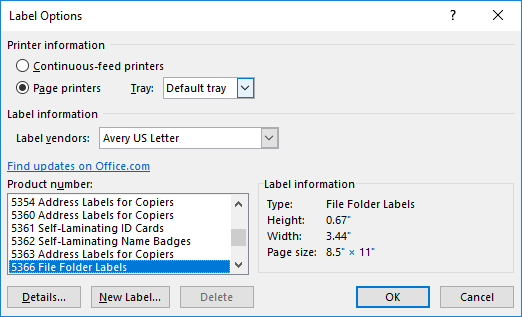
Figure 2. The Label Options dialog box.
WordTips is your source for cost-effective Microsoft Word training. (Microsoft Word is the most popular word processing software in the world.) This tip (12500) applies to Microsoft Word 2007, 2010, 2013, 2016, 2019, and 2021. You can find a version of this tip for the older menu interface of Word here: Creating Labels.

Do More in Less Time! An easy-to-understand guide to the more advanced features available in the Microsoft 365 version of Word. Enhance the quality of your documents and boost productivity in any field with this in-depth resource. Complete your Word-related tasks more efficiently as you unlock lesser-known tools and learn to quickly access the features you need. Check out Microsoft 365 Word For Professionals For Dummies today!
Labels can be expensive, and a little common sense will help you waste less money as you try to get your labels to appear ...
Discover MoreA common task in Word is to create labels. This tip presents two approaches you can use when you need to create labels ...
Discover MoreNeed your labels to look a certain way? You can save time by formatting them before Word actually creates the sheet of ...
Discover MoreFREE SERVICE: Get tips like this every week in WordTips, a free productivity newsletter. Enter your address and click "Subscribe."
2019-03-04 12:03:54
Michael Bush
Hello Allen,
I am trying to print labels on a continuous feed printer using a mix of Unicode 128 and text. I would also like to insert a company logo on to the 1 inch by 3 inch label. How do I set the page size roll, top margin, and side margin. The printer is a Brady 33. (see Figure 1 below)

Figure 1. sample label
Got a version of Word that uses the ribbon interface (Word 2007 or later)? This site is for you! If you use an earlier version of Word, visit our WordTips site focusing on the menu interface.
Visit the WordTips channel on YouTube

FREE SERVICE: Get tips like this every week in WordTips, a free productivity newsletter. Enter your address and click "Subscribe."
Copyright © 2026 Sharon Parq Associates, Inc.
 Please Note:
This article is written for users of the following Microsoft Word versions: 2007, 2010, 2013, 2016, 2019, and 2021. If you are using an earlier version (Word 2003 or earlier), this tip may not work for you. For a version of this tip written specifically for earlier versions of Word, click here:
Please Note:
This article is written for users of the following Microsoft Word versions: 2007, 2010, 2013, 2016, 2019, and 2021. If you are using an earlier version (Word 2003 or earlier), this tip may not work for you. For a version of this tip written specifically for earlier versions of Word, click here:
Comments