Please Note: This article is written for users of the following Microsoft Word versions: 2007, 2010, 2013, 2016, 2019, and 2021. If you are using an earlier version (Word 2003 or earlier), this tip may not work for you. For a version of this tip written specifically for earlier versions of Word, click here: Putting Tables within Margins.
Written by Allen Wyatt (last updated March 31, 2025)
This tip applies to Word 2007, 2010, 2013, 2016, 2019, and 2021
Need to know a quick way to make sure a too-wide table fits within the margins of your page? Here's a really easy method:
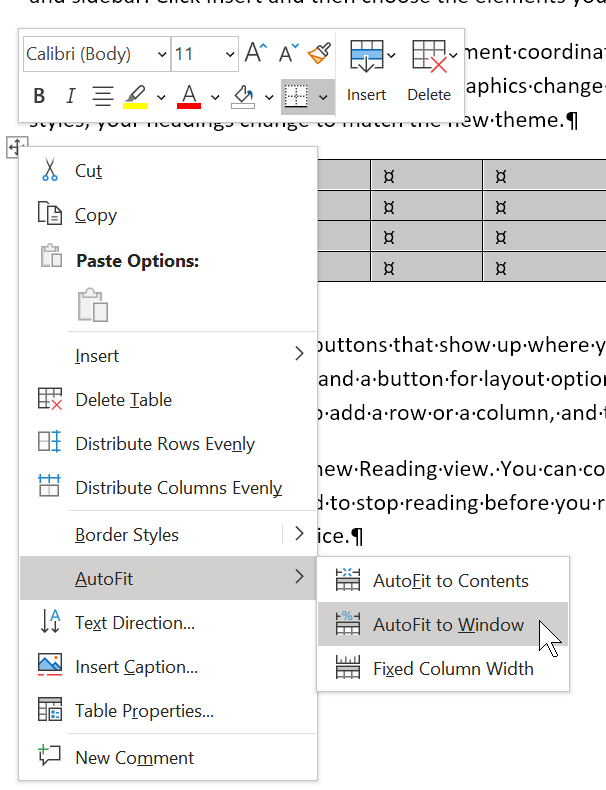
Figure 1. The Context menu available for a table.
The result is that each of the column widths of the table is set evenly, with the entire table fitting from margin to margin.
WordTips is your source for cost-effective Microsoft Word training. (Microsoft Word is the most popular word processing software in the world.) This tip (11646) applies to Microsoft Word 2007, 2010, 2013, 2016, 2019, and 2021. You can find a version of this tip for the older menu interface of Word here: Putting Tables within Margins.

Do More in Less Time! An easy-to-understand guide to the more advanced features available in the Microsoft 365 version of Word. Enhance the quality of your documents and boost productivity in any field with this in-depth resource. Complete your Word-related tasks more efficiently as you unlock lesser-known tools and learn to quickly access the features you need. Check out Microsoft 365 Word For Professionals For Dummies today!
When you transpose information, it is essentially "rotated" in a direction. If you transpose the information in a table, ...
Discover MoreIf you have a lot of tables in your documents, you might want to change the width of all of them. You can take forever ...
Discover MoreIf you make structural changes to your table by adding new columns here and there, you could easily end up with a table ...
Discover MoreFREE SERVICE: Get tips like this every week in WordTips, a free productivity newsletter. Enter your address and click "Subscribe."
2025-03-31 21:09:03
Erik Eilertsen
So, assuming I have moved my internal column widths to suit the content i.e. col 1 is number, col 2 is date, col three is part No. col 4 is description, all of those columns will have different column widths to suit the amount of text each has to contain. By choosing the method outlined are my columns all made the same size as part of the alignment or are my preset column widths, as described, maintained?
I ask because the illustrated solution suggests that all the columns will be made the same width in which case there goes my carefully structured table to hell in a...mouse click...
2021-04-26 11:39:30
Andrew
AutoFit has the unfortunate side effect enabling the "Automatically resize to fit contents" option. I find this so excruciatingly that I'll typically manually put the margins in the right places and then use the "Distribute columns evenly" command..
Andy.
2021-04-24 05:19:16
Ken Endacott
With autofit to Window the table border will be to the left of the left page margin by the cell left margin of the top left cell. To demonstrate this, right click inside the top left cell and click Table Properties > Cell tab > Options then set the left cell margin to a value such as 1.0, untick Same as the whole table, then OK.
Similarly, the right table border position is determined by the right cell margin of the top right hand cell.
It becomes a little tricky if you want the table borders to be exactly at the left and right margins.
Got a version of Word that uses the ribbon interface (Word 2007 or later)? This site is for you! If you use an earlier version of Word, visit our WordTips site focusing on the menu interface.
Visit the WordTips channel on YouTube

FREE SERVICE: Get tips like this every week in WordTips, a free productivity newsletter. Enter your address and click "Subscribe."
Copyright © 2026 Sharon Parq Associates, Inc.
 Please Note:
This article is written for users of the following Microsoft Word versions: 2007, 2010, 2013, 2016, 2019, and 2021. If you are using an earlier version (Word 2003 or earlier), this tip may not work for you. For a version of this tip written specifically for earlier versions of Word, click here:
Please Note:
This article is written for users of the following Microsoft Word versions: 2007, 2010, 2013, 2016, 2019, and 2021. If you are using an earlier version (Word 2003 or earlier), this tip may not work for you. For a version of this tip written specifically for earlier versions of Word, click here:
Comments