Written by Allen Wyatt (last updated February 24, 2024)
This tip applies to Word 2007, 2010, 2013, 2016, 2019, 2021, and Word in Microsoft 365
David has information that he's imported into Word. The information is plain text, and anything that is supposed to be bold is surrounded by double asterisks, as in **this should be bold**. David wonders if there is an easy way to convert this double-asterisk convention into actual bold text.
This can be accomplished relatively easily using Find and Replace, as long as you do your searching and replacing with the aid of wildcards. Follow these steps:
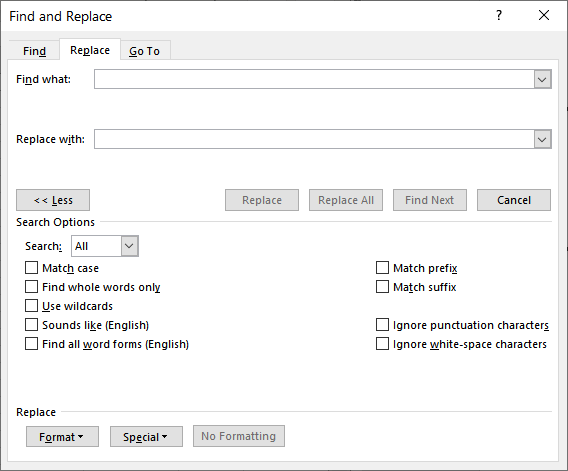
Figure 1. The expanded Find and Replace dialog box.
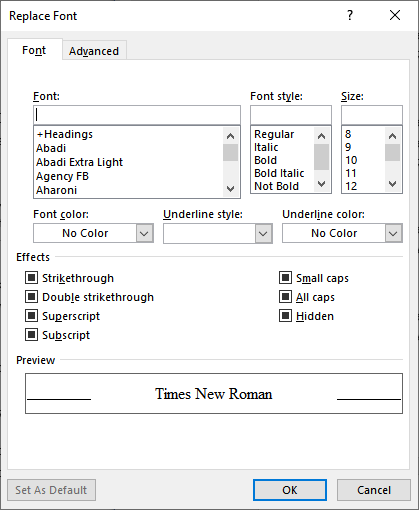
Figure 2. The Replace Font dialog.
What happens is that Word finds all instances of text within double asterisks, deletes the asterisks, and formats the text as bold. This is done because of the pattern you entered in the Find What box (step 4). The backslashes just before each asterisk cause Word to treat them as actual characters, not as wildcards—which asterisks normally are. The \1 in the Replace With box (step 5) indicates that you want to replace the matched text with whatever is within the first set of parentheses in the Find What box. That asterisk within the parentheses does not use a backslash, so it is a wildcard that matches any text.
The steps to perform the changes are easy to accomplish, but if you do this type of replacement quite a bit, you should consider using a macro to perform the task. You can do so by using the Macro Recorder while you perform the above steps. The macro will look very similar to this:
Sub BoldDoubleAsterisks
    Selection.Find.ClearFormatting
    Selection.Find.Replacement.ClearFormatting
    Selection.Find.Replacement.Font.Bold = True
    With Selection.Find
        .Text = "\*\*(*)\*\*"
        .Replacement.Text = "\1"
        .Forward = True
        .Wrap = wdFindContinue
        .Format = True
        .MatchCase = False
        .MatchWholeWord = False
        .MatchAllWordForms = False
        .MatchSoundsLike = False
        .MatchWildcards = True
    End With
    Selection.Find.Execute Replace:=wdReplaceAll
End Sub
Run the macro, and all the double-asterisk enclosed text in the document is affected. You can also assign the macro a shortcut key or add it to the Quick Access Toolbar to make it more accessible.
Note:
WordTips is your source for cost-effective Microsoft Word training. (Microsoft Word is the most popular word processing software in the world.) This tip (11222) applies to Microsoft Word 2007, 2010, 2013, 2016, 2019, 2021, and Word in Microsoft 365.

Create Custom Apps with VBA! Discover how to extend the capabilities of Office 365 applications with VBA programming. Written in clear terms and understandable language, the book includes systematic tutorials and contains both intermediate and advanced content for experienced VB developers. Designed to be comprehensive, the book addresses not just one Office application, but the entire Office suite. Check out Mastering VBA for Microsoft Office 365 today!
Word allows two different types of quote marks in a document: straight quotes and smart quotes. If you want to make sure ...
Discover MoreHTML tags are great when you want to display information on a web page. They are not so great when you have them in a ...
Discover MoreWant a quick, easy way to "search again" for the next occurrence of what you need? Use the technique in this tip and ...
Discover MoreFREE SERVICE: Get tips like this every week in WordTips, a free productivity newsletter. Enter your address and click "Subscribe."
2026-01-21 06:04:47
Barry
@ Leanne Bentley
This is very late for Leanne, but may be useful to others with the same quest... I just hope I am not 'out of order' promoting someone elses website/work; but I have found the '...wildcard cookbook...' very helpful. A comprehensive gude to F & R generally and espesially for using wildcards:
https://intelligentediting.com/blog/free-e-book-wildcard-cookbook-for-word/
2026-01-20 04:07:51
cavajane
Thank you so much Dave!
I felt like you were right there with me with the Find >> Replace.
Now to remember how to record a macro for it.
Blessing!!
2025-06-28 16:53:23
Ozzy
lifesaving! thank you. i like to write fiction on my phone as it feels like lower stakes, and then send it to word for formatting, and this saved me SO much time today (244 replacements!)
2025-04-23 16:54:54
Ian Andrews
You are very clever!
2024-09-25 22:05:47
Todd
Thanks for posting this guide! I found it helpful in formatting a document generated by AI.
Have a great day.
Todd
2024-07-20 09:49:13
Kirk Livingston
Allen, thanks very much for this. It is super helpful.
2024-05-22 13:39:54
Mohammed naeem
Thanks a lot for your hard work, I really appreciate!
Thanks again.
Mohammed Naeem
2024-02-24 14:38:27
Tomek
Correction:
rather than deleting the line
.Wrap = wdFindContinue
you should change it to
.Wrap = wdFindStop
The reason is that this setting is remembered by Word, hence deleting the line may give unexpected results.
2024-02-24 14:24:08
Just a caveat:
You have to make sure that when you start the Search-Replace, the cursor is at the very beginning of the document, or at least not between the two double stars marking the text to be bold. Otherwise the process may convert the text that was not to be bold into bold - opposite to what you want.
The same applies when you run the macro, but you can add the following line of code at the beginning of the macro to start at the beginning of the document:
Selection.HomeKey Unit:=wdStory
The macro as written in the tip will convert the text between double-asterisk marks into bold in the whole document, even if you start with just a selection of text. This is controlled by the line:
.Wrap = wdFindContinue
You can delete this line if you want the conversion only to apply to the selected text. The caveat still applies.
I propose a slightly modified macro, which will process the whole document starting at the beginning, if the selection is just the insertion point, otherwise it will only process the selected text. This macro can also be run on a header or footer.
-------------------------------
Sub BoldDoubleAsterisksinSelection()
If Selection.Type = wdSelectionIP Then Selection.HomeKey Unit:=wdStory
Selection.Find.ClearFormatting
Selection.Find.Replacement.ClearFormatting
Selection.Find.Replacement.Font.Bold = True
With Selection.Find
.Text = "\*\*(*)\*\*"
.Replacement.Text = "\1"
.Forward = True
.Wrap = wdFindStop
.Format = True
.MatchCase = False
.MatchWholeWord = False
.MatchAllWordForms = False
.MatchSoundsLike = False
.MatchWildcards = True
End With
Selection.Find.Execute Replace:=wdReplaceAll
End Sub
2024-02-24 04:47:59
Leanne Bentley
I’d love more wild card tips. I use this one a lot.
Got a version of Word that uses the ribbon interface (Word 2007 or later)? This site is for you! If you use an earlier version of Word, visit our WordTips site focusing on the menu interface.
Visit the WordTips channel on YouTube

FREE SERVICE: Get tips like this every week in WordTips, a free productivity newsletter. Enter your address and click "Subscribe."
Copyright © 2026 Sharon Parq Associates, Inc.
Comments