Please Note: This article is written for users of the following Microsoft Word versions: 2007, 2010, and 2013. If you are using an earlier version (Word 2003 or earlier), this tip may not work for you. For a version of this tip written specifically for earlier versions of Word, click here: Chapter Numbers in Indexes and TOAs.
Written by Allen Wyatt (last updated November 24, 2023)
This tip applies to Word 2007, 2010, and 2013
Pam wrote about a problem she was having with getting chapter-number prefixes to appear in her index and table of authorities. She could get the chapter number to appear in the table of contents, but not the other two elements.
Word is capable of using either of two general formats for page numbering: It can use either a number by itself, or it can use a combination of a prefix followed by a number. However, it can use only one page format in a given document. You set the format you want to use for a document by displaying the Insert tab of the ribbon, clicking the Page Number tool in the Header & Footer group, and then choosing Format Page Numbers. Word displays the Page Number Format dialog box. (See Figure 1.)
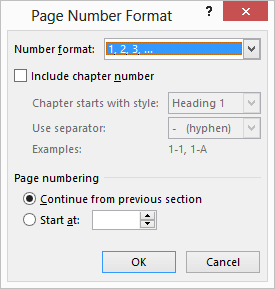
Figure 1. The Page Number Format dialog box.
Using the controls in the dialog box you can specify if Word is to include the chapter number with the page numbers it generates.
In order for chapter-number prefixes to work, the prefix must be a numbering format selected for one of the built-in heading styles that come with Word. This means that in order to include this prefix, your chapter heading style must be numbered. This would result in all chapters starting with a number, which is generally not the way chapters start. To prevent this, the number that Word adds to the chapter heading must be formatted as hidden.
The general steps, then, are to first use a Heading style for your chapter name and number. Then, number the chapter headings using hidden text, pick a page format that will use heading numbers, and create your indices, table of contents, table of authorities, etc. The steps are:
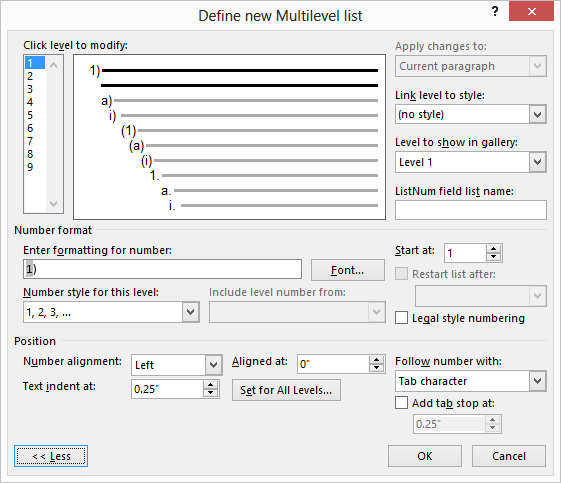
Figure 2. The Define New Multilevel List dialog box.
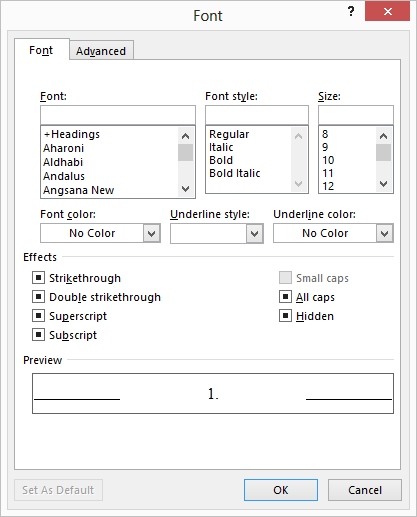
Figure 3. The Font dialog box.
When you create your index or other special tables, the page numbers will show with the chapter-number prefixes in place. Because each chapter is a separate file, you must do this for each chapter, making sure to pick the appropriate start-at number in step 6.
WordTips is your source for cost-effective Microsoft Word training. (Microsoft Word is the most popular word processing software in the world.) This tip (10622) applies to Microsoft Word 2007, 2010, and 2013. You can find a version of this tip for the older menu interface of Word here: Chapter Numbers in Indexes and TOAs.

Comprehensive VBA Guide Visual Basic for Applications (VBA) is the language used for writing macros in all Office programs. This complete guide shows both professionals and novices how to master VBA in order to customize the entire Office suite for their needs. Check out Mastering VBA for Office 2010 today!
The indexing feature provided by Word can be a great help, but in some situations, it may not sort your index as you ...
Discover MoreIt is not unusual to need to convert one notation in a document into another entirely different notation. For instance, ...
Discover MoreWhen indexing a document, you may get some funny results once in a while. If you get single index entries when you were ...
Discover MoreFREE SERVICE: Get tips like this every week in WordTips, a free productivity newsletter. Enter your address and click "Subscribe."
There are currently no comments for this tip. (Be the first to leave your comment—just use the simple form above!)
Got a version of Word that uses the ribbon interface (Word 2007 or later)? This site is for you! If you use an earlier version of Word, visit our WordTips site focusing on the menu interface.
Visit the WordTips channel on YouTube

FREE SERVICE: Get tips like this every week in WordTips, a free productivity newsletter. Enter your address and click "Subscribe."
Copyright © 2024 Sharon Parq Associates, Inc.
 Please Note:
This article is written for users of the following Microsoft Word versions: 2007, 2010, and 2013. If you are using an earlier version (Word 2003 or earlier), this tip may not work for you. For a version of this tip written specifically for earlier versions of Word, click here:
Please Note:
This article is written for users of the following Microsoft Word versions: 2007, 2010, and 2013. If you are using an earlier version (Word 2003 or earlier), this tip may not work for you. For a version of this tip written specifically for earlier versions of Word, click here:
Comments