Fredric often has documents emailed to him. He wants to apply his specific, custom styles to them, but the styles do not appear in the ribbon or the drop-downs. Fredric wonders how to find his specific styles so he can apply them.
When you create a document in Word, it has a template associated with it. There is no way around this; even if you think you don't use styles or templates, Word still dutifully associates the Normal template with a new document.
When you receive a document from someone else, that document was not created on your system. (Sounds obvious, right?) On whatever system it was created, it was associated with a template. More than likely, it was associated with the Normal template on that other system. When the document was mailed to you, Word remembers those styles from the template that was associated with it on that other system.
When you open the e-mailed document on your system, Word checks to see what template the document was associated with. If a template by the same name exists on your system, then the template is loaded and Word is happy. If the template does not exist, then Word uses the styles saved within the document itself.
If you don't see the styles you want to see, it simply means that Word hasn't opened the template that contains those styles. The solution is to associate your template—the one that contains the styles you want to see—with the e-mailed document. To do that, follow these steps:
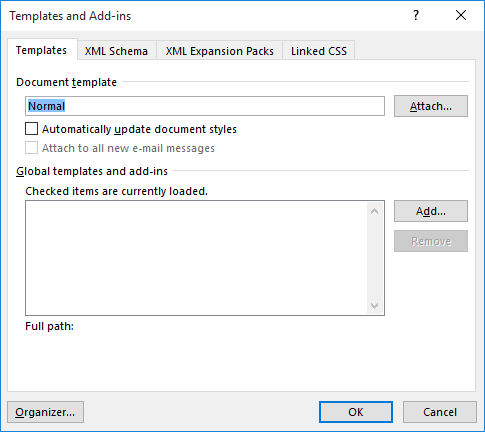
Figure 1. The Templates and Add-Ins dialog box.
Your styles should now be available to use with the document. If they are not immediately visible in the Styles task pane, you need to configure the pane to display all the styles:
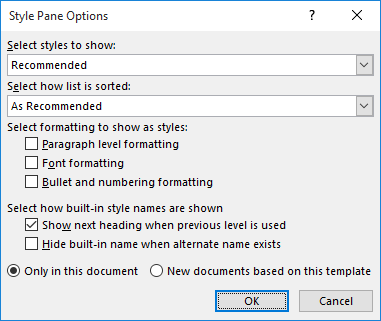
Figure 2. The Style Pane Options dialog box.
If you prefer to not mess with templates (even though you really should mess with templates), there is a quick and dirty way to get the styles available in the new document: Copy them. Here's a rundown on the technique:
WordTips is your source for cost-effective Microsoft Word training. (Microsoft Word is the most popular word processing software in the world.) This tip (9961) applies to Microsoft Word 2007, 2010, 2013, 2016, 2019, 2021, and Word in Microsoft 365.

Discover the Power of Microsoft Office This beginner-friendly guide reveals the expert tips and strategies you need to skyrocket your productivity and use Office 365 like a pro. Mastering software like Word, Excel, and PowerPoint is essential to be more efficient and advance your career. Simple lessons guide you through every step, providing the knowledge you need to get started. Check out Microsoft Office 365 For Beginners today!
Styles are very powerful, but they can be messed up if someone chooses to use direct formatting with document text. If ...
Discover MoreCreating styles for your documents is a powerful way to format them. How do you get paragraphs formatting with those ...
Discover MoreStyles are invaluable when it comes to applying consistent formatting in and across documents. If you need to rename a ...
Discover MoreFREE SERVICE: Get tips like this every week in WordTips, a free productivity newsletter. Enter your address and click "Subscribe."
2026-04-14 08:40:21
Patty Esposito
I recently discovered an alternative way to apply styles, and it is fairly well hidden.
When I have a document with strong styles, whether it is mine or from another template, I go to the Design ribbon, click the dropdown next to the Document Formatting group and choose (at the bottom) Save as a New Style Set. The dialog that populates will save it to QuickStyles when given a name. That Style Set is now located in that same section under Custom.
Merely click on it to apply to another document. It can be added to the QAT.
Thank you for all the wisdom you have brought over the years.
Got a version of Word that uses the ribbon interface (Word 2007 or later)? This site is for you! If you use an earlier version of Word, visit our WordTips site focusing on the menu interface.
Visit the WordTips channel on YouTube

FREE SERVICE: Get tips like this every week in WordTips, a free productivity newsletter. Enter your address and click "Subscribe."
Copyright © 2026 Sharon Parq Associates, Inc.
Comments