Please Note: This article is written for users of the following Microsoft Word versions: 2007, 2010, 2013, 2016, 2019, 2021, and Word in Microsoft 365. If you are using an earlier version (Word 2003 or earlier), this tip may not work for you. For a version of this tip written specifically for earlier versions of Word, click here: Printing without Track Changes Marks.
Track Changes is a handy feature to use when editing a Word document. The marks let you know what edits have been made and are particularly useful if you have multiple editors working on the same document. You may, at times, want to print a document before the changes have been resolved and not have the Track Changes marks show on the printout.
You can accomplish this task by following these steps if you are using Word 2007:
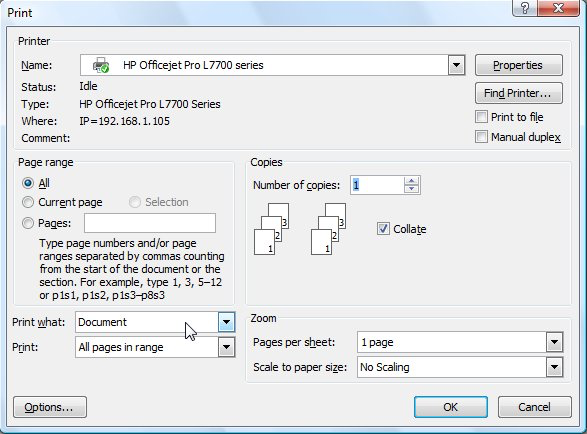
Figure 1. The Print dialog box in Word 2007.
The printout should not show your Track Changes marks. The marks are only printed if the Print What drop-down list (step 2) is set to Document Showing Markup.
If you are using Word 2010 or a later version, then the steps are different:
The printout should not show your Track Changes marks. The marks are only printed if the check mark appears next to the Print Markup options in step 3.
It is important to understand that Word changes the value of this drop-down list (Word 2007) or check mark (Word 2010 and later versions), by default, depending on whether there are any tracked changes in your document or not. If there are not, then Document is the default setting for the drop-down (Word 2007) or the check mark is cleared (Word 2010 and later versions). If there are tracked changes (whether you have Track Changes currently on or not) then Document Showing Markup (Word 2007) or Print Markup (Word 2010 and later versions) is the default. This is why, if you have tracked changes and you want them not to show in the printout, you need to check the settings in the dialog box (Word 2007) or on the File tab of the ribbon (Word 2010 and later versions) instead of printing without checking.
WordTips is your source for cost-effective Microsoft Word training. (Microsoft Word is the most popular word processing software in the world.) This tip (9892) applies to Microsoft Word 2007, 2010, 2013, 2016, 2019, 2021, and Word in Microsoft 365. You can find a version of this tip for the older menu interface of Word here: Printing without Track Changes Marks.

The First and Last Word on Word! Bestselling For Dummies author Dan Gookin puts his usual fun and friendly candor back to work to show you how to navigate Word 2019. Spend more time working and less time trying to figure it all out! Check out Word 2019 For Dummies today!
Need to have a series of documents customized for individual users? Mail merge may be overkill, but the macro presented ...
Discover MoreIf you need to send a command directly to your printer, then you need to use the PRINT field. It allows you to send ...
Discover MoreThe Navigation pane can be a handy tool for seeing the overall organization of your document and easily moving to ...
Discover MoreFREE SERVICE: Get tips like this every week in WordTips, a free productivity newsletter. Enter your address and click "Subscribe."
There are currently no comments for this tip. (Be the first to leave your comment—just use the simple form above!)
Got a version of Word that uses the ribbon interface (Word 2007 or later)? This site is for you! If you use an earlier version of Word, visit our WordTips site focusing on the menu interface.
Visit the WordTips channel on YouTube

FREE SERVICE: Get tips like this every week in WordTips, a free productivity newsletter. Enter your address and click "Subscribe."
Copyright © 2026 Sharon Parq Associates, Inc.
 Please Note:
This article is written for users of the following Microsoft Word versions: 2007, 2010, 2013, 2016, 2019, 2021, and Word in Microsoft 365. If you are using an earlier version (Word 2003 or earlier), this tip may not work for you. For a version of this tip written specifically for earlier versions of Word, click here:
Please Note:
This article is written for users of the following Microsoft Word versions: 2007, 2010, 2013, 2016, 2019, 2021, and Word in Microsoft 365. If you are using an earlier version (Word 2003 or earlier), this tip may not work for you. For a version of this tip written specifically for earlier versions of Word, click here:
Comments