Written by Allen Wyatt (last updated December 21, 2024)
This tip applies to Word 2007, 2010, 2013, 2016, 2019, Word in Microsoft 365, and 2021
Marty created a Word document with endnotes. After that, he wanted to create another version for a newspaper without the endnotes. So he displayed the Layout tab of the Page Setup dialog box and clicked on the Suppress Endnotes check box. Problem is, nothing happened; the endnotes remained and the document remained unchanged. Marty wonders how to really suppress endnotes.
The short answer is that if you want to suppress endnotes (not have them print) you need to actually delete them. (More on that in a moment.) This might lead you to question what the purpose is for the Suppress Endnotes check box; it is plainly visible in the Layout dialog box. (See Figure 1.)
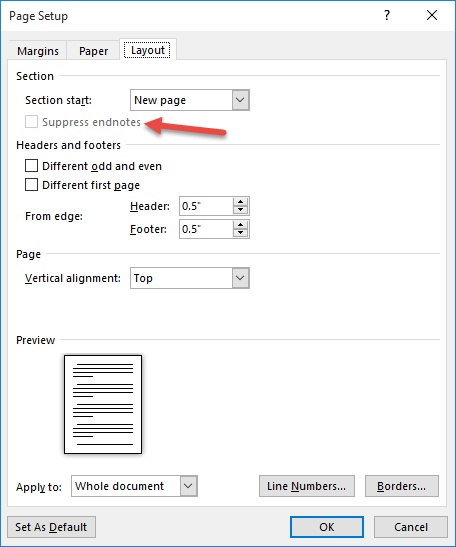
Figure 1. The Layout tab of the Page Setup dialog box.
This check box isn't used to turn off the display of all your endnotes. Instead, it is used to suppress the display of endnotes within specific sections of a document, pushing them forward to the next section. This concept will take a bit of explanation.
You see, you can instruct Word to place endnotes at the end of each section of a document instead of at the end of the entire document. This is handy if you use a separate section for each chapter in an overall document and you want endnotes at the end of each chapter.
If you direct Word to place endnotes at the end of each section, you may run across a section where you want the endnotes suppressed. That is what the check box is for—to suppress the endnotes that would normally be displayed at the end of that particular section. Word dutifully does that, moving those endnotes to the end of the following section, unless they are suppressed there, as well. If you suppress the endnotes in every section of your document, then they are still printed at the very end of the document.
Note that the endnotes are not hidden or removed; they are simply suppressed for that particular section. This entire concept of controlling placement of endnotes across sections (and using the Suppress Endnotes check box) is covered in a different WordTip:
https://wordribbon.tips.net/T009694
Now, back to how you create a version of your document that doesn't include endnotes. As mentioned, the short answer is that you need to actually delete them. Follow these steps:
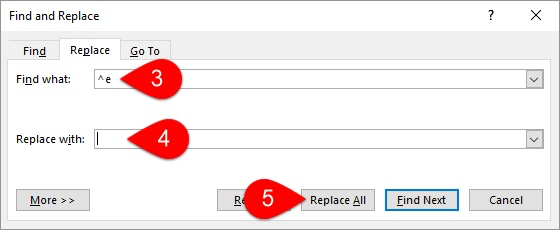
Figure 2. The Replace tab of the Find and Replace dialog box.
That's it; your endnotes should now be removed and you have the desired "clean" copy. You can print it out or save it under a different name. (Don't save it under the same name. That would overwrite the copy you saved in step 1 and your endnotes would be permanently gone.)
WordTips is your source for cost-effective Microsoft Word training. (Microsoft Word is the most popular word processing software in the world.) This tip (8835) applies to Microsoft Word 2007, 2010, 2013, 2016, 2019, Word in Microsoft 365, and 2021.
Learning Made Easy! Quickly teach yourself how to format, publish, and share your content using Word 2013. With Step by Step, you set the pace, building and practicing the skills you need, just when you need them! Check out Microsoft Word 2013 Step by Step today!
Endnotes are a required element in some types of writing. When you add an endnote, Word moves you to the end of your ...
Discover MoreWord is flexible on how it numbers your endnotes. This tip shows how easy it is to make the changes to the numbering system.
Discover MoreIf you have a document with lots of endnotes, you may need them converted to regular text so that they can be used ...
Discover MoreFREE SERVICE: Get tips like this every week in WordTips, a free productivity newsletter. Enter your address and click "Subscribe."
There are currently no comments for this tip. (Be the first to leave your comment—just use the simple form above!)
Got a version of Word that uses the ribbon interface (Word 2007 or later)? This site is for you! If you use an earlier version of Word, visit our WordTips site focusing on the menu interface.
Visit the WordTips channel on YouTube

FREE SERVICE: Get tips like this every week in WordTips, a free productivity newsletter. Enter your address and click "Subscribe."
Copyright © 2024 Sharon Parq Associates, Inc.
Comments