Please Note: This article is written for users of the following Microsoft Word versions: 2007, 2010, 2013, 2016, 2019, and 2021. If you are using an earlier version (Word 2003 or earlier), this tip may not work for you. For a version of this tip written specifically for earlier versions of Word, click here: Last-Row Border Formatting.
Lynne wrote about a problem she encountered with formatting a table in Word. The table was formatted so the outline border used double lines, and the inside borders used single lines. Everything looked fine until the table extended to a second page. Then, the last line of the last row on the first page didn't switch to a double line, instead remaining a single line.
Before getting into how you can fix this, you should first make sure that you are looking at the table in the proper manner. If you look at the table in Draft view, it won't appear that the table is outlined properly at the page break. Instead, you must view the document in Print Layout view.
If you still don't see it properly, then follow these steps:

Figure 1. The Borders tab of the Borders and Shading dialog box.
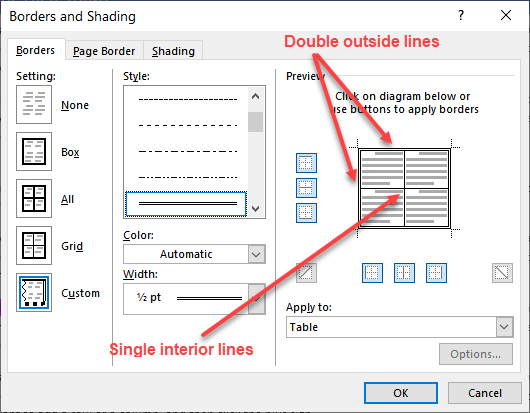
Figure 2. Double outside lines and single interior lines preview in Borders and Shading dialog box.
Now, when you view a multi-page table using Print Layout view the table should be outlined in double lines on each page where the table appears. Only the interior lines should be single. If, for some reason, your table still doesn't behave in the described manner, it could be related to your printer driver. Make sure you have the most current driver for your printer and try again.
WordTips is your source for cost-effective Microsoft Word training. (Microsoft Word is the most popular word processing software in the world.) This tip (8383) applies to Microsoft Word 2007, 2010, 2013, 2016, 2019, and 2021. You can find a version of this tip for the older menu interface of Word here: Last-Row Border Formatting.

Create Custom Apps with VBA! Discover how to extend the capabilities of Office 365 applications with VBA programming. Written in clear terms and understandable language, the book includes systematic tutorials and contains both intermediate and advanced content for experienced VB developers. Designed to be comprehensive, the book addresses not just one Office application, but the entire Office suite. Check out Mastering VBA for Microsoft Office 365 today!
When working with tables (particularly those created by others), you can spend a large amount of time getting the ...
Discover MoreWord can adjust the height of individual rows in a table based on the information you put in each row. This may not ...
Discover MoreIndividual cells in a table can be aligned any way you desire. As pointed out here, just select the cell and apply the ...
Discover MoreFREE SERVICE: Get tips like this every week in WordTips, a free productivity newsletter. Enter your address and click "Subscribe."
There are currently no comments for this tip. (Be the first to leave your comment—just use the simple form above!)
Got a version of Word that uses the ribbon interface (Word 2007 or later)? This site is for you! If you use an earlier version of Word, visit our WordTips site focusing on the menu interface.
Visit the WordTips channel on YouTube

FREE SERVICE: Get tips like this every week in WordTips, a free productivity newsletter. Enter your address and click "Subscribe."
Copyright © 2026 Sharon Parq Associates, Inc.
 Please Note:
This article is written for users of the following Microsoft Word versions: 2007, 2010, 2013, 2016, 2019, and 2021. If you are using an earlier version (Word 2003 or earlier), this tip may not work for you. For a version of this tip written specifically for earlier versions of Word, click here:
Please Note:
This article is written for users of the following Microsoft Word versions: 2007, 2010, 2013, 2016, 2019, and 2021. If you are using an earlier version (Word 2003 or earlier), this tip may not work for you. For a version of this tip written specifically for earlier versions of Word, click here:
Comments