Please Note: This article is written for users of the following Microsoft Word versions: 2007, 2010, 2013, and 2016. If you are using an earlier version (Word 2003 or earlier), this tip may not work for you. For a version of this tip written specifically for earlier versions of Word, click here: Printing Documents without Markup.

Printing Documents without Markup

Written by Allen Wyatt (last updated June 9, 2020)
This tip applies to Word 2007, 2010, 2013, and 2016


8

Word includes the ability to print your documents with or without "markup" showing. Markup is defined as editing marks (using Word's Track Changes feature) and comments placed in a document during its development.

You can control whether or not markup is printed in Word 2007 by displaying the Print dialog box and using the Print What drop-down list. If you choose Document, then only the document is printed. If you choose Document with Markup, then the markup is printed along with the document. (See Figure 1.)
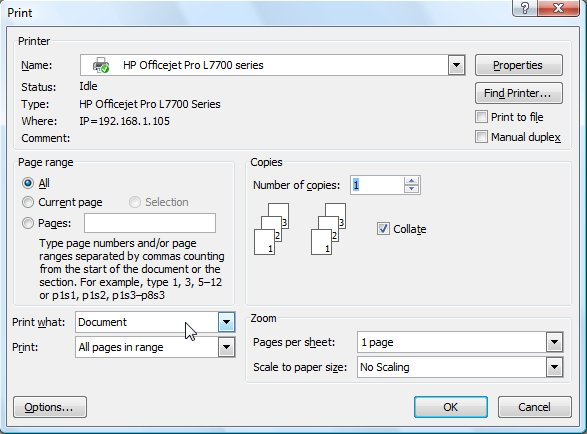
Figure 1. The Print dialog box.

If you are using Word 2010, Word 2013, or Word 2016, the traditional Print dialog box no longer exists. Instead, you can control whether markup is printed or not by displaying the print options (press Ctrl+P) and clicking the drop-down list that indicates what you want to print. (It is the first drop-down list under the Settings heading, and is normally set to Print All Pages.) At the bottom of the options presented you see a Print Markup setting. Choose the option, and then your document will print with markup on the printout.

The default behavior of the Print What drop-down list (Word 2007) and the Print Markup setting (Word 2010 and later versions) is rather odd. In fact, at times it can seem to have a mind of its own. In doing testing, I found out that the default for the Print What drop-down list will be Document (Word 2007) and the Print Markup setting won't be selected (Word 2010 and later versions) unless one of the following is true:

  • You have Final Showing Markup chosen in the Tracking group on the Review tab of the ribbon.
  • You have Original Showing Markup chosen in the Tracking group on the Review tab of the ribbon.

Changing the setting of the Print What drop-down list to Document (Word 2007) or selecting the Print Markup setting (Word 2010 and later versions) does not override the Markup setting. Basically, all you are doing is specifying that you want this one printing of the document to not show markup. The next time you display the Print dialog box (Word 2007) or the printing options (Word 2010 and later versions), you'll find that Word is set to print markup, based on the Markup setting in the document. (It is not the Print What drop-down list or the Print Markup setting that is "sticky," but the Markup setting, which always overrides the Print What drop-down list and the Print Markup setting.)

The setting of the Markup option is saved with your document. Similarly, if you have a template open, then the setting can be saved with the template, to be used as a default for all future documents based on the template.

If you want the Print What drop-down list to always default to Document (Word 2007) or the Print Markup setting to always be selected (Word 2010 and later versions), then you need to turn off the Markup option in the document or in the template, and then save the document and template. Since the setting is saved on a per-document basis, you may need to do this in lots of documents to get the effect you want.

WordTips is your source for cost-effective Microsoft Word training. (Microsoft Word is the most popular word processing software in the world.) This tip (6058) applies to Microsoft Word 2007, 2010, 2013, and 2016. You can find a version of this tip for the older menu interface of Word here: Printing Documents without Markup.

Author Bio

Allen Wyatt

With more than 50 non-fiction books and numerous magazine articles to his credit, Allen Wyatt is an internationally recognized author. He is president of Sharon Parq Associates, a computer and publishing services company. ...

MORE FROM ALLEN

Adjusting Row Height for Your Text

Want Excel to automatically adjust the height of a worksheet row when it wraps text within the cell? It's easy to do, ...

Discover More

Using Object Anchors

An object anchor is used to signify the point at which an object is inserted into a document. If you want to see these ...

Discover More

PivotTables for the Faint of Heart (Special Offer)

PivotTables for the Faint of Heart shows you how to condense huge amounts of data so you can make sense of it. ...

Discover More

Comprehensive VBA Guide Visual Basic for Applications (VBA) is the language used for writing macros in all Office programs. This complete guide shows both professionals and novices how to master VBA in order to customize the entire Office suite for their needs. Check out Mastering VBA for Office 2010 today!

More WordTips (ribbon)

Understanding Background Printing

We click the button to print our document and seldom think of what is happening behind the scenes. Word prints documents, ...

Discover More

Easily Changing Print Order

You can change the order in which pages are printed (normal or reversed) using the Print dialog box or the print settings ...

Discover More

Printing Summary Information

Word automatically maintains a number of properties for each document you create. As part of those properties you can ...

Discover More
Subscribe

FREE SERVICE: Get tips like this every week in WordTips, a free productivity newsletter. Enter your address and click "Subscribe."

View most recent newsletter.

Comments

If you would like to add an image to your comment (not an avatar, but an image to help in making the point of your comment), include the characters [{fig}] (all 7 characters, in the sequence shown) in your comment text. You’ll be prompted to upload your image when you submit the comment. Maximum image size is 6Mpixels. Images larger than 600px wide or 1000px tall will be reduced. Up to three images may be included in a comment. All images are subject to review. Commenting privileges may be curtailed if inappropriate images are posted.

What is 7 + 4?

2023-04-29 19:55:08

Tomek

@Anne Woolaver:
One more hint on your problem:
The Print Markup setting in Print Options (the one you get by pressing Ctrl+P) is non-sticky - it is valid only for current print session. However, it is inherited from the setting in Review Tab, in the Tracking Group, which is called Display for Review (the tool tip shows if you hover over it for a while). You have four options there including "No Markup"; if you select it, you won't see markup while editing and when you go to print, Print Markup will also be unselected. This setting will be stored with the document or template.

My comments about Normal templates are still valid, but possibly this comment explains what you observe.


2023-04-29 19:15:23

Tomek

@Anne Woolaver:
Is the template you mention Normal.dotm? If so, I think there is a bug in Word that often prevents you from using that template when you modify it. If you create a document with all things needed in your template and save it as a template with a name Normal.dotm, it will likely end up in your Documents\Custom Office Templates. If so, the template actually used by Word for new documents is likely in different location C:\Users\<user>\AppData\Roaming\Microsoft\Templates\. In such case the changes you made to the template will not show up in the new document.

What is even more complicated is that the template Normal.dotm saved in Custom Office Templates cannot be accessed from the Backstage.
Even worse, if you click on Normal.dotm template in Custom Office Templates in File explorer, the document created will be still based on the Normal template from C:\Users\<user>\AppData\Roaming\Microsoft\Templates\, not on the one you clicked. Go figure.

It seems that the only way to see what is in the Normal.dotm from custom Office Templates is to open it from within Word, which will open the template, not create a new document.

In short, you may avoid such problems if you make sure there is only one Normal template on your system and it is in the location C:\Users\<user>\AppData\Roaming\Microsoft\Templates\

I have posted more details on that in my comment of 2023-03-07 to the tip
https://wordribbon.tips.net/T013044_Putting_a_File_Name_and_Path_in_a_Default_Footer.html
in answer to Larry Schwartz.

Anne, Please let me know If my comment helped you, either by posting here or sending me an e-mail (in this comment it is not hidden).


2023-04-27 10:21:19

Anne Woolaver

"The setting of the Markup option is saved with your document. Similarly, if you have a template open, then the setting can be saved with the template, to be used as a default for all future documents based on the template."

This is not working for me. I am using Microsoft 365, and changing the markup setting in the macro-enabled Word template (.dotm) does not save with the template; when the "saved" template is closed and then reopened, the markup setting is back to "All markup".

Can you give a step-by-step demonstration of the process I should be using to create a Word template on which the DEFAULT review setting is "No markup", which should in turn suppress the "Print markup" setting unless I deliberately choose it? Thanks very much.


2023-04-21 12:27:16

Rebekah Smith

Thank you, Allen. A while ago, I turned on Print Mark Up and then forgot what I did. So, I had to deselect Print Mark Up in the print dialog box every time I wanted to print something. It's been annoying. Changing this option in Track Changes on the ribbon fixed the problem. I'm so grateful to have landed on your page that had the answer I needed! Rebekah


2021-08-26 00:05:46

Robert Boysen

Hi, Allen,
Normally I don’t have a problem with printing in Word, and, normally I am using my PC. For reasons beyond my control, I’m now using an IPad with Word installed. When I searched how to print in word,
I was told click file, print. There is no file so I cannot print. Can you help?
My email is brenda.bob@icloud.com.

Thank you,

Bob Boysen(a faithful reader of your columns)


2021-06-24 08:52:49

Ethan Hack

At the time of writing, it is possible to set the Microsoft Word 365 (or 2016) default to printing without markup by editing the Windows Registry to add a new registry key:

HKEY_CURRENT_USER\Software\Microsoft\Office\16.0\Word\Options - new DWORD Value - SetDefaultPrintViewToFinal - value 1.

This is based on a Microsoft Knowledge Base article for Word 2007, currently available at http://web.archive.org/web/20140419210825/http://support.microsoft.com:80/kb/835219.


2016-05-17 06:00:21

Bonika

Can you Combine your macro to print all Open documents to Print all Open documents as Final Markup with out any track changes - in short i need a Macro to Print all open word doucments but without track changes as the macro in this link below prints all the open documents with Track changes

http://word.tips.net/T000401_Printing_All_Open_Documents.html


2016-04-21 12:28:42

Dawn

I have tried everything to hide the review comments from printing. I am editing a large group of documents that when sent to the mailroom they should be able to just grab the file and print without opening it. What settings can I change to get the comments to be hid from the letters before they are printed - but not necessarily delete the comment?


This Site

Got a version of Word that uses the ribbon interface (Word 2007 or later)? This site is for you! If you use an earlier version of Word, visit our WordTips site focusing on the menu interface.

Videos
Subscribe

FREE SERVICE: Get tips like this every week in WordTips, a free productivity newsletter. Enter your address and click "Subscribe."

(Your e-mail address is not shared with anyone, ever.)

View the most recent newsletter.