Mary Anne works as a freelance editor of academic documents. Very frequently, they contain Level 3 headings as well as Levels 1 and 2. She wonders if there is any way to make the Level 3 headings display in the Navigation pane. Mary Anne opens the Navigation pane as a matter of course when working on her documents and the disappearance of Level 3 heads is a nuisance.
The easiest way to control how many heading levels are displayed in the Navigation pane is to follow these steps:
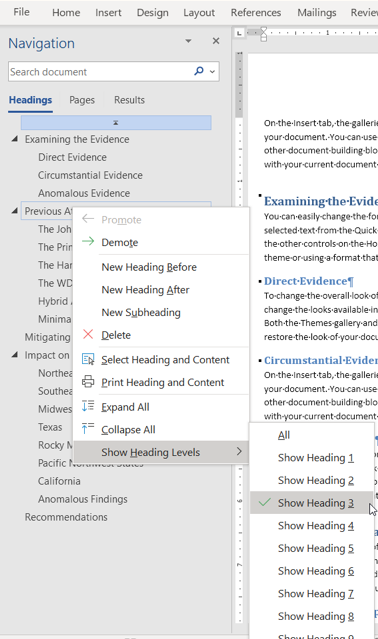
Figure 1. You can specify which heading levels are displayed in the Navigation pane.
What you see in the Navigation pane should be immediately updated. If you don't see all the headings you expected, then you'll want to check to make sure that the headings are actually formatted using the necessary heading styles (Heading 1, Heading 2, Heading 3, etc.). You should note, as well, that if a heading is contained within a table, then there is a very good chance that the heading won't appear in the Navigation pane. Word "overlooks" these headings, for some reason.
WordTips is your source for cost-effective Microsoft Word training. (Microsoft Word is the most popular word processing software in the world.) This tip (13776) applies to Microsoft Word 2007, 2010, 2013, 2016, 2019, and 2021.

Do More in Less Time! An easy-to-understand guide to the more advanced features available in the Microsoft 365 version of Word. Enhance the quality of your documents and boost productivity in any field with this in-depth resource. Complete your Word-related tasks more efficiently as you unlock lesser-known tools and learn to quickly access the features you need. Check out Microsoft 365 Word For Professionals For Dummies today!
It is nice when you change settings in Word and the program remembers your settings from session to session. In this tip ...
Discover MoreDisplaying graphics in a document requires a great deal more computer processing than displaying simple text. A document ...
Discover MoreThe Developer tab of the ribbon is the gateway to many advanced features in Word, including those features related to ...
Discover MoreFREE SERVICE: Get tips like this every week in WordTips, a free productivity newsletter. Enter your address and click "Subscribe."
2025-07-11 12:09:39
SER
I also wanna know how to change the default to view all levels.
2025-01-04 00:52:50
Bryce
Hi Allen,
My challenge is, having selected the lowest level I wish to display in the Navigation Pane, and noted that the pane has updated correctly; to retain that setting so that setting when I close and open the document again.
Can this be done please?
Regards Bryce
2023-05-10 16:01:20
A Monaco
Thanks for the tip about the Nav-Pane levels. I've been searching for this answer off/on for a while. It was really helpful.
Do you know of a way to make the levels selected a 'default setting'?
Thanks
ADM
2022-11-10 14:57:40
Zana
the problem is it is showing the wrong level, I had it set to LEVEL 3 but it is showing me headings at level 6 !!
2022-03-22 12:12:10
Idaho Storm
Thanks for the tip! I've found that if you attempt to have the first word of a sentence or phrase be the "heading," it will not show up on the headings list unless you select the full line or isolate the word.
2021-11-12 04:35:10
Rob KB
Is there a way to control which levels the Nav pane displays on startup? At the moment I have to tweak this every time I open my document as it shows everything, which can take a long time to scroll through. I tried looking in Word options but without any success.
2020-06-28 15:50:59
Carrie C.
Strangely, this is exactly what I was wondering about with documents I'm about to start editing!
Got a version of Word that uses the ribbon interface (Word 2007 or later)? This site is for you! If you use an earlier version of Word, visit our WordTips site focusing on the menu interface.
Visit the WordTips channel on YouTube

FREE SERVICE: Get tips like this every week in WordTips, a free productivity newsletter. Enter your address and click "Subscribe."
Copyright © 2026 Sharon Parq Associates, Inc.
Comments