Pip has been using Word for years. In older versions of Word (specifically, Word 2003) Pip could right-align a tab stop that was beyond the right margin. If she tabbed to this stop, Word would keep the text thus tabbed on the line, even though it was placed beyond the right margin. In current versions of Word, Pip can still set a tab stop beyond the right margin, but tabbing to the location automatically moves the text to the next line. She needs a way to place information beyond the right margin as she used to be able to do, and she doesn't want to use text boxes or tables as these unnecessarily complicate the document.
Pip is correct—in current versions of Word you cannot set a tab beyond the right margin. However, you can work around this by adjusting how you layout your document. What comes into play here are two layout elements: your right margin and the right indent.
When you set up your document, you specify margins for that document. These margins define the size of your text block. In Pip's case, we are concerned with the width of the text block, which is defined by the left and right margins. If your paper width is 8.5 inches and your left and right margins are 1.25 inches, then your text block is 6 inches wide. (That is calculated by 8.5 - 1.25 - 1.25 = 6.) You cannot put things outside of this text block, except for special elements such as text boxes. Word lets you set a tab stop outside of that text box, but it won't let you align any text to that tab stop.
This is where a right indent comes into play. Word allows you to set a right indent which is cumulative with the right margin. These indents are set for specific paragraphs. For instance, if you have a paragraph with a 1-inch right indent, this is added to the right margin, and text within that paragraph will behave as if there is 2.25 inches of white space at the right side of the document.
You can, however, set a tab beyond that right indent, which can be very helpful. It can lead to some funky behavior, though, if you don't remember that you are working with both indents and margins. Let me show you what I mean.
Let's say that you have a paragraph where you want some text, some of it long, and you want your margins at 1.25 inches left and right. On the final line you want a dot-leader, right-aligned tab that is beyond the right margin for the paragraph, at 6.25 inches. You can set up your margins and paragraph like this, and the tab stop shows up in the ruler just fine, to the right of your right margin. Your tabbed text, however, won't go beyond the right margin. (See Figure 1.)
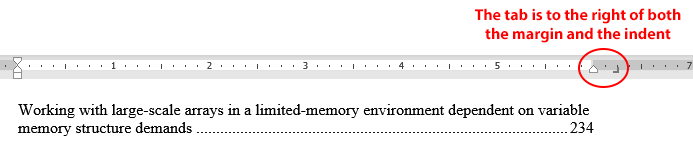
Figure 1. Text won't tab beyond the right margin of your document.
Interestingly, you can adjust the indent on the paragraph so that it is 1-inch from the right margin, but that doesn't help your situation. Your tabbed text still won't go beyond that right margin. In fact, it won't even go to the right margin, stopping, instead, at the right indent for the paragraph. (See Figure 2.)
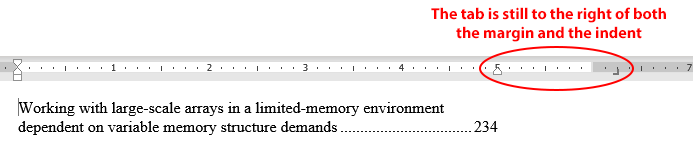
Figure 2. Text tabs only to the right indent when the tab is beyond the right margin.
The solution to this is to keep your right indent for the paragraph but move your tab stop so it isn't set beyond the right margin. It can be beyond the indent, but it should not be beyond the right margin. For example, you might set the tab stop to be 6 inches, which is equal to the width of the text block and therefore just at the right margin of the document. The paragraph indent, however, is still set to 1-inch, so that the text in the paragraph wraps at 5 inches. (See Figure 3.)
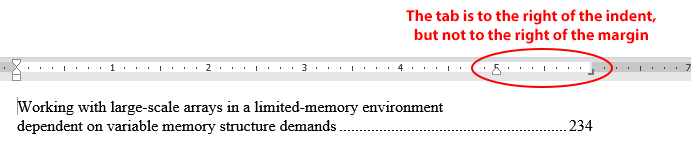
Figure 3. Text tabs beyond the right indent just fine.
Now the tab stop behaves as you would expect, putting the page number to the right of your text in the paragraph. The key here, though, is that the tab stop must be within the text block as defined by your left and right margins.
WordTips is your source for cost-effective Microsoft Word training. (Microsoft Word is the most popular word processing software in the world.) This tip (828) applies to Microsoft Word 2007, 2010, 2013, 2016, 2019, and 2021.

Learning Made Easy! Quickly teach yourself how to format, publish, and share your content using Word 2021 or Microsoft 365. With Step by Step, you set the pace, building and practicing the skills you need, just when you need them! Check out Microsoft Word Step by Step today!
Those with a publishing, typographic, or design background may understand what leading is, but not how to adjust the ...
Discover MoreWord allows you to format a paragraph so that it extends into the left margin of the document. This is done by setting a ...
Discover MoreYou may search high and low for a way to add automatic numbers to paragraphs in a document. You won't find the ...
Discover MoreFREE SERVICE: Get tips like this every week in WordTips, a free productivity newsletter. Enter your address and click "Subscribe."
2019-07-09 19:36:48
Robert Balter
So Allen, I am a lawyer and I like to have documents initial and dated on each page and had done this in my footer which worked until recently. In order to get it to work again, do I have to have a zero right margin and then indent all text 1" from the right margin in order to have 1" margins all around and yet be able to put the initials and dates in the margin as you describe? Thanks in advance. Robert Balter.
2019-07-07 07:35:46
Simon Freeman
Does it work for the left margin the same way?
2019-07-06 10:24:24
Henry Noble
A clever work-around.
Good use of graphics to illustrate points being made in the Tip.
Got a version of Word that uses the ribbon interface (Word 2007 or later)? This site is for you! If you use an earlier version of Word, visit our WordTips site focusing on the menu interface.
Visit the WordTips channel on YouTube

FREE SERVICE: Get tips like this every week in WordTips, a free productivity newsletter. Enter your address and click "Subscribe."
Copyright © 2026 Sharon Parq Associates, Inc.
Comments