When working with tables, you may not want the individual rows in the table to break across pages. In other words, you want everything in each row to be on the same page. This is easy enough to do manually—you just adjust the table properties in this manner:
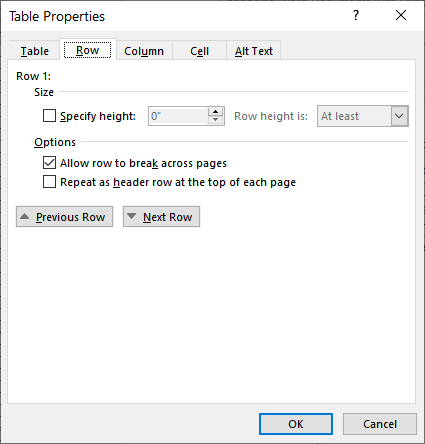
Figure 1. The Row tab of the Table Properties dialog box.
Now each row will stay on its own page. The table will still break across pages, but individual rows in the table will not.
While this seems easy enough, it can be tiresome to go through this same process for lots of tables in a document. For example, if you have 50 tables, then you'd have to go through the above steps 50 times. Argh!
The answer is to use a macro to change the Allow Row to Break Across Pages setting for all the tables. The following will do the trick:
Sub StopRowBreaking()
    Dim tbl As Table

    For Each tbl In ActiveDocument.Tables
        tbl.Rows.AllowBreakAcrossPages = False
    Next
    Set tbl = Nothing
End Sub
The macro works because it steps through each table and clears the setting (the AllowBreakAcrossPages property) for all the table's rows as a group. It is very quick, even if you have 50 or more tables in your document.
Note:
WordTips is your source for cost-effective Microsoft Word training. (Microsoft Word is the most popular word processing software in the world.) This tip (13339) applies to Microsoft Word 2007, 2010, 2013, 2016, 2019, 2021, and Word in Microsoft 365.

Learning Made Easy! Quickly teach yourself how to format, publish, and share your content using Word 2021 or Microsoft 365. With Step by Step, you set the pace, building and practicing the skills you need, just when you need them! Check out Microsoft Word Step by Step today!
Individual cells in a table can be aligned any way you desire. As pointed out here, just select the cell and apply the ...
Discover MoreWhen you have a long table that extends over multiple pages, Word allows you to specify one or more rows to be repeated ...
Discover MoreWhen working with tables, you can adjust the height of individual rows. How you go about such adjustments depends on the ...
Discover MoreFREE SERVICE: Get tips like this every week in WordTips, a free productivity newsletter. Enter your address and click "Subscribe."
There are currently no comments for this tip. (Be the first to leave your comment—just use the simple form above!)
Got a version of Word that uses the ribbon interface (Word 2007 or later)? This site is for you! If you use an earlier version of Word, visit our WordTips site focusing on the menu interface.
Visit the WordTips channel on YouTube

FREE SERVICE: Get tips like this every week in WordTips, a free productivity newsletter. Enter your address and click "Subscribe."
Copyright © 2026 Sharon Parq Associates, Inc.
Comments