Please Note: This article is written for users of the following Microsoft Word versions: 2007, 2010, 2013, 2016, 2019, and 2021. If you are using an earlier version (Word 2003 or earlier), this tip may not work for you. For a version of this tip written specifically for earlier versions of Word, click here: Automatic Question Numbering.
Written by Allen Wyatt (last updated September 23, 2025)
This tip applies to Word 2007, 2010, 2013, 2016, 2019, and 2021
Cara works for a school district and part of her responsibilities includes putting together some quizzes and tests for teachers. She is looking for a quick way to put together true/false questions, using the following format:
_____ 1. This is the question
There are several ways you can accomplish this task. Some folks suggest that you use a three-column table. The first column can contain the underline (done either using the underscore character or by applying a bottom border to the appropriate cell), the second can contain the question number and period, and the third can contain the question itself. The advantage of this approach is that it is very easy to format each component of the questions easily. The drawback, of course, is that setting up the table and putting things in the proper cells can take a little extra time.
Another approach is to change the way that Word does its automatic numbering. Follow these steps:
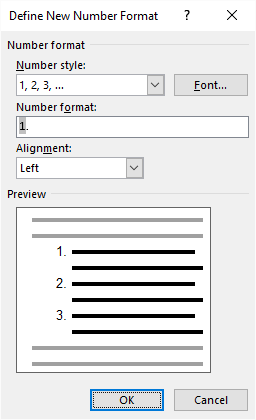
Figure 1. The Define New Number Format dialog box.
The customized numbering, with the leading underlines, is applied to the questions you selected in step 2. Further, if you add any questions in the middle, the question numbering is automatically adjusted. The drawback to this approach is that you cannot have the underline left-justified and the number right-justified at the same time. (For most uses this won't be a big drawback.)
A third approach is to use the automatic numbering fields available in Word, and then create a Building Block entry that contains the numbering field. Follow these steps:
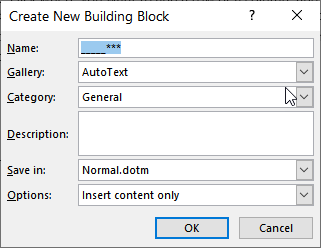
Figure 2. The Create New Building Block dialog box.
Now, whenever you want to create a new question, simply type the name you defined in step 10 and press F3. The question pattern appears, and you can type the question you desire. The numbering for the questions will be updated to consecutive numbers when you choose to print the document.
WordTips is your source for cost-effective Microsoft Word training. (Microsoft Word is the most popular word processing software in the world.) This tip (9040) applies to Microsoft Word 2007, 2010, 2013, 2016, 2019, and 2021. You can find a version of this tip for the older menu interface of Word here: Automatic Question Numbering.

Learning Made Easy! Quickly teach yourself how to format, publish, and share your content using Word 2021 or Microsoft 365. With Step by Step, you set the pace, building and practicing the skills you need, just when you need them! Check out Microsoft Word Step by Step today!
When you convert a paragraph to a numbered list, Word adds a number at the start of the paragraph, as you would expect. ...
Discover MoreWord's automatic numbering formats allow you to easily create lists that have one leading zero. If you want more than one ...
Discover MoreIf you have a numbered list in a document, you might want to convert it to regular, non-dynamic text and not lose the ...
Discover MoreFREE SERVICE: Get tips like this every week in WordTips, a free productivity newsletter. Enter your address and click "Subscribe."
There are currently no comments for this tip. (Be the first to leave your comment—just use the simple form above!)
Got a version of Word that uses the ribbon interface (Word 2007 or later)? This site is for you! If you use an earlier version of Word, visit our WordTips site focusing on the menu interface.
Visit the WordTips channel on YouTube

FREE SERVICE: Get tips like this every week in WordTips, a free productivity newsletter. Enter your address and click "Subscribe."
Copyright © 2026 Sharon Parq Associates, Inc.
 Please Note:
This article is written for users of the following Microsoft Word versions: 2007, 2010, 2013, 2016, 2019, and 2021. If you are using an earlier version (Word 2003 or earlier), this tip may not work for you. For a version of this tip written specifically for earlier versions of Word, click here:
Please Note:
This article is written for users of the following Microsoft Word versions: 2007, 2010, 2013, 2016, 2019, and 2021. If you are using an earlier version (Word 2003 or earlier), this tip may not work for you. For a version of this tip written specifically for earlier versions of Word, click here:
Comments