Please Note: This article is written for users of the following Microsoft Word versions: 2007, 2010, 2013, 2016, 2019, and 2021. If you are using an earlier version (Word 2003 or earlier), this tip may not work for you. For a version of this tip written specifically for earlier versions of Word, click here: Displaying Nonprinting Characters.
There are several different characters, such as a space and tab, which Word does not normally display on the screen. In addition, there are several special characters that Word uses for housekeeping purposes. For instance, Word uses special characters to indicate the end of a line or the end of a paragraph. You can display these special characters, which Word refers to as nonprinting characters, by following these steps:
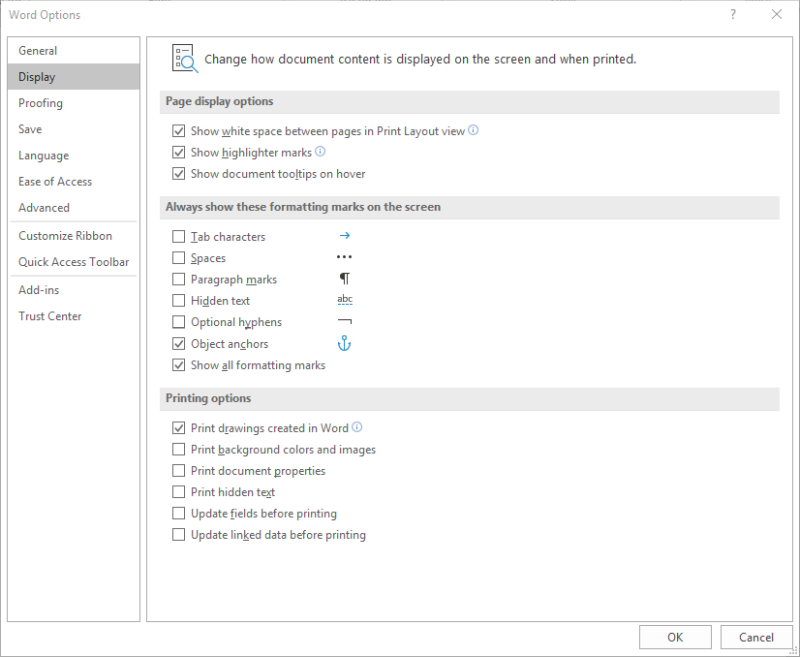
Figure 1. The Display options in the Word Options dialog box.
Why would you want to display these characters? Quite simply, because it is much easier to understand spacing when the characters are displayed. You can quickly tell, for instance, when you have inserted two spaces between words or added an extra carriage return. This allows you to more accurately control the look of your document and what it contains.
There is also a quick way you can turn nonprinting characters on and off using the ribbon. Display the Home tab of the ribbon and look for a tool in the Paragraph group that looks like a backwards P. (Technically this character is called a pilcrow.) This tool is known as the Show/Hide tool. Clicking it toggles the condition of the Show All Formatting Marks checkbox in the dialog box shown earlier. Thus, it can quickly turn on and off the nonprinting character display.
There is one interesting "gottcha" to this, however. In the dialog box, you can select to individually display or hide specific nonprinting characters. If you select the checkboxes for all these individual characters, using the Show/Hide tool still only toggles the Show All Formatting Marks checkbox—the individual settings for specific characters are not affected at all.
WordTips is your source for cost-effective Microsoft Word training. (Microsoft Word is the most popular word processing software in the world.) This tip (8879) applies to Microsoft Word 2007, 2010, 2013, 2016, 2019, and 2021. You can find a version of this tip for the older menu interface of Word here: Displaying Nonprinting Characters.

The First and Last Word on Word! Bestselling For Dummies author Dan Gookin puts his usual fun and friendly candor back to work to show you how to navigate Word 2019. Spend more time working and less time trying to figure it all out! Check out Word 2019 For Dummies today!
When typing a bulleted list, Word seems to automatically make the first letter of each item in the list uppercase. The ...
Discover MoreAll those little ScreenTips bug you when moving through the toolbars and ribbons of Word? You can turn them off by ...
Discover MoreThe style area, displayed at the left side of your document, can be helpful in understanding how styles are used in your ...
Discover MoreFREE SERVICE: Get tips like this every week in WordTips, a free productivity newsletter. Enter your address and click "Subscribe."
2022-01-29 16:41:45
John Wafford
I am using Word 2019 and am trying to get formatting marks to display but with no success. I have tried File>Options>Display and CTRL + * but neither of them works. Any suggestions?
Got a version of Word that uses the ribbon interface (Word 2007 or later)? This site is for you! If you use an earlier version of Word, visit our WordTips site focusing on the menu interface.
Visit the WordTips channel on YouTube

FREE SERVICE: Get tips like this every week in WordTips, a free productivity newsletter. Enter your address and click "Subscribe."
Copyright © 2026 Sharon Parq Associates, Inc.
 Please Note:
This article is written for users of the following Microsoft Word versions: 2007, 2010, 2013, 2016, 2019, and 2021. If you are using an earlier version (Word 2003 or earlier), this tip may not work for you. For a version of this tip written specifically for earlier versions of Word, click here:
Please Note:
This article is written for users of the following Microsoft Word versions: 2007, 2010, 2013, 2016, 2019, and 2021. If you are using an earlier version (Word 2003 or earlier), this tip may not work for you. For a version of this tip written specifically for earlier versions of Word, click here:
Comments