Written by Allen Wyatt (last updated October 19, 2019)
This tip applies to Word 2007, 2010, 2013, 2016, 2019, and 2021
The ribbon-based interface is made up of different tabs, each of which contains a collection of related tools. The tabs that are visible often depend on what you are doing in Word at the moment.
One tab that is especially necessary for advanced users is the Developer tab. This tab contains a variety of tools that allow you to "develop" and customize Word. Of particular importance is the fact that the Developer tab contains tools that allow you to create and access macros.
The Developer tab is not contextual in nature; it should always be visible on the ribbon. If it is not visible, that means you have not configured Word to display it. To display the tab, follow these steps if you are using Word 2010 or a later version:
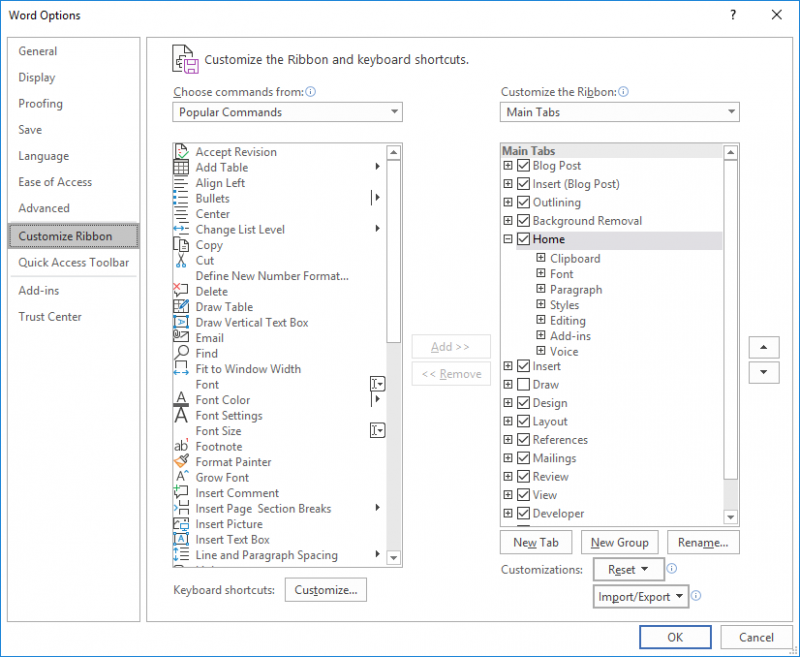
Figure 1. The Customize Ribbon options of the Word Options dialog box.
Follow these steps in Word 2007:
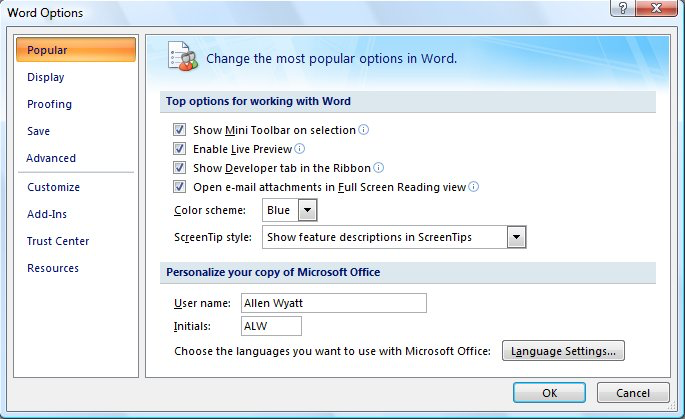
Figure 2. The Popular options of the Word Options dialog box.
The developer tab should now be visible on the ribbon.
Note:
WordTips is your source for cost-effective Microsoft Word training. (Microsoft Word is the most popular word processing software in the world.) This tip (6746) applies to Microsoft Word 2007, 2010, 2013, 2016, 2019, and 2021.

Discover the Power of Microsoft Office This beginner-friendly guide reveals the expert tips and strategies you need to skyrocket your productivity and use Office 365 like a pro. Mastering software like Word, Excel, and PowerPoint is essential to be more efficient and advance your career. Simple lessons guide you through every step, providing the knowledge you need to get started. Check out Microsoft Office 365 For Beginners today!
Do you have bothersome boxes appear around the text in your document? Here's how you can get rid of them and make your ...
Discover MoreAll those little ScreenTips bug you when moving through the toolbars and ribbons of Word? You can turn them off by ...
Discover MoreWant to add lots of tools to your Quick Access Toolbar? Word allows you to do so, seemingly without limit. This tip ...
Discover MoreFREE SERVICE: Get tips like this every week in WordTips, a free productivity newsletter. Enter your address and click "Subscribe."
2021-12-30 08:48:38
Henk
In Word365:
Options, Quick Access Toolbar (left frame), Choose commands from "Developer tab" (2nd frame), select Code, View Macros and Visual Basic Editor.
2020-05-07 05:48:38
Rod
Thanks! it really helped
2020-04-10 09:34:21
Hadassa M. Sylvestre
Hi! I just want to thank you very much for these tips for Word users, it's the second time I came here this week, and it's always very helpful =)
Got a version of Word that uses the ribbon interface (Word 2007 or later)? This site is for you! If you use an earlier version of Word, visit our WordTips site focusing on the menu interface.
Visit the WordTips channel on YouTube

FREE SERVICE: Get tips like this every week in WordTips, a free productivity newsletter. Enter your address and click "Subscribe."
Copyright © 2025 Sharon Parq Associates, Inc.
Comments