Please Note: This article is written for users of the following Microsoft Word versions: 2007, 2010, 2013, 2016, 2019, 2021, and Word in Microsoft 365. If you are using an earlier version (Word 2003 or earlier), this tip may not work for you. For a version of this tip written specifically for earlier versions of Word, click here: Removing Automatic Lines.
Written by Allen Wyatt (last updated June 25, 2022)
This tip applies to Word 2007, 2010, 2013, 2016, 2019, 2021, and Word in Microsoft 365
Have you ever noticed how if you type a few equal signs on a line in your document, and then press Enter, Word replaces what you typed with a double line that extends the whole width of your document? Actually, this works if you enter as few as three equal signs, dashes, or underscores. In each case, Word replaces your characters with a different type of line.
In some instances, this Word feature can be a great timesaver. In other instances, you might have really wanted the characters in your document, not the line that Word thought you wanted. In these instances there are three ways you can handle the situation.
First, and probably the easiest method, is to hit Backspace after pressing Enter. The automatic line that Word created will disappear, but the original characters you typed will remain and the insertion point will stay on the text line below. You can also press Ctrl+Z right after you pressed Enter to undo the automatic line and achieve the same results.
Using the undo shortcut may not be practical if you don't use it right away, though. This leads to the second method of dealing with the line. If you later want to remove the line, it helps to understand how Word added it in the first place. When you pressed Enter at the end of your characters (the ones Word replaced with its line), Word removed the characters and added a border to the paragraph just before where you typed the characters. You can verify this in the following manner:
The third method of dealing with the line is to simply turn off the feature that causes Word to replace your equal signs, dashes, and underscores with its own line. Follow these steps:
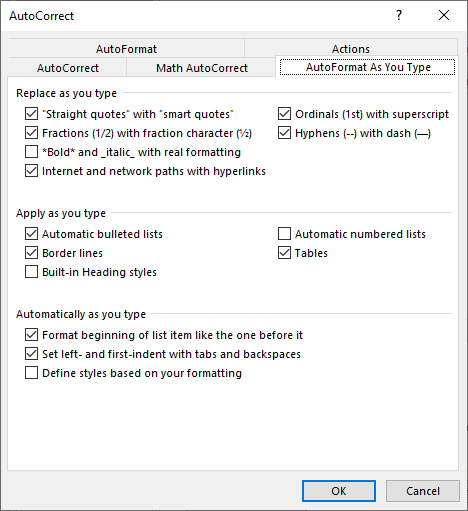
Figure 1. The AutoFormat As You Type tab of the AutoCorrect dialog box.
WordTips is your source for cost-effective Microsoft Word training. (Microsoft Word is the most popular word processing software in the world.) This tip (6022) applies to Microsoft Word 2007, 2010, 2013, 2016, 2019, 2021, and Word in Microsoft 365. You can find a version of this tip for the older menu interface of Word here: Removing Automatic Lines.

Create Custom Apps with VBA! Discover how to extend the capabilities of Office 365 applications with VBA programming. Written in clear terms and understandable language, the book includes systematic tutorials and contains both intermediate and advanced content for experienced VB developers. Designed to be comprehensive, the book addresses not just one Office application, but the entire Office suite. Check out Mastering VBA for Microsoft Office 365 today!
When you type a URL into a document, Word helpfully converts it to a live hyperlink. If you don't want Word to be quite ...
Discover MoreWord provides several built-in tools that can affect how what you type is formatted. One of those tools can even change ...
Discover MoreWant an easy way to add lines in your document? You can do it by making sure Word is using one of its AutoFormat features.
Discover MoreFREE SERVICE: Get tips like this every week in WordTips, a free productivity newsletter. Enter your address and click "Subscribe."
There are currently no comments for this tip. (Be the first to leave your comment—just use the simple form above!)
Got a version of Word that uses the ribbon interface (Word 2007 or later)? This site is for you! If you use an earlier version of Word, visit our WordTips site focusing on the menu interface.
Visit the WordTips channel on YouTube

FREE SERVICE: Get tips like this every week in WordTips, a free productivity newsletter. Enter your address and click "Subscribe."
Copyright © 2025 Sharon Parq Associates, Inc.
 Please Note:
This article is written for users of the following Microsoft Word versions: 2007, 2010, 2013, 2016, 2019, 2021, and Word in Microsoft 365. If you are using an earlier version (Word 2003 or earlier), this tip may not work for you. For a version of this tip written specifically for earlier versions of Word, click here:
Please Note:
This article is written for users of the following Microsoft Word versions: 2007, 2010, 2013, 2016, 2019, 2021, and Word in Microsoft 365. If you are using an earlier version (Word 2003 or earlier), this tip may not work for you. For a version of this tip written specifically for earlier versions of Word, click here:
Comments