Please Note: This article is written for users of the following Microsoft Word versions: 2007, 2010, 2013, 2016, 2019, 2021, and Word in Microsoft 365. If you are using an earlier version (Word 2003 or earlier), this tip may not work for you. For a version of this tip written specifically for earlier versions of Word, click here: Discovering the RGB Value of a Custom Text Color.
Written by Allen Wyatt (last updated December 23, 2023)
This tip applies to Word 2007, 2010, 2013, 2016, 2019, 2021, and Word in Microsoft 365
Steve has text in a document that has been formatted in a custom color. He wants to use Find and Replace to change the color throughout, but doesn't know how to specify the custom color in the Find box. He wonders if there is a way to discover the RGB values of a custom color.
There are several ways you can discover the RGB value of a color used on some text. Here's one way:
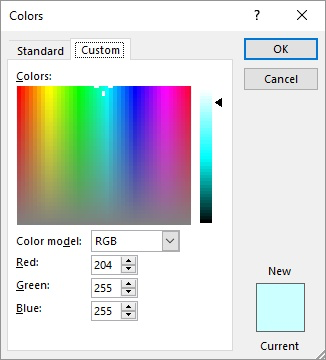
Figure 1. The Custom tab of the Colors dialog box.
Word also provides another way to display the RGB colors of a text selection: All you need to do is select the text and press Shift+F1. Word displays the Reveal Formatting pane at the right side of the document. This pane shows all the formatting applied to the selected text. In the Font section of the pane you can see an indication of the RGB colors of the text.
You can also use a third-party utility to figure out the RGB colors of your text. Most of these utilities don't really care about the text, they simply show the color of any particular pixel of the screen that you point at. Here are two suggestions for such utilities:
http://instant-eyedropper.com/
http://colorcop.net/
Once you have the RGB values for the existing color, you can easily use Find and Replace to make the change. Just follow these steps:
Of course, there is a way to change custom colors without even worrying about RGB values. Follow these steps:
This approach only works, of course, if the only distinguishing formatting of the text is its color. For example, if the text you selected in step 1 is a certain font size and boldface, then those factors will be taken into account in step 2. Word may not select some text in the document that uses the same color as the text in step 1 but isn't the same font size and non-bold.
Finally, if you need to change a lot of colors in this manner, you may want to use a macro to do the actual changes. The following macro can make the change in a single pass:
Sub ChangeCustomColor()
    CFC = Selection.Font.Color
    Selection.WholeStory
    With Selection.Find
        .Format = True
        .Text = ""
        .Font.Color = CFC
        .Replacement.Text = ""
        .Replacement.Font.Color = RGB(0, 0, 255)  ' Change to BLUE font
    End With
    Selection.Find.Execute Replace:=wdReplaceAll
End Sub
Before you run the macro, change the RGB setting in the line that controls the replacement color. Then, select the text that uses the custom color you want to change. When you run the macro, all the text that uses the same color as the selected text is modified to whatever color you specified in the macro itself.
Note:
WordTips is your source for cost-effective Microsoft Word training. (Microsoft Word is the most popular word processing software in the world.) This tip (261) applies to Microsoft Word 2007, 2010, 2013, 2016, 2019, 2021, and Word in Microsoft 365. You can find a version of this tip for the older menu interface of Word here: Discovering the RGB Value of a Custom Text Color.

Discover the Power of Microsoft Office This beginner-friendly guide reveals the expert tips and strategies you need to skyrocket your productivity and use Office 365 like a pro. Mastering software like Word, Excel, and PowerPoint is essential to be more efficient and advance your career. Simple lessons guide you through every step, providing the knowledge you need to get started. Check out Microsoft Office 365 For Beginners today!
The formatting in a document is often a mix of styles and explicit formatting, applied over time. You may want to apply ...
Discover MoreIf you need to format a number so that it appears as currency, it is not as easy to do in Word as it is in Excel. You can ...
Discover MoreYou don't have to select whole words before applying direct character formatting. With the proper Word options set, ...
Discover MoreFREE SERVICE: Get tips like this every week in WordTips, a free productivity newsletter. Enter your address and click "Subscribe."
There are currently no comments for this tip. (Be the first to leave your comment—just use the simple form above!)
Got a version of Word that uses the ribbon interface (Word 2007 or later)? This site is for you! If you use an earlier version of Word, visit our WordTips site focusing on the menu interface.
Visit the WordTips channel on YouTube

FREE SERVICE: Get tips like this every week in WordTips, a free productivity newsletter. Enter your address and click "Subscribe."
Copyright © 2026 Sharon Parq Associates, Inc.
 Please Note:
This article is written for users of the following Microsoft Word versions: 2007, 2010, 2013, 2016, 2019, 2021, and Word in Microsoft 365. If you are using an earlier version (Word 2003 or earlier), this tip may not work for you. For a version of this tip written specifically for earlier versions of Word, click here:
Please Note:
This article is written for users of the following Microsoft Word versions: 2007, 2010, 2013, 2016, 2019, 2021, and Word in Microsoft 365. If you are using an earlier version (Word 2003 or earlier), this tip may not work for you. For a version of this tip written specifically for earlier versions of Word, click here:
Comments