Please Note: This article is written for users of the following Microsoft Word versions: 2007, 2010, 2013, 2016, 2019, 2021, and Word in Microsoft 365. If you are using an earlier version (Word 2003 or earlier), this tip may not work for you. For a version of this tip written specifically for earlier versions of Word, click here: Checking Your Data File.
Written by Allen Wyatt (last updated February 4, 2023)
This tip applies to Word 2007, 2010, 2013, 2016, 2019, 2021, and Word in Microsoft 365
Word includes a powerful feature called Mail Merge that allows you to combine a document with data from a data source to create individualized documents. Once you have created your main document and your data file is attached, it is a good idea to run a final check by comparing your data file with your document. To do this, start by opening your main document. Make sure the Mailings tab of the ribbon is displayed.
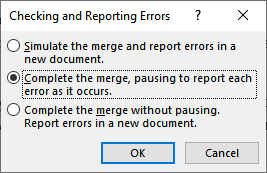
In the Preview Results group click the tool called Check for Errors or, in earlier versions of Word, called Auto Check for Errors. Word displays the Checking and Reporting Errors dialog box. (See Figure 1.)

Figure 1. The Checking and Reporting Errors dialog box.
Select the radio button that indicates how you want Word to check your data file. The selection you make depends on how confident you are in the quality of your data file. If you are fairly confident in its quality, accept the default and allow Word to show you the few errors your file may contain. If you aren't sure about the quality of your data file, then select the first option to simulate a merge and report the errors in a new document.
WordTips is your source for cost-effective Microsoft Word training. (Microsoft Word is the most popular word processing software in the world.) This tip (9739) applies to Microsoft Word 2007, 2010, 2013, 2016, 2019, 2021, and Word in Microsoft 365. You can find a version of this tip for the older menu interface of Word here: Checking Your Data File.

Do More in Less Time! An easy-to-understand guide to the more advanced features available in the Microsoft 365 version of Word. Enhance the quality of your documents and boost productivity in any field with this in-depth resource. Complete your Word-related tasks more efficiently as you unlock lesser-known tools and learn to quickly access the features you need. Check out Microsoft 365 Word For Professionals For Dummies today!
When you merge data from Excel into a Word document, you may need to do some conditional processing based on the data you ...
Discover MoreNeed to group records in some manner when they are used in a mail merge? It can be frustrating when your records are not ...
Discover MoreWhen merging data into a Word document, you may want to add information to the document based on an evaluation of what is ...
Discover MoreFREE SERVICE: Get tips like this every week in WordTips, a free productivity newsletter. Enter your address and click "Subscribe."
There are currently no comments for this tip. (Be the first to leave your comment—just use the simple form above!)
Got a version of Word that uses the ribbon interface (Word 2007 or later)? This site is for you! If you use an earlier version of Word, visit our WordTips site focusing on the menu interface.
Visit the WordTips channel on YouTube
FREE SERVICE: Get tips like this every week in WordTips, a free productivity newsletter. Enter your address and click "Subscribe."
Copyright © 2026 Sharon Parq Associates, Inc.
Comments