Please Note: This article is written for users of the following Microsoft Word versions: 2007, 2010, 2013, 2016, 2019, and Word in Microsoft 365. If you are using an earlier version (Word 2003 or earlier), this tip may not work for you. For a version of this tip written specifically for earlier versions of Word, click here: Adding an AutoText Entry.

Creating a Building Block

Written by Allen Wyatt (last updated October 12, 2019)
This tip applies to Word 2007, 2010, 2013, 2016, 2019, and Word in Microsoft 365


To get the most out of Word's Building Blocks you will want to customize it to help with words and phrases that you use most. You can add Building Blocks in this manner:

  1. Select the text and/or graphics for which you want to create a Building Block. You will need to select the paragraph marker as well if you want to store paragraph formatting with the text.
  2. Press Alt+F3. Word displays the Create New Building Block dialog box. (See Figure 1.)
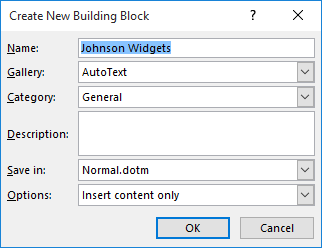
  3. Figure 1. The Create New Building Block dialog box.

  4. Replace the suggested name with the desired name for your new entry.
  5. Click on the OK button.

Those four steps are the simplest way to create your Building Block. If you take a look at the Create New Building Block dialog box again, you'll notice that there are quite a few items you can change besides the name for the Building Block. For instance, you may want to change which gallery the Building Block is stored in and the category you want to use to classify it.

After working with Building Blocks for a while, you many need to change some of your entries. Fortunately, Word makes it really easy to change your Building Blocks. Follow the steps outlined for adding entries, and when you click on OK, you will be asked if you want to redefine the Building Block entry. Click on Yes and you will be able to use the new entry.

WordTips is your source for cost-effective Microsoft Word training. (Microsoft Word is the most popular word processing software in the world.) This tip (8223) applies to Microsoft Word 2007, 2010, 2013, 2016, 2019, and Word in Microsoft 365. You can find a version of this tip for the older menu interface of Word here: Adding an AutoText Entry.

Author Bio

Allen Wyatt

With more than 50 non-fiction books and numerous magazine articles to his credit, Allen Wyatt is an internationally recognized author. He is president of Sharon Parq Associates, a computer and publishing services company. ...

MORE FROM ALLEN

Setting Up Custom AutoFiltering

The filtering capabilities of Excel are very helpful when you are working with large sets of data. You can create a ...

Discover More

Changing Excel's Background Color

Excel doesn't provide a built-in means to change the standard background color of a worksheet. There are a few different ...

Discover More

Cascading Document Windows

Want the various documents you have open to be cascaded on-screen so you can organize them easier? The capability is ...

Discover More

The First and Last Word on Word! Bestselling For Dummies author Dan Gookin puts his usual fun and friendly candor back to work to show you how to navigate Word 2013. Spend more time working and less time trying to figure it all out! Check out Word 2013 For Dummies today!

More WordTips (ribbon)

Quick Recall of Table Formats

Got a table that you use over and over again? One way you can make quick work of such repetition is to save the table in ...

Discover More

Editing a Building Block Entry

Once you've created a Building Block, you may believe that it is "set in stone" and cannot be changed. Not so! You can ...

Discover More

Synchronizing Building Blocks for a Network

Building blocks can be a great asset when putting together documents, as they make inserting standardized information ...

Discover More
Subscribe

FREE SERVICE: Get tips like this every week in WordTips, a free productivity newsletter. Enter your address and click "Subscribe."

View most recent newsletter.

Comments

If you would like to add an image to your comment (not an avatar, but an image to help in making the point of your comment), include the characters [{fig}] (all 7 characters, in the sequence shown) in your comment text. You’ll be prompted to upload your image when you submit the comment. Maximum image size is 6Mpixels. Images larger than 600px wide or 1000px tall will be reduced. Up to three images may be included in a comment. All images are subject to review. Commenting privileges may be curtailed if inappropriate images are posted.

What is one less than 9?

There are currently no comments for this tip. (Be the first to leave your comment—just use the simple form above!)


This Site

Got a version of Word that uses the ribbon interface (Word 2007 or later)? This site is for you! If you use an earlier version of Word, visit our WordTips site focusing on the menu interface.

Videos
Subscribe

FREE SERVICE: Get tips like this every week in WordTips, a free productivity newsletter. Enter your address and click "Subscribe."

(Your e-mail address is not shared with anyone, ever.)

View the most recent newsletter.