Please Note: This article is written for users of the following Microsoft Word versions: 2007, 2010, 2013, and 2016. If you are using an earlier version (Word 2003 or earlier), this tip may not work for you. For a version of this tip written specifically for earlier versions of Word, click here: Suppressing ASK Fields When Printing.
Fields provide quite a bit of processing power for your documents, as you learned from other issues of WordTips. The ASK field is one you can use to prompt users for text which is then assigned to a bookmark. (This is great for customizing boilerplate text on the fly.) Susan had problems with the ASK field, however, because not only did users get asked for their text once, but also a second time when the document was printed.
By default, Word updates all fields just prior to printing. If you have ASK fields in your document, this means that when they are updated the user is asked for text a second time. To avoid this behavior, follow these steps:
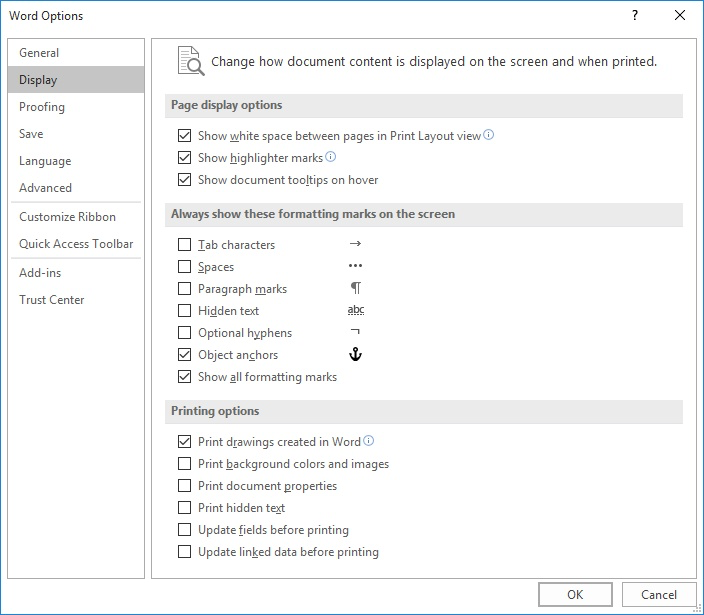
Figure 1. The display options of the Word Options dialog box.
Now Word won't update fields before printing. The only downside to this, however, is that other fields won't be automatically updated either. If you do have other fields in the document you may want to make sure that you update them manually prior to printing.
If manually updating fields is a bother, you may want to consider removing the ASK fields completely and instead designing a user form. Another alternative is to ask for user text under the control of a macro, and then use the macro to assign the text to bookmarks. (This is the same functionality as the ASK fields, but it only runs when you specifically want it to run.)
If such changes are not possible, you could turn on automatic updating of fields back on and instead use the following macro to print your document:
Sub CustomPrint()
    Dim afield As Field

    For Each afield In ActiveDocument.Fields
        If afield.Type = wdFieldAsk Then afield.Locked = True
    Next afield
    ActiveDocument.PrintOut
    For Each afield In ActiveDocument.Fields
        If afield.Type = wdFieldAsk Then afield.Locked = False
    Next afield
End Sub
The macro examines every field in your document, locking those that are ASK fields. The document is then printed, and the fields are again unlocked.
Note:
WordTips is your source for cost-effective Microsoft Word training. (Microsoft Word is the most popular word processing software in the world.) This tip (8177) applies to Microsoft Word 2007, 2010, 2013, and 2016. You can find a version of this tip for the older menu interface of Word here: Suppressing ASK Fields When Printing.

Create Custom Apps with VBA! Discover how to extend the capabilities of Office 365 applications with VBA programming. Written in clear terms and understandable language, the book includes systematic tutorials and contains both intermediate and advanced content for experienced VB developers. Designed to be comprehensive, the book addresses not just one Office application, but the entire Office suite. Check out Mastering VBA for Microsoft Office 365 today!
When working with printed documents, many people prefer to see the document double-spaced. If you have a single-spaced ...
Discover MoreIf you have a document with Track Changes turned on, you can accumulate quite a bit of "markup" in it. Here's how you can ...
Discover MoreThe Navigation pane can be a handy tool for seeing the overall organization of your document and easily moving to ...
Discover MoreFREE SERVICE: Get tips like this every week in WordTips, a free productivity newsletter. Enter your address and click "Subscribe."
There are currently no comments for this tip. (Be the first to leave your comment—just use the simple form above!)
Got a version of Word that uses the ribbon interface (Word 2007 or later)? This site is for you! If you use an earlier version of Word, visit our WordTips site focusing on the menu interface.
Visit the WordTips channel on YouTube

FREE SERVICE: Get tips like this every week in WordTips, a free productivity newsletter. Enter your address and click "Subscribe."
Copyright © 2026 Sharon Parq Associates, Inc.
 Please Note:
This article is written for users of the following Microsoft Word versions: 2007, 2010, 2013, and 2016. If you are using an earlier version (Word 2003 or earlier), this tip may not work for you. For a version of this tip written specifically for earlier versions of Word, click here:
Please Note:
This article is written for users of the following Microsoft Word versions: 2007, 2010, 2013, and 2016. If you are using an earlier version (Word 2003 or earlier), this tip may not work for you. For a version of this tip written specifically for earlier versions of Word, click here:
Comments