Please Note: This article is written for users of the following Microsoft Word versions: 2007, 2010, 2013, 2016, 2019, and Word in Microsoft 365. If you are using an earlier version (Word 2003 or earlier), this tip may not work for you. For a version of this tip written specifically for earlier versions of Word, click here: Using Alternating Styles.

Using Alternating Styles

Written by Allen Wyatt (last updated June 8, 2019)
This tip applies to Word 2007, 2010, 2013, 2016, 2019, and Word in Microsoft 365


1

There may be times when you want to set up Word so that you can easily enter alternating types of paragraphs. For instance, you may have a series of questions and answers to enter, one right after another. Word is powerful enough that you can define different styles that allow entering these types of alternating paragraphs very easily.

For the sake of this example, let's say you want to follow the Q and A scenario. You want each Question paragraph to begin with a bold capital Q and use a hanging indent. You want each answer to pretty much be the same, but use a bold capital A.

The following is a rather long and involved process to accomplish this, but you only need to do it once. Once the styles are set up, using them is very, very easy. You should follow these steps:

  1. Display the Home tab of the ribbon.
  2. Click the small icon at the bottom-right of the Styles group. Word displays the Styles task pane.
  3. At the bottom of the Styles task pane there are three small tool buttons. Click the left-most of these; the New Style tool. Word displays the Create New Style from Formatting dialog box. (See Figure 1.)
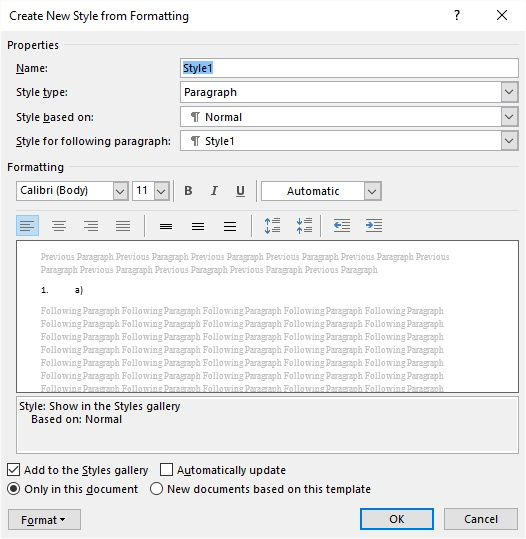
  4. Figure 1. The Create New Style from Formatting dialog box.

  5. In the Name field, enter the style name you want to use for your questions. For instance, you could enter Question. (Makes sense, huh?)
  6. In the Style Based On field, pick a style on which you want this Question style based. Typically, this will be something like Normal or Body Text.
  7. Click on Format. Word displays a drop-down menu.
  8. Choose the Numbering option from the menu. Word displays the Numbering and Bullets dialog box.
  9. Make sure the Bullets tab is selected. (See Figure 2.)
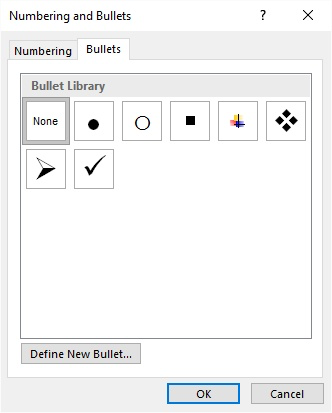
  10. Figure 2. The Bullets tab of the Numbering and Bullets dialog box.

  11. Choose one of the pre-defined bullet types from those in the Bullet Library. Make sure you pick one you won't really use for your regular bullets.
  12. Click on Define New Bullet. Word displays the Define New Bullet dialog box. (See Figure 3.)
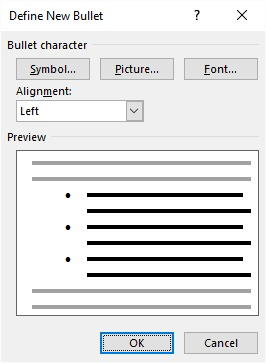
  13. Figure 3. The Define New Bullet dialog box.

  14. Click on the Symbol button. Word displays the Symbol dialog box. (See Figure 4.)
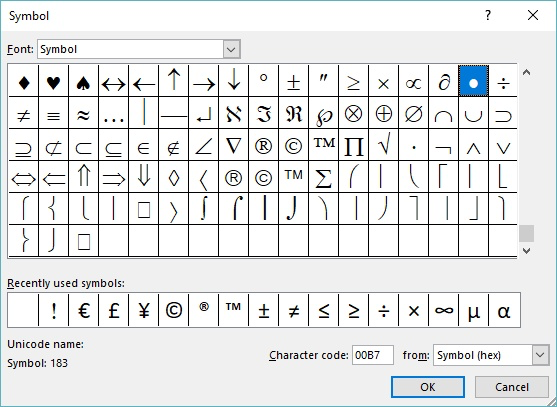
  15. Figure 4. The Symbol dialog box.

  16. Using the Font drop-down list, make sure that (normal text) is chosen.
  17. Scroll through the list of symbols until you can click on the capital letter Q in the character display.
  18. Click on OK. The Symbol dialog box is closed.
  19. Click on Font. Word displays the Font dialog box. (See Figure 5.)
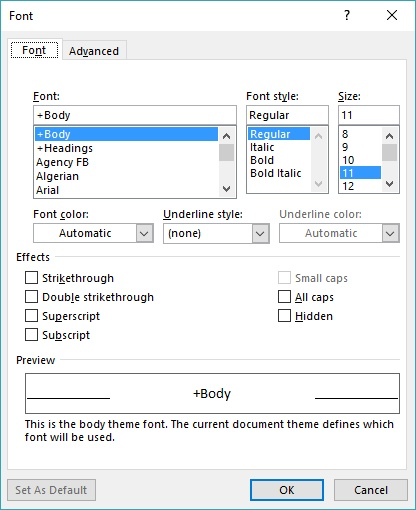
  20. Figure 5. The Font dialog box.

  21. In the list of Font Styles, choose Bold.
  22. Click on OK. The Font dialog box is closed.
  23. Click on OK. The Define New Bullet dialog box is closed, and the bolded capital Q appears in the Bullet Library portion of the Numbering and Bullets dialog box. (It should be selected.)
  24. Click on OK. The new bullet format is applied to the style.
  25. Click on OK. The Question style is now defined, and the Styles task pane is still displayed at the right of the screen.
  26. At the bottom of the Styles task pane click the New Style tool. Word again displays the Create New Style from Formatting dialog box.
  27. In the Name field, enter the style name you want to use for your questions. For instance, you could enter Answer. (Again, a cognitive leap.)
  28. In the Style Based On field, pick a style on which you want this Answer style based. Typically, this will be something like Normal or Body Text.
  29. In the Style For Following Paragraph drop-down list, choose Question. (This setting controls what style is used next when you press Enter at the end of an Answer-formatted paragraph.)
  30. Click on Format. Word displays a drop-down menu.
  31. Choose the Numbering option from the menu. Word displays the Numbering and Bullets dialog box.
  32. Make sure the Bullets tab is selected.
  33. Choose one of the pre-defined bullet types from those in the Bullet Library. Make sure you pick one you won't really use for your regular bullets.
  34. Click on Define New Bullet. Word displays the Define New Bullet dialog box.
  35. Click on the Symbol button. Word displays the Symbol dialog box.
  36. Using the Font drop-down list, make sure that (normal text) is chosen.
  37. Scroll through the list of symbols until you can click on the capital letter A in the character display.
  38. Click on OK. The Symbol dialog box is closed.
  39. Click on Font. Word displays the Font dialog box.
  40. In the list of Font Styles, choose Bold.
  41. Click on OK. The Font dialog box is closed.
  42. Click on OK. The Define New Bullet dialog box is closed, and the bolded capital A appears in the Bullet Library portion of the Numbering and Bullets dialog box. (It should be selected.)
  43. Click on OK. The new bullet format is applied to the style.
  44. Click on OK. The Question style is now defined, and the Styles task pane is still displayed at the right of the screen.
  45. In the list of Styles, hover the mouse pointer over the Question style you defined earlier in this process. A drop-down arrow should appear at the right of the style name.
  46. Click the down arrow and then click Modify. Word displays the Modify Style dialog box.
  47. In the Style For Following Paragraph drop-down list, choose Answer.
  48. Click on OK. The Modify Style dialog box should close.
  49. Close the Styles task pane, if desired.

This is undoubtedly the longest list of steps I have ever done in WordTips. It goes much quicker than it reads, however.

You are now ready to use your two new styles. When you are ready to start your first question, apply the Question style to a paragraph. The expected Q immediately appears, and you can type your question. When you press Enter at the end of the question, the next paragraph is formatted as an answer and includes the A. Press Enter at the end of the answer, and the next paragraph is formatted again as a question. When you are done and have no more questions and answers, simply pick another style for your paragraph.

WordTips is your source for cost-effective Microsoft Word training. (Microsoft Word is the most popular word processing software in the world.) This tip (7117) applies to Microsoft Word 2007, 2010, 2013, 2016, 2019, and Word in Microsoft 365. You can find a version of this tip for the older menu interface of Word here: Using Alternating Styles.

Author Bio

Allen Wyatt

With more than 50 non-fiction books and numerous magazine articles to his credit, Allen Wyatt is an internationally recognized author. He is president of Sharon Parq Associates, a computer and publishing services company. ...

MORE FROM ALLEN

Determining Word Frequency

How to construct a word frequency list.

Discover More

Quickly Identifying Applied AutoFilters

Apply an AutoFilter to a worksheet, and you can quickly forget exactly what that AutoFilter entailed. Here are a couple ...

Discover More

Replacing a Colon in a Sequence

Sometimes you'll run across the need to replace a very specific sequence of characters in your document. It is for these ...

Discover More

Do More in Less Time! Are you ready to harness the full power of Word 2013 to create professional documents? In this comprehensive guide you'll learn the skills and techniques for efficiently building the documents you need for your professional and your personal life. Check out Word 2013 In Depth today!

More WordTips (ribbon)

One Change Affects Everything

Have you ever made one formatting change in your document, only to see that change applied to all the paragraphs in the ...

Discover More

Turning Off Smart Quotes for Specific Styles

Smart quotes can be helpful in making a great-looking document, but at times, they can be a real pain. Wouldn’t it be ...

Discover More

Adding Individual Styles to the Template

One of the things you can store within templates are styles. When you use styles, it is critical that you understand how ...

Discover More
Subscribe

FREE SERVICE: Get tips like this every week in WordTips, a free productivity newsletter. Enter your address and click "Subscribe."

View most recent newsletter.

Comments

If you would like to add an image to your comment (not an avatar, but an image to help in making the point of your comment), include the characters [{fig}] (all 7 characters, in the sequence shown) in your comment text. You’ll be prompted to upload your image when you submit the comment. Maximum image size is 6Mpixels. Images larger than 600px wide or 1000px tall will be reduced. Up to three images may be included in a comment. All images are subject to review. Commenting privileges may be curtailed if inappropriate images are posted.

What is nine minus 5?

2019-06-18 06:05:47

Richard

That is quite possibly the longest tip I have ever seen on WordTips! But clearly written, and showing what happens at each step. I commend you Allen.


This Site

Got a version of Word that uses the ribbon interface (Word 2007 or later)? This site is for you! If you use an earlier version of Word, visit our WordTips site focusing on the menu interface.

Videos
Subscribe

FREE SERVICE: Get tips like this every week in WordTips, a free productivity newsletter. Enter your address and click "Subscribe."

(Your e-mail address is not shared with anyone, ever.)

View the most recent newsletter.