Please Note: This article is written for users of the following Microsoft Word versions: 2007, 2010, 2013, 2016, 2019, 2021, 2024, and Word in Microsoft 365. If you are using an earlier version (Word 2003 or earlier), this tip may not work for you. For a version of this tip written specifically for earlier versions of Word, click here: Using Track Changes.
Word includes a feature that allows you to see what changes have been made to a document. These changes, known as markup, are primarily created using the Track Changes feature of Word. To turn on Track Changes, all you need to do is display the Review tab of the ribbon. In the Tracking group, click the Track Changes tool.
From this point, as you make changes to your document, your changes are shown on-screen using marks that are very similar to those used manually by editors for years. The essence of markup (depending on which version of Word you are using) is that added text is shown as underlined and deleted text is displayed with a strikethrough line drawn through the text. Added comments or text that has had a format change is shown at the right of the document in elements called "balloons."
If desired, you can change the way in which Word shows the markup. To specify how the edits should be noted, follow these steps if you are using Word 2007 or Word 2010:
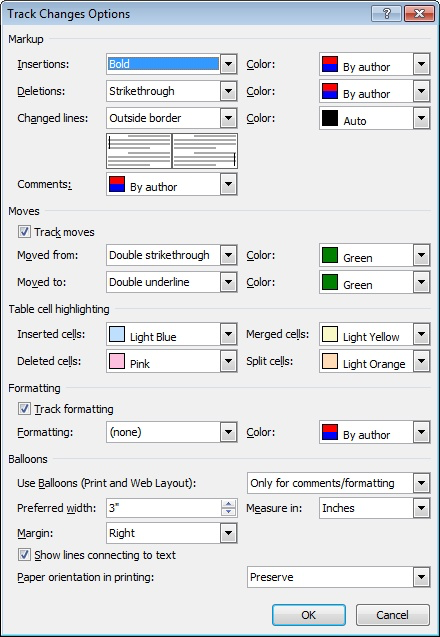
Figure 1. The Track Changes Options dialog box.
If you are using Word 2013 or a later version, the steps are a bit different. The biggest difference is in how you display the correct dialog box to make changes.
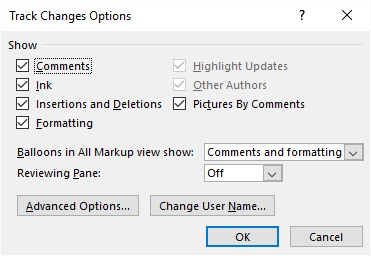
Figure 2. The Track Changes Options dialog box.
As changes are made in a document, Word notes who it was who made the changes. At some point you may want to make the changes anonymous by removing the name associated with the changes. There is a relatively easy way to do this, but the steps are best left to a different WordTip. Check this page:
https://tips.net/T10222
Once you are through making changes in the document, or if you receive a document from someone else that is marked up, you need to go through a process of examining each revision and deciding whether to keep it or toss it out. This is done by searching for the changes and then making your decision on a case-by-case basis. You do this in the following manner:
WordTips is your source for cost-effective Microsoft Word training. (Microsoft Word is the most popular word processing software in the world.) This tip (6112) applies to Microsoft Word 2007, 2010, 2013, 2016, 2019, 2021, 2024, and Word in Microsoft 365. You can find a version of this tip for the older menu interface of Word here: Using Track Changes.

Do More in Less Time! An easy-to-understand guide to the more advanced features available in the Microsoft 365 version of Word. Enhance the quality of your documents and boost productivity in any field with this in-depth resource. Complete your Word-related tasks more efficiently as you unlock lesser-known tools and learn to quickly access the features you need. Check out Microsoft 365 Word For Professionals For Dummies today!
When using Track Changes, Word normally notes the originator of a particular comment or change. This information can then ...
Discover MoreWord includes editing tools that allow you to track what changes you've made in a document. Making the tracked changes go ...
Discover MoreTrack changes is a great feature to use when you want to show what has changed in a document. Word should note which ...
Discover MoreFREE SERVICE: Get tips like this every week in WordTips, a free productivity newsletter. Enter your address and click "Subscribe."
There are currently no comments for this tip. (Be the first to leave your comment—just use the simple form above!)
Got a version of Word that uses the ribbon interface (Word 2007 or later)? This site is for you! If you use an earlier version of Word, visit our WordTips site focusing on the menu interface.
Visit the WordTips channel on YouTube

FREE SERVICE: Get tips like this every week in WordTips, a free productivity newsletter. Enter your address and click "Subscribe."
Copyright © 2026 Sharon Parq Associates, Inc.
 Please Note:
This article is written for users of the following Microsoft Word versions: 2007, 2010, 2013, 2016, 2019, 2021, 2024, and Word in Microsoft 365. If you are using an earlier version (Word 2003 or earlier), this tip may not work for you. For a version of this tip written specifically for earlier versions of Word, click here:
Please Note:
This article is written for users of the following Microsoft Word versions: 2007, 2010, 2013, 2016, 2019, 2021, 2024, and Word in Microsoft 365. If you are using an earlier version (Word 2003 or earlier), this tip may not work for you. For a version of this tip written specifically for earlier versions of Word, click here:
Comments