Please Note: This article is written for users of the following Microsoft Word versions: 2007, 2010, 2013, 2016, 2019, 2021, and Word in Microsoft 365. If you are using an earlier version (Word 2003 or earlier), this tip may not work for you. For a version of this tip written specifically for earlier versions of Word, click here: Printing Documents without Markup.
Written by Allen Wyatt (last updated October 7, 2023)
This tip applies to Word 2007, 2010, 2013, 2016, 2019, 2021, and Word in Microsoft 365
Word includes the ability to print your documents with or without "markup" showing. Markup is defined as editing marks (using Word's Track Changes feature) and comments placed in a document during its development.
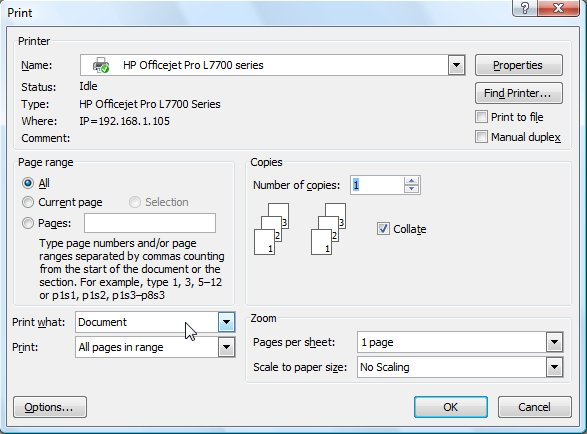
You can control whether or not markup is printed in Word 2007 by displaying the Print dialog box and using the Print What drop-down list. If you choose Document, then only the document is printed. If you choose Document with Markup, then the markup is printed along with the document. (See Figure 1.)

Figure 1. The Print dialog box.
If you are using Word 2010 or a later version of the program, the traditional Print dialog box no longer exists. Instead, you can control whether markup is printed or not by displaying the print options (press Ctrl+P) and clicking the drop-down list that indicates what you want to print. (It is the first drop-down list under the Settings heading, and is normally set to Print All Pages.) At the bottom of the options presented you see a Print Markup setting. Choose the option, and then your document will print with markup on the printout.
The default behavior of the Print What drop-down list (Word 2007) and the Print Markup setting (Word 2010 and later versions) is rather odd. In fact, at times it can seem to have a mind of its own. In doing testing, I found out that the default for the Print What drop-down list will be Document (Word 2007) and the Print Markup setting won't be selected (Word 2010 and later versions) unless one of the following is true:
Changing the setting of the Print What drop-down list to Document (Word 2007) or selecting the Print Markup setting (Word 2010 and later versions) does not override the Markup setting. Basically, all you are doing is specifying that you want this one printing of the document to not show markup. The next time you display the Print dialog box (Word 2007) or the printing options (Word 2010 and later versions), you'll find that Word is set to print markup, based on the Markup setting in the document. (It is not the Print What drop-down list or the Print Markup setting that is "sticky," but the Markup setting, which always overrides the Print What drop-down list and the Print Markup setting.)
The setting of the Markup option is saved with your document. Similarly, if you have a template open, then the setting can be saved with the template, to be used as a default for all future documents based on the template.
If you want the Print What drop-down list to always default to Document (Word 2007) or the Print Markup setting to always be selected (Word 2010 and later versions), then you need to turn off the Markup option in the document or in the template, and then save the document and template. Since the setting is saved on a per-document basis, you may need to do this in lots of documents to get the effect you want.
WordTips is your source for cost-effective Microsoft Word training. (Microsoft Word is the most popular word processing software in the world.) This tip (6058) applies to Microsoft Word 2007, 2010, 2013, 2016, 2019, 2021, and Word in Microsoft 365. You can find a version of this tip for the older menu interface of Word here: Printing Documents without Markup.

Create Custom Apps with VBA! Discover how to extend the capabilities of Office 365 applications with VBA programming. Written in clear terms and understandable language, the book includes systematic tutorials and contains both intermediate and advanced content for experienced VB developers. Designed to be comprehensive, the book addresses not just one Office application, but the entire Office suite. Check out Mastering VBA for Microsoft Office 365 today!
When you are printing a document, it is not unusual to see messages (dialog boxes) periodically. When you want the ...
Discover MoreIf you are printing more than one copy of a multi-page document, it would be great if Word could print them in complete ...
Discover MoreWord can be used for printing a variety of document types. You may want to use the program to print a festive banner for ...
Discover MoreFREE SERVICE: Get tips like this every week in WordTips, a free productivity newsletter. Enter your address and click "Subscribe."
There are currently no comments for this tip. (Be the first to leave your comment—just use the simple form above!)
Got a version of Word that uses the ribbon interface (Word 2007 or later)? This site is for you! If you use an earlier version of Word, visit our WordTips site focusing on the menu interface.
Visit the WordTips channel on YouTube
FREE SERVICE: Get tips like this every week in WordTips, a free productivity newsletter. Enter your address and click "Subscribe."
Copyright © 2026 Sharon Parq Associates, Inc.
Comments