Please Note: This article is written for users of the following Microsoft Word versions: 2007, 2010, 2013, 2016, 2019, 2021, 2024, and Word in Microsoft 365. If you are using an earlier version (Word 2003 or earlier), this tip may not work for you. For a version of this tip written specifically for earlier versions of Word, click here: Horizontally Viewing All Your Text.
Normally, Word displays text on the screen as it will appear on a hard-copy printout. This feature is often referred to as WYSIWYG (pronounced whizzy-wig), which means "what you see is what you get." There may be times, however, when viewing documents this way can be bothersome. For instance, if you are working on a very wide document, or if you are using a computer set to a low video resolution. In these instances, the only way to see all your text horizontally is to scroll left and right—which can get to be very tedious.
If you get tired of scrolling left and right, you can try the following:
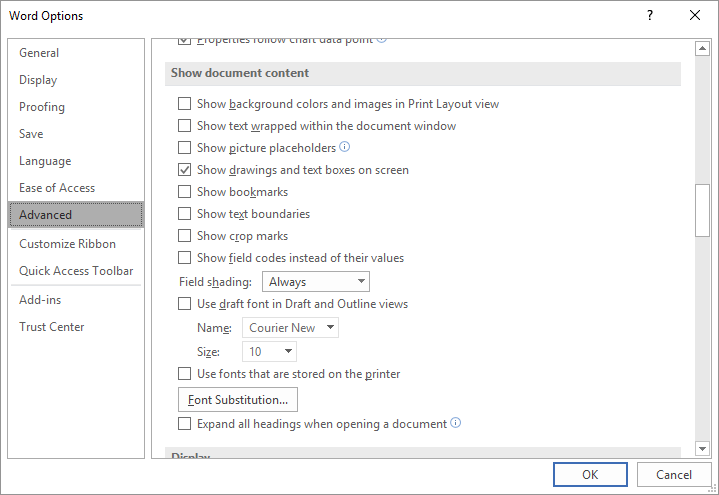
Figure 1. The Advanced options of the Word Options dialog box.
This check box essentially turns off most of the WYSIWYG features of Word. Instead, none of your document lines will extend beyond the right-most edge of your screen. It should be noted that you won't be able to see the results of clearing the Show Text Wrapped Within the Document Window check box if the document on the screen is viewed in the Print Layout view. Change to either Outline or Draft view in order to see the results. When you later want to see what your document will look like on a printout, simply repeat the above steps to set the check box.
WordTips is your source for cost-effective Microsoft Word training. (Microsoft Word is the most popular word processing software in the world.) This tip (6019) applies to Microsoft Word 2007, 2010, 2013, 2016, 2019, 2021, 2024, and Word in Microsoft 365. You can find a version of this tip for the older menu interface of Word here: Horizontally Viewing All Your Text.

Do More in Less Time! An easy-to-understand guide to the more advanced features available in the Microsoft 365 version of Word. Enhance the quality of your documents and boost productivity in any field with this in-depth resource. Complete your Word-related tasks more efficiently as you unlock lesser-known tools and learn to quickly access the features you need. Check out Microsoft 365 Word For Professionals For Dummies today!
One way to insert the current date into your document is to use the Date and Time dialog box. The Default button in the ...
Discover MoreWant a quick way to change the shortcut key associated with a tool available on a ribbon, toolbar, or menu? Here's one ...
Discover MoreNeed to change the information that Word stores about you? Here's how to find the info.
Discover MoreFREE SERVICE: Get tips like this every week in WordTips, a free productivity newsletter. Enter your address and click "Subscribe."
2025-06-01 08:06:20
Barry
Brilliant! but I think there may be a slip-up in this tip.
On my Word 2019 version the Show Text Wrapped Within the Document Window check box has to be ticked to enable showing all text that will cascade down the page as the window width is reduced.
With the text box cleared, if I reduce the width of the Word window some of the text just gets 'erased' from the view - scary! but - Ctrl+Z re-displays everything. (??)
Got a version of Word that uses the ribbon interface (Word 2007 or later)? This site is for you! If you use an earlier version of Word, visit our WordTips site focusing on the menu interface.
Visit the WordTips channel on YouTube

FREE SERVICE: Get tips like this every week in WordTips, a free productivity newsletter. Enter your address and click "Subscribe."
Copyright © 2026 Sharon Parq Associates, Inc.
 Please Note:
This article is written for users of the following Microsoft Word versions: 2007, 2010, 2013, 2016, 2019, 2021, 2024, and Word in Microsoft 365. If you are using an earlier version (Word 2003 or earlier), this tip may not work for you. For a version of this tip written specifically for earlier versions of Word, click here:
Please Note:
This article is written for users of the following Microsoft Word versions: 2007, 2010, 2013, 2016, 2019, 2021, 2024, and Word in Microsoft 365. If you are using an earlier version (Word 2003 or earlier), this tip may not work for you. For a version of this tip written specifically for earlier versions of Word, click here:
Comments