Thurletta opened a two-year-old letter, hoping to print it as evidence that she had written it two years ago. When opening, though, the date in the letter was updated, thereby making it useless for the evidentiary purpose she desired. She wonders if there is a way in Word to suppress the automatic update of fields when a document is opened.
When you use the Insert Date tool to add a date into a document, by default Word inserts the DATE field. This field always reflects the current date, which means that every time fields are updated in the document, the DATE field is updated to reflect today's date.
This can be a problem in situations like Thurletta's. Unfortunately, there is no way to stop those fields from updating when opening the document. There may be ways around the problem, however. One potential solution is to try these steps:
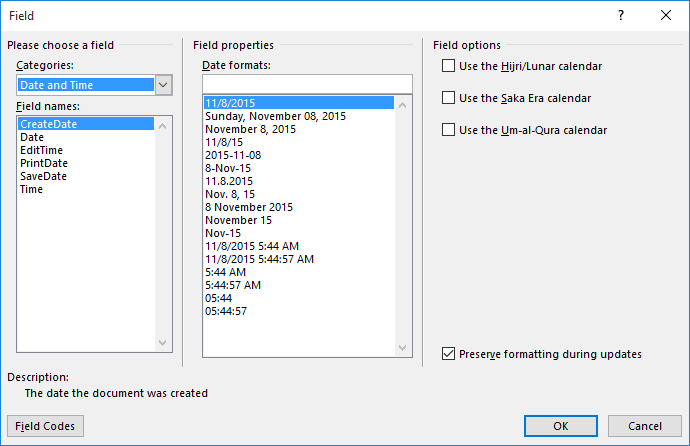
Figure 1. The Field dialog box.
What these steps do is to replace the original DATE field with the CREATEDATE field, which always reflects the date the document was first created. This may well suffice, assuming that the document was actually created two years ago and not longer ago. (For instance, if your two-year-old document started out as a three-year-old document that you simply modified and saved under a different name.)
You could also see important dates related to your document by taking a look at the Properties dialog box. How you display the dialog box depends on the version of Word you are using:
Regardless of which version of Word you are using, make sure the Statistics tab is displayed. (See Figure 2.)
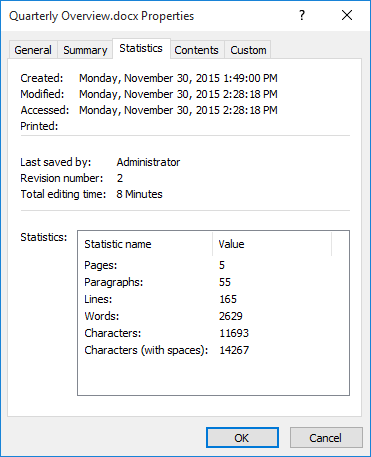
Figure 2. The Statistics tab of the Properties dialog box.
Note that at the top of the dialog box you can see when the document was created, when it was last modified, and when it was last accessed. If you capture a screen shot of this information, that may suffice to prove when the document was actually written.
In conclusion, there is a lesson to be learned here: If you don't want the date shown in your documents to change, don't use the Insert Date tool. Instead, type the date the old fashioned way. Or, if you absolutely want to use the Insert Date tool, select the date (after it is inserted) and press Ctrl+Shift+F9. This "unlinks" the field, essentially converting it to static text—meaning the date won't change in the future.
WordTips is your source for cost-effective Microsoft Word training. (Microsoft Word is the most popular word processing software in the world.) This tip (1994) applies to Microsoft Word 2007, 2010, 2013, 2016, 2019, 2021, and Word in Microsoft 365.

The First and Last Word on Word! Bestselling For Dummies author Dan Gookin puts his usual fun and friendly candor back to work to show you how to navigate Word 2019. Spend more time working and less time trying to figure it all out! Check out Word 2019 For Dummies today!
Word can automatically add captions to your figures. You can then reference those captions from within your document. If ...
Discover MoreWhen creating a Word form, you use special form fields to collect information from users. You can even perform ...
Discover MoreThe COMPARE field is rather esoteric, but it can be helpful when you need to compare two values using fields. The result ...
Discover MoreFREE SERVICE: Get tips like this every week in WordTips, a free productivity newsletter. Enter your address and click "Subscribe."
2023-09-16 05:35:50
Dr. Bartolo
There are other options to consider as well.
One (my preference) is to use the SAVEDATE field rather than using the insert date tool. The latter creates a DATE field, not a SAVEDATE field. The result of using the SAVEDATE field only updates (a) after the file is saved and (b) when you highlight the field and press F9.
The other thing one could do is to select the DATE field result and press Ctrl + F11 before closing the file. That locks the result in place so that opening the file later, even years later, the DATE field result will not change. But that only works if you remember to lock the DATE field when you create the file.
Got a version of Word that uses the ribbon interface (Word 2007 or later)? This site is for you! If you use an earlier version of Word, visit our WordTips site focusing on the menu interface.
Visit the WordTips channel on YouTube

FREE SERVICE: Get tips like this every week in WordTips, a free productivity newsletter. Enter your address and click "Subscribe."
Copyright © 2026 Sharon Parq Associates, Inc.
Comments