Written by Allen Wyatt (last updated May 4, 2024)
This tip applies to Word 2007, 2010, 2013, 2016, 2019, 2021, and Word in Microsoft 365
Rachelle often needs to insert a symbol into Word; perhaps a check mark, an accented letter, or a divide-by symbol. To her, Word's Insert Symbol dialog box seems stuck in the 1990s. She spends too much time scrolling through font families trying to find characters. The "recently used" list is useless as it contains symbols she's never used and omits symbols she often uses. Rachelle would appreciate any Word hacks, add-ins, or alternative ways of inserting symbols.
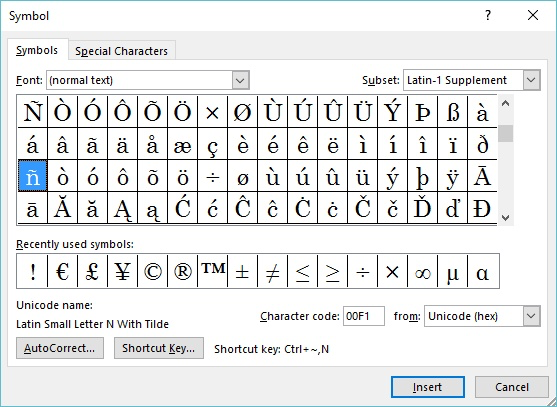
There are quite a few ways that you can work with symbols in Word. Most people, as Rachelle notes, use the Symbol dialog box. If you need to use the dialog box quite often, you quickly find that it can be a pain to work with. To get around this, it is good to note that the Symbol dialog box actually includes a few helps you can use. (See Figure 1.)

Figure 1. The Symbol dialog box.
Note that when you select a symbol, there is a "character code" shown near the bottom-right corner of the dialog box. This character code can actually be used as a shortcut key. All you need to do is hold down the Alt key as you type that character code. When you release the Alt key, Word inserts the symbol in the document. Another approach is to simply type the four Unicode characters and then press Alt+X, which converts the character code to the symbol.
If you have only a few characters that you insert regularly, then you can simply memorize the codes. If you have a "few more than a few," some people simply jot them down on a sticky note and use it as a cheat sheet to enter the characters they desire.
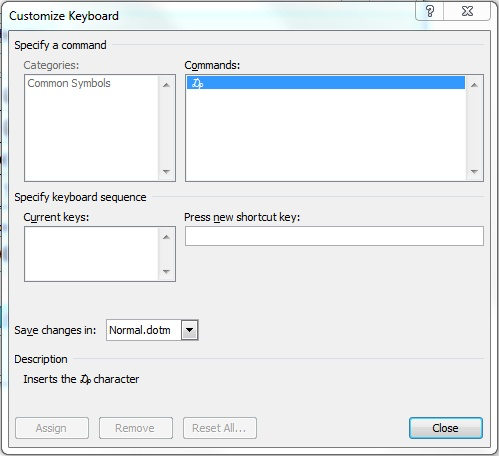
Looking back at the Symbol dialog box, you'll notice that near the bottom of the dialog box is a Shortcut Key button, and to the right of the button is an indication of whether there is a shortcut key assigned for the character. If you want to change the shortcut key (or create your own shortcut key if the character has none), you can click the Shortcut Key button and Word displays the Customize Keyboard dialog box. (See Figure 2.)

Figure 2. The Customize Keyboard dialog box.
Using the Press New Shortcut Key field, you can specify what shortcut key you want to use for the symbol. If you define a series of shortcut keys for the symbols you use most often, you'll seldom need to display the Symbol dialog box again.
Finally, you can also use AutoCorrect to input your common symbols. In fact, if you look back at the Symbol dialog box, you'll see that there is an AutoCorrect button. Select the symbol you want to create an AutoCorrect entry for, and then click the AutoCorrect button. Word fills in what it can for a new AutoCorrect entry, and all you need to do is provide what you want to use as the "trigger" for that entry. For instance, if you use a checkmark symbol quite frequently, you could create an AutoCorrect entry that would automatically replace ";ck" with the check mark.
Some folks go the extra mile and simply create an in-house "symbol sheet." This Word document includes the common symbols used in the company, along with notes as to how the symbols are to be used. For instance, if the in-house style calls for a "degree symbol" to include a small space before it, that could be noted in the document. Then, people can simply copy from the symbol sheet and paste into the document where they want to use the symbol. The benefit of this approach is that it encourages consistency among multiple users.
Still another approach is to bypass the Symbol dialog box and use one of the basic accessories available in Windows: the Character Map accessory. At first glance it seems like a "stripped down" version of the Symbol dialog box. The benefit, though, is that because it is a bit simpler, it can also be easier to use. Plus, it will work with any Windows program, not just Windows.
Finally, if you feel really industrious, you may want to create your own font. Believe it or not, Windows provides a tool (available in most versions of Windows) to help you in such an endeavor. You can find more information at this page:
https://www.makeuseof.com/tag/create-your-own-fonts-symbols-characters-windows/
WordTips is your source for cost-effective Microsoft Word training. (Microsoft Word is the most popular word processing software in the world.) This tip (563) applies to Microsoft Word 2007, 2010, 2013, 2016, 2019, 2021, and Word in Microsoft 365.

Do More in Less Time! An easy-to-understand guide to the more advanced features available in the Microsoft 365 version of Word. Enhance the quality of your documents and boost productivity in any field with this in-depth resource. Complete your Word-related tasks more efficiently as you unlock lesser-known tools and learn to quickly access the features you need. Check out Microsoft 365 Word For Professionals For Dummies today!
Press a tab at the beginning of a paragraph, and Word normally assumes you want to indent the paragraph. If you don't ...
Discover MoreWord includes keyboard shortcuts for many things. One it doesn't include, though, is a way to jump to the last location ...
Discover MoreAt the bottom of your document, on the status bar, Word allows you to include an indicator of the line on which your ...
Discover MoreFREE SERVICE: Get tips like this every week in WordTips, a free productivity newsletter. Enter your address and click "Subscribe."
There are currently no comments for this tip. (Be the first to leave your comment—just use the simple form above!)
Got a version of Word that uses the ribbon interface (Word 2007 or later)? This site is for you! If you use an earlier version of Word, visit our WordTips site focusing on the menu interface.
Visit the WordTips channel on YouTube
FREE SERVICE: Get tips like this every week in WordTips, a free productivity newsletter. Enter your address and click "Subscribe."
Copyright © 2026 Sharon Parq Associates, Inc.
Comments