Written by Allen Wyatt (last updated February 1, 2020)
This tip applies to Word 2007, 2010, 2013, 2016, 2019, and 2021
Fakhruddin created four documents using Word's built-in heading styles, Heading 1 through Heading 3. Now he needs to combine the four files into one quite long document, so each file will represent a chapter. This introduces the need for a higher-level heading at the beginning of each file. Fakhruddin wonders how he can quickly change the levels of the current headings (move them all down one level, to Heading 2 through Heading 4) so that he can add the new Heading 1 headings at the beginning of each file as he does the combining.
There is actually a plethora of ways that could be used to accomplish this task. (I've identified five of them, though there may actually be more.) I want to focus this tip, however, on what I consider the two easiest ways of accomplishing the task.
The first way is great if you need to do this type of heading adjustment only sporadically. It uses what many consider a too-easily-overlooked tool in Word—Outline view. Follow these steps:
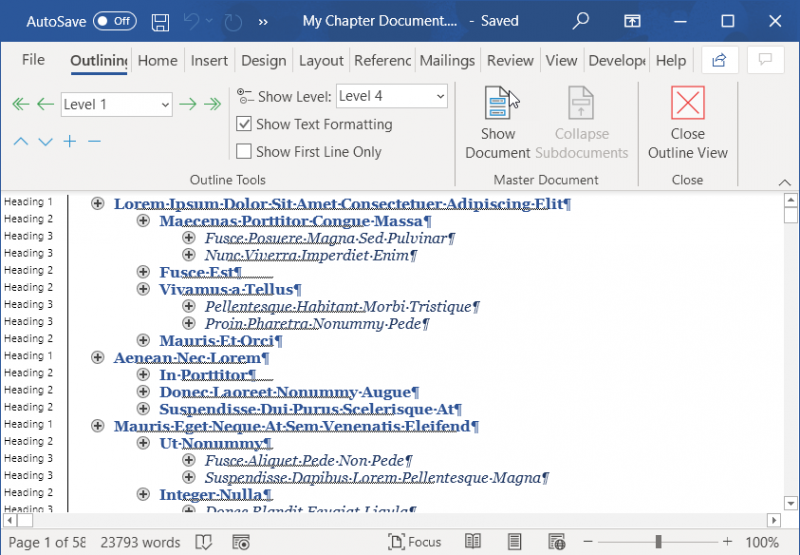
Figure 1. Outline view, showing only headings.
Simple, right? The demotion of the headings affects only those headings that are selected, but since we used Ctrl+A (step 4), all the headings were affected. This means that if you want to affect only a subset of headings, you should select those headings in step 4.
The second approach I wanted to highlight is to use a macro. Why would you use a macro when using Outline View is so easy? I think it comes in most handy when you need to perform the task a lot or when you need to demote the headings more than once. Here's the macro I came up with:
Sub DemoteAllHeadings()
    Dim p As Paragraph
    Dim sParStyle As String
    Dim iHeadLevel As Integer

    For Each p In ActiveDocument.Paragraphs
        sParStyle = p.Style
        If Left(sParStyle, 7) = "Heading" Then
            iHeadLevel = Val(Mid(sParStyle,8)) + 1
            If iHeadLevel > 9 Then iHeadLevel = 9
            p.Style = "Heading " & iHeadLevel
        End If
    Next p
End Sub
The macro runs very quickly, regardless of the length of your document. It steps through every paragraph, sees if it is a heading level, and if it is, increments the heading style applied to the paragraph. It has a safeguard built in that stops it from incrementing beyond the Heading 9 style, as there are only nine heading style levels built into Word.
Note:
WordTips is your source for cost-effective Microsoft Word training. (Microsoft Word is the most popular word processing software in the world.) This tip (13732) applies to Microsoft Word 2007, 2010, 2013, 2016, 2019, and 2021.

Create Custom Apps with VBA! Discover how to extend the capabilities of Office 365 applications with VBA programming. Written in clear terms and understandable language, the book includes systematic tutorials and contains both intermediate and advanced content for experienced VB developers. Designed to be comprehensive, the book addresses not just one Office application, but the entire Office suite. Check out Mastering VBA for Microsoft Office 365 today!
Want to get your text away from the explicit formatting you applied, back to the underlying formatting? Here are a few ...
Discover MoreWord is very flexible in what it allows you to search for. One thing it can't do, however, is allow you to search for ...
Discover MoreUsing styles in your documents can be very helpful when it comes to consistency and ease of formatting. When others open ...
Discover MoreFREE SERVICE: Get tips like this every week in WordTips, a free productivity newsletter. Enter your address and click "Subscribe."
2020-02-04 18:02:38
Gretchen
In step 3, you don't need to know how many levels are used in the document. Just specify Level 1. When you select and demote all the Level 1 headings, all the subordinate levels are demoted as well.
2020-02-03 16:16:23
Margaret
Thanks! I work in the accessibility field, and while I've never needed to do precisely this thing, that may well turn out to be a helpful hint for me or someone I know.
Got a version of Word that uses the ribbon interface (Word 2007 or later)? This site is for you! If you use an earlier version of Word, visit our WordTips site focusing on the menu interface.
Visit the WordTips channel on YouTube

FREE SERVICE: Get tips like this every week in WordTips, a free productivity newsletter. Enter your address and click "Subscribe."
Copyright © 2026 Sharon Parq Associates, Inc.
Comments