Written by Allen Wyatt (last updated June 24, 2023)
This tip applies to Word 2007, 2010, 2013, 2016, 2019, Word in Microsoft 365, and 2021
Ginger has a document that uses footnotes. On those pages that include footnotes, Word places a short line between the main text on the page and the footnotes. Ginger wonders if there is a way to change this short line to a double line that extends across the entire width of the main text.
The "short line" to which Ginger refers is called, by Microsoft, a "footnote separator." By default, the footnote separator is a short line, just a couple of inches long. Changing the footnote separator is rather easy, but the way you do it is buried in a rather esoteric place within Word.
To change the footnote separator, you need to be working with a document that already has at least one footnote within it. (The reason for this will become apparent shortly.) Now you need to perform esoteric step number one—switch to Draft view. You can do this by displaying the View tab of the ribbon and then, from the views available at the left side of the ribbon, click Draft.
Now, display the References tab of the ribbon. Within the Footnotes group, click the Show Notes tool. (If this tool is not available on your system, then you are working in a document that has no footnotes. Remember that I said, earlier, you needed to have at least one footnote within your document. This is why.) If your document contains both footnotes and endnotes, then you may see, at this point, a dialog box asking which type of note you wish to show. (See Figure 1.)
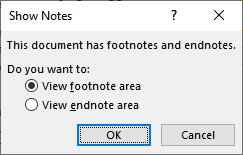
Figure 1. The Show Notes dialog box.
If you see this dialog box, then choose the View Footnote Area radio button and click the OK button.
At this point you should see the Notes pane appear at the bottom of your document. Within the pane you can see any footnotes you have in the document. (See Figure 2.)
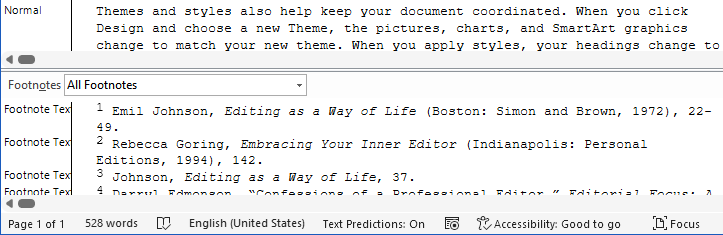
Figure 2. The Notes pane appears at the bottom of the document.
Notice at the top of the Notes pane that there is a drop-down list. By default, the option chosen in the drop-down list is "All Footnotes." However, if you click on the drop-down list, you can choose the "Footnote Separator" option. (I told you that this option was in a rather esoteric place within Word.) When you do, the footnotes disappear from the Notes pane and you can see the actual footnote separator. (See Figure 3.)

Figure 3. Accessing the footnote separator.
There are a couple of things to notice at this point. First, the footnote separator is completely editable. It is some strange line that you can select and delete, if desired. (It almost behaves like a field when you select it, but it isn't a field. It is also not a graphic object.) In its place you can use just about anything you want.
That brings me to the second thing to notice about the footnote separator—it is a paragraph, and therefore can be formatted as a paragraph. Notice in the figure above the word "Normal" that appears to the left side of the separator. This means that the paragraph is formatted, in this case, with the Normal style. If you delete the entire footnote separator (select it all and press Delete), then Word changes the footnote separator so that it uses the Footer style.
Because the footnote separator is a styled paragraph, you could use the Styles pane (accessible through the Home tab of the ribbon) to select a different style to be used for the separator. Thus, you could create a new style that includes borders—such as the full-width double line that Ginger wants—and apply that style to the footnote separator.
If you don't want to take advantage of styles at this point, you could use another default feature of Word to create the double lines. First, though, make sure turn on Show/Hide within the Notes pane. (With the insertion point within the Notes pane, display the Home tab of the ribbon and click the Show/Hide tool.) This will allow you to see exactly what is going on as you edit the footnote separator.
Now, select everything within the footnote separator, except for the end-of-paragraph marker. The easiest way to do this is to make sure the insertion point is at the beginning of the paragraph used for the footnote separator, then, while holding down the Shift key, press the End key and immediately press the Left Arrow key. (See Figure 4.)
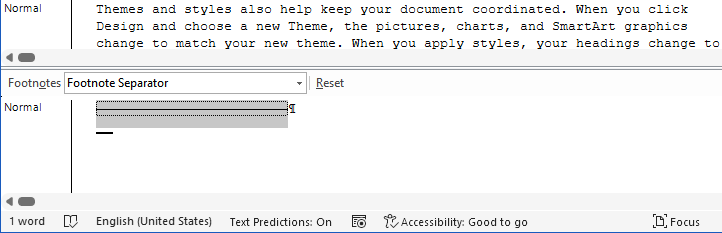
Figure 4. Everything in the footnote separator is selected except for the end-of-paragraph marker.
Press the Delete key, and the only thing that should still be in the footnote separator is the end-of-paragraph marker. Plus, the paragraph is still formatted with the Normal style instead of switching, automatically, to the Footer style. (This is the purpose behind not selecting the end-of-paragraph marker.)
Now press the Equal Sign key three times and then press Enter. Assuming there is nothing else on the line (such as spaces), Word should automatically convert the three equal signs into a double line that goes from margin to margin. (See Figure 5.)
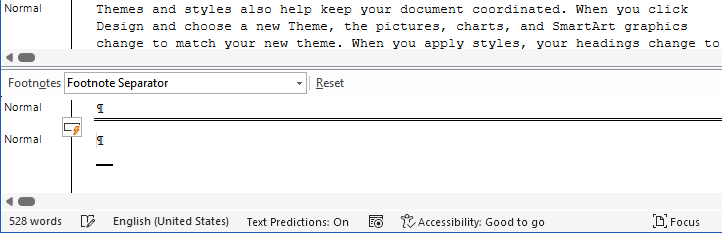
Figure 5. The equal signs are converted to a double line.
All Word has done is to format the footnote separator paragraph so that it has a double-line border beneath it. Also notice that there are now two paragraphs (both formatted using the Normal style) in the footnote separator. You can delete the second end-of-paragraph marker, and you are back to the single, bordered paragraph. At this point you can apply any other formatting to the paragraph that you want in order to get the exact footnote separator you want.
When you are done adjusting how you want your footnote separator to appear, simply jump over to the View tab of the ribbon and click the Print Layout tool near the left of the ribbon. Alternatively, you could click the Print Layout tool near the right side of the status bar. Your new and improved footnote separator should now appear in the document as you expect.
WordTips is your source for cost-effective Microsoft Word training. (Microsoft Word is the most popular word processing software in the world.) This tip (13417) applies to Microsoft Word 2007, 2010, 2013, 2016, 2019, Word in Microsoft 365, and 2021.

Do More in Less Time! Are you ready to harness the full power of Word 2013 to create professional documents? In this comprehensive guide you'll learn the skills and techniques for efficiently building the documents you need for your professional and your personal life. Check out Word 2013 In Depth today!
Automatic footnotes are easy to insert in Word documents. The default settings are usually fine for most projects. ...
Discover MoreWhen using full justification of your text, you may get extra spaces in places you never wanted. This tip examines one ...
Discover MoreWhen working with footnotes in Draft view, you rely on the use of the footnote pane. However, the pane doesn't work ...
Discover MoreFREE SERVICE: Get tips like this every week in WordTips, a free productivity newsletter. Enter your address and click "Subscribe."
There are currently no comments for this tip. (Be the first to leave your comment—just use the simple form above!)
Got a version of Word that uses the ribbon interface (Word 2007 or later)? This site is for you! If you use an earlier version of Word, visit our WordTips site focusing on the menu interface.
Visit the WordTips channel on YouTube

FREE SERVICE: Get tips like this every week in WordTips, a free productivity newsletter. Enter your address and click "Subscribe."
Copyright © 2024 Sharon Parq Associates, Inc.
Comments