Written by Allen Wyatt (last updated June 18, 2022)
This tip applies to Word 2007, 2010, 2013, 2016, 2019, Word in Microsoft 365, and 2021
John notes that it used to be that when he chose to open a file from within Word, the program would display a traditional Open dialog box that allowed him to browse his system to find the documents he wanted to open. Not anymore. Now Word users see options to go to OneDrive or to network locations and have to click multiple times to get to the Open dialog box. John wonders how to just display the traditional Open dialog box, without the need to dig down.
There are a few ways you can go about this, and the methods are a great study in the quirkiness of Word.
First, if you display the File tab of the ribbon and then click Open (or just press Ctrl+O), then Word displays the area referenced by John. This was introduced in Word 2013 and is called the Backstage. (Why? I have no idea, except that some marketing wonk thought it was a good name.) In that area, click the Browse link, and you'll see the traditional Open dialog box. In other words, one click in the Backstage, and you are where you want to be.
To make it even quicker, you can use a different shortcut key. Press Ctrl+F12 and Word displays the Open dialog box directly, bypassing the Backstage.
If you prefer, you can tell Word to make the Ctrl+O shortcut work like it traditionally did. Just follow these steps:
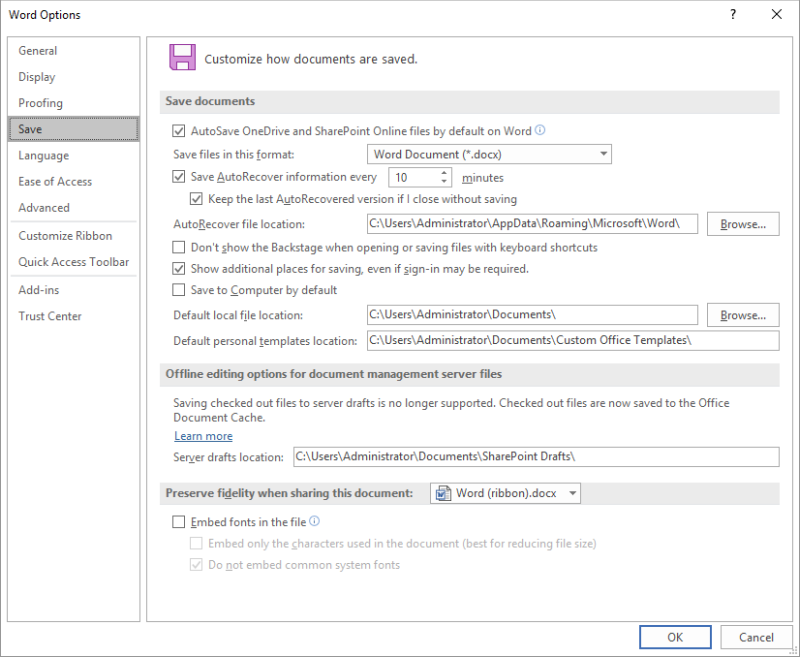
Figure 1. The Save options of the Word Options dialog box.
Now the Ctrl+O shortcut should work exactly the same as the Ctrl+F12 shortcut, displaying the Open dialog box immediately.
Note the wording of the option in step 3—it specifically says "with keyboard shortcuts." This caveat was added post-Word 2016; in earlier versions it wasn't there. In those earlier versions (up through Word 2016) you could make this change and it would basically disable display of the Backstage.
Not so in later versions. The configuration setting only affects the behavior of the shortcut keys. Sort of. You see, in versions of Word after Word 2016, displaying the File tab of the ribbon and clicking Open, still displays the Backstage. However, you can add the Open tool to the Quick Access Toolbar in this manner:

Figure 2. The Quick Access Toolbar portion of the Word Options dialog box.
Now the Open icon appears on your Quick Access Toolbar. Provided you went through the earlier steps to "Don't Show the Backstage when Opening or Saving Files with Keyboard Shortcuts," clicking the Open icon will take you directly to the Open dialog box. (If you didn't make the configuration change, then the Open icon will take you to the Backstage.)
Like I said—the "fixes" for bypassing the Backstage are a great case study in the quirkiness of Word.
WordTips is your source for cost-effective Microsoft Word training. (Microsoft Word is the most popular word processing software in the world.) This tip (12910) applies to Microsoft Word 2007, 2010, 2013, 2016, 2019, Word in Microsoft 365, and 2021.

Create Custom Apps with VBA! Discover how to extend the capabilities of Office 2013 (Word, Excel, PowerPoint, Outlook, and Access) with VBA programming, using it for writing macros, automating Office applications, and creating custom applications. Check out Mastering VBA for Office 2013 today!
Managing large numbers of documents in Word can lead to some interesting challenges. One potential challenge is that your ...
Discover MoreWord allows you to easily insert the contents of one document into another. Doing so, however, may result in unintended ...
Discover MoreUsing both Word and Windows, there are a variety of ways you can mark a file as read-only so that it cannot be changed. ...
Discover MoreFREE SERVICE: Get tips like this every week in WordTips, a free productivity newsletter. Enter your address and click "Subscribe."
2022-12-06 11:26:09
Sparky
Thank you! My hero. I recently upgraded from Word 2010 to Word 2019, and this was driving me nuts.
2022-06-20 09:18:36
Alan
Fantastic tip which I couldn't find due to not knowing it was called 'Backstage'. It is really annoying.
2022-06-19 11:39:29
I contributed to this tip, but Allen, by combining yours and other people's ideas, you made this tip (no to forget your other tips) really optimized.
The option "Don't Show the Backstage when Opening or Saving Files with Keyboard Shortcuts" really is a cherry on top. I really prefer to use my buttons on QAT rather than forgettable keyboard shortcuts and that enabled me to do so.
Keep up these tips coming.
Got a version of Word that uses the ribbon interface (Word 2007 or later)? This site is for you! If you use an earlier version of Word, visit our WordTips site focusing on the menu interface.
Visit the WordTips channel on YouTube

FREE SERVICE: Get tips like this every week in WordTips, a free productivity newsletter. Enter your address and click "Subscribe."
Copyright © 2024 Sharon Parq Associates, Inc.
Comments