Please Note: This article is written for users of the following Microsoft Word versions: 2007, 2010, 2013, 2016, 2019, and 2021. If you are using an earlier version (Word 2003 or earlier), this tip may not work for you. For a version of this tip written specifically for earlier versions of Word, click here: Different Ways of Inserting Dates.
Written by Allen Wyatt (last updated November 2, 2019)
This tip applies to Word 2007, 2010, 2013, 2016, 2019, and 2021
Word provides a couple of different ways to insert the current date in a document. One common way is to display the Insert tab of the ribbon and then click Date & Time in the Text group. Word displays the Date and Time dialog box and you can choose how you want the date and time inserted in your document. (See Figure 1.)
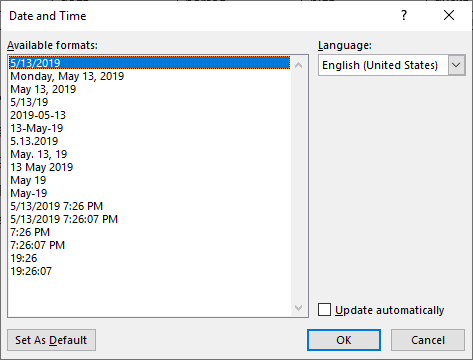
Figure 1. The Date and Time dialog box.
At the bottom-right of the Date and Time dialog box there is an interesting check box entitled Update Automatically. If this check box is not selected, then when you click OK, the date is inserted in your document as text. If you select the check box, then the date is inserted as a DATE field. The difference between the two, of course, is that when a date is inserted as text, it is static; it doesn't change. If the DATE field is used, then the date is dynamic, and it always changes to reflect the current date.
If you are a keyboard-oriented person, then you can insert today's date by pressing Shift+Alt+D. This shortcut always inserts a DATE field, the same as if you had used the Date and Time dialog box and selected the Update Automatically check box.
Even though the Date and Time dialog box and the Shift+Alt+D shortcut do similar things (allow you to insert the date), there is no "association" between the two. Shift+Alt+D is an independent shortcut; it is not a shortcut for the Date and Time dialog box. This means that the settings in the Date and Time dialog box are not configuration settings for Shift+Alt+D. Instead, the keyboard shortcut always inserts the dynamic DATE field, regardless of how you last used the Date and Time dialog box.
The upshot of this distinction, of course, is that if you want to put a static, non-changing date into your document, you should either just type it or you should use the Date and Time dialog box with the Update Automatically check box unselected.
If you are insistent on using a keyboard shortcut, you will need to use Shift+Alt+D to insert the date, press the left arrow key until you are in the middle of the inserted date, and then press Shift+Ctrl+F9 to unlink the field. (Unlinking a field replaces the field code with the result of that field code. It effectively gets rid of the field.)
WordTips is your source for cost-effective Microsoft Word training. (Microsoft Word is the most popular word processing software in the world.) This tip (11811) applies to Microsoft Word 2007, 2010, 2013, 2016, 2019, and 2021. You can find a version of this tip for the older menu interface of Word here: Different Ways of Inserting Dates.

Create Custom Apps with VBA! Discover how to extend the capabilities of Office 365 applications with VBA programming. Written in clear terms and understandable language, the book includes systematic tutorials and contains both intermediate and advanced content for experienced VB developers. Designed to be comprehensive, the book addresses not just one Office application, but the entire Office suite. Check out Mastering VBA for Microsoft Office 365 today!
Need to jump a certain percentage of the way through a document? You can do it using the familiar Go To tab of the Find ...
Discover MorePasting 'plain text' into a document is one of the most common ways of pasting information. Wouldn't it be great if this ...
Discover MoreDouble-click on a word and Word selects it, plus some. It also selects any trailing spaces after the word. Here's a ...
Discover MoreFREE SERVICE: Get tips like this every week in WordTips, a free productivity newsletter. Enter your address and click "Subscribe."
2019-11-04 10:08:53
Ann C.
Typically I want to insert the long date not as a field, but a fixed date. I use the following simple macro, and have a QAT button, since I insert it frequently.
Sub InsertDate()
'
' InsertDate Macro
'
'
Selection.InsertDateTime DateTimeFormat:="MMMM d, yyyy", InsertAsField:= _
False, DateLanguage:=wdEnglishUS, CalendarType:=wdCalendarWestern, _
InsertAsFullWidth:=False
End Sub
Got a version of Word that uses the ribbon interface (Word 2007 or later)? This site is for you! If you use an earlier version of Word, visit our WordTips site focusing on the menu interface.
Visit the WordTips channel on YouTube

FREE SERVICE: Get tips like this every week in WordTips, a free productivity newsletter. Enter your address and click "Subscribe."
Copyright © 2026 Sharon Parq Associates, Inc.
 Please Note:
This article is written for users of the following Microsoft Word versions: 2007, 2010, 2013, 2016, 2019, and 2021. If you are using an earlier version (Word 2003 or earlier), this tip may not work for you. For a version of this tip written specifically for earlier versions of Word, click here:
Please Note:
This article is written for users of the following Microsoft Word versions: 2007, 2010, 2013, 2016, 2019, and 2021. If you are using an earlier version (Word 2003 or earlier), this tip may not work for you. For a version of this tip written specifically for earlier versions of Word, click here:
Comments