Written by Allen Wyatt (last updated April 20, 2024)
This tip applies to Word 2007, 2010, 2013, 2016, 2019, 2021, and Word in Microsoft 365
Eugene has created an AutoCorrect entry that replaces "ive" with "I've." The problem is that AutoCorrect always seems to do the replacing using a regular apostrophe instead of a smart apostrophe. If he types "I've," Word uses a smart apostrophe just fine, but if he lets AutoCorrect do the replacement, Word doesn't replace the regular apostrophe with a smart one. Eugene wonders why this is happening.
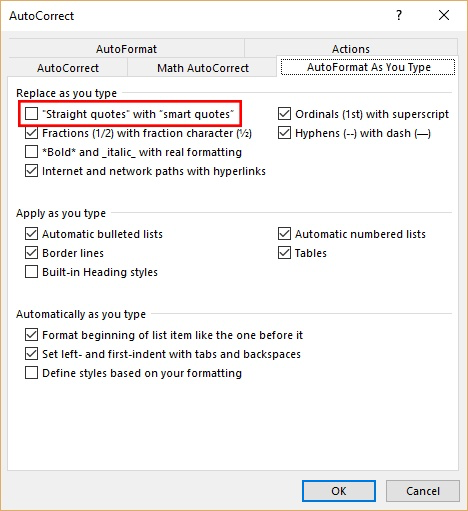
The "why" of what is going on is rooted in how Word implements the smart quotes feature of the program. You see, it is part of AutoFormat, which can be considered a portion of the AutoCorrect capabilities of the program. You can see this by displaying the AutoCorrect dialog box. To do this, display the Word Options dialog box. (In Word 2007 click the Office button and then click Word Options. In later versions of Word display the File tab of the ribbon and then click Options.) At the left side of the dialog box click Proofing, and then click AutoCorrect Options. The tab you want to look at on the dialog box is called AutoFormat As You Type. (See Figure 1.)

Figure 1. The AutoFormat As You Type tab of the AutoCorrect dialog box.
The control you want to pay attention to is the “Straight Quotes” with “Smart Quotes” check box. This controls whether Word converts your quote marks and apostrophes as you type them. That last part of the sentence is the key, however—as you type them. Thus, the very moment you press either the quote key (") or the apostrophe key ('), Word looks at the context of where you are typing—meaning if there is a space in front of the character or not—and physically replaces the straight version of the quote or apostrophe with the "smart" version, if the check box in the AutoFormat As You Type tab is selected.
When you choose to use an AutoCorrect entry, like Eugene is doing, whatever is in the "Replace" portion of the AutoCorrect entry is replaced with the "With" portion after the "Replace" portion is fully typed and some sort of punctuation or space is typed.
Let's consider Eugene's entry for a moment. The "Replace" portion of his AutoCorrect entry is "ive" and the "With" portion is "I've." That's all well and good; when he types "ive" as a full word—meaning it is preceded by a space and terminated by a space or a punctuation mark—then the replacement is made. (This is important, because you don't want Word to replace "ive" when it is part of another word, such as "hive" or "ivermectin.")
Because AutoCorrect is replacing a chunk of text (the "Replace" portion of the AutoCorrect entry) with a different chunk of text (the "With" portion of the AutoCorrect entry), Word doesn't consider the "With" portion as something you typed. Therefore, whatever you've configured on the AutoFormat As You Type tab doesn't come into play because you didn't really type what AutoCorrect stuck into your document.
Now that you understand the "why" of what is happening, let's take a look at how to correct it. The correction has to do with how the AutoCorrect entry was created in the first place—it actually contains a straight apostrophe and isn't changed when inserted, for reasons already described.
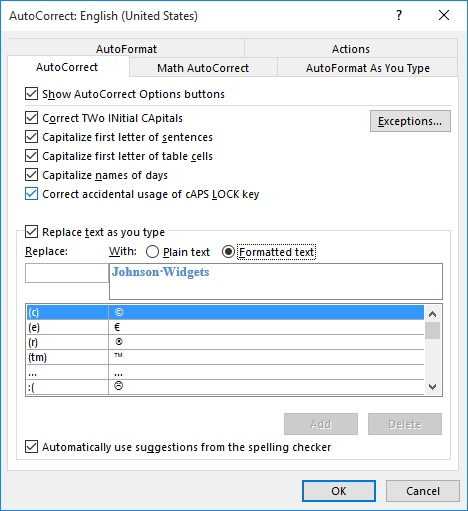
In Eugene's case, he needs to go into AutoCorrect and replace the AutoCorrect entry he previously created. He can do this by following these steps:

Figure 2. The AutoCorrect tab of the AutoCorrect dialog box.
That should do it. Now, when Eugene types "ive" as a word, it should be replaced with "I've," including the smart apostrophe. This occurs because the AutoCorrect entry actually contains the smart apostrophe, not because of any setting on the AutoFormat As You Type tab of the AutoCorrect dialog box.
WordTips is your source for cost-effective Microsoft Word training. (Microsoft Word is the most popular word processing software in the world.) This tip (10491) applies to Microsoft Word 2007, 2010, 2013, 2016, 2019, 2021, and Word in Microsoft 365.

Discover the Power of Microsoft Office This beginner-friendly guide reveals the expert tips and strategies you need to skyrocket your productivity and use Office 365 like a pro. Mastering software like Word, Excel, and PowerPoint is essential to be more efficient and advance your career. Simple lessons guide you through every step, providing the knowledge you need to get started. Check out Microsoft Office 365 For Beginners today!
Want an easy way to add lines in your document? You can do it by making sure Word is using one of its AutoFormat features.
Discover MoreType a few dashes, underscores, or equal signs, and you could end up with a full-width line in your document. This is ...
Discover MoreIt can be frustrating when you change settings and they later change all on their own. If the settings you want to remain ...
Discover MoreFREE SERVICE: Get tips like this every week in WordTips, a free productivity newsletter. Enter your address and click "Subscribe."
There are currently no comments for this tip. (Be the first to leave your comment—just use the simple form above!)
Got a version of Word that uses the ribbon interface (Word 2007 or later)? This site is for you! If you use an earlier version of Word, visit our WordTips site focusing on the menu interface.
Visit the WordTips channel on YouTube
FREE SERVICE: Get tips like this every week in WordTips, a free productivity newsletter. Enter your address and click "Subscribe."
Copyright © 2026 Sharon Parq Associates, Inc.
Comments