Olivia works for a publishing company, and they rely on styles extensively. When authors submit a manuscript, Olivia needs to figure out which text has been formatted with styles and which text has been formatted with direct formatting. This is relatively easy at a paragraph level. Olivia wonders, though, if there is a way to analyze a document and somehow mark text that uses direct formatting so she can correct those instances.
There is no tool native to Word that will do a full-document analysis. There are tools available, though, that can help. The first is the Style Inspector. You display this tool by displaying the Styles pane (click the small icon at the bottom-right of the Styles group on the Home tab of the ribbon) and then clicking the Style Inspector button. This button is at the bottom of the Styles pane and looks like the letter A with a magnifying glass "inspecting" the letter.
The Style Inspector allows you select text within the document, and then it will show you what styles that text uses (both paragraph and character styles), along with any direct formatting that has been done. In the following screen shot, the Style Inspector shows that the text uses the default paragraph font, plus italic. (See Figure 1.) This is because the insertion point is within the word "community" just to the right of the Style Inspector. This "plus" part is direct formatting.
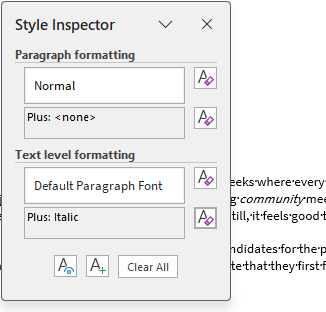
Figure 1. The Style Inspector.
To remove any direct formatting from the selected text, just click the icon to the right of the formatting. For instance, to remove the direct italic formatting, you could click the icon just to the right of the "Plus: Italic" indicator.
You need to realize that any "plus" formatting is immediately removed by clicking the icon. You cannot pick-and-choose which formatting is removed. For instance, if the "plus" showed that both bold and italic were applied to the text, the icon would remove both of those; you couldn't choose to erase just bold or italic.
Note that at the bottom of the Style Inspector there are a few buttons. The leftmost button launches the Reveal Formatting task pane. (You can also launch it by pressing Shift+F1.) Some people find this task pane helpful because it can show all the formatting applied to selected text. It doesn't have the same capabilities, however, of removing direct formatting as can be done in the Style Inspector.
If you want a more automated way of dealing with direct formatting, you may want to consider Editor's ToolKit PLUS, which is available from The Editorium. You can find more information about it here:
https://www.editorium.com/ETKPlus2023.htm
WordTips is your source for cost-effective Microsoft Word training. (Microsoft Word is the most popular word processing software in the world.) This tip (9177) applies to Microsoft Word 2007, 2010, 2013, 2016, 2019, 2021, 2024, and Word in Microsoft 365.

Do More in Less Time! An easy-to-understand guide to the more advanced features available in the Microsoft 365 version of Word. Enhance the quality of your documents and boost productivity in any field with this in-depth resource. Complete your Word-related tasks more efficiently as you unlock lesser-known tools and learn to quickly access the features you need. Check out Microsoft 365 Word For Professionals For Dummies today!
If you are trying to limit what styles can and can't be used in a document, you might think a good approach is to store ...
Discover MoreWord can hyphenate documents automatically, if you want it to. But what about those situations where you want most of a ...
Discover MoreWhen you add formatting to some text in your document, Word may apply your formatting to every other part of your ...
Discover MoreFREE SERVICE: Get tips like this every week in WordTips, a free productivity newsletter. Enter your address and click "Subscribe."
2025-11-18 12:30:23
Marie
Thanks for this tip! Would you please move Figure 1 so that it doesn't cover the referenced text? This is a super website!
Got a version of Word that uses the ribbon interface (Word 2007 or later)? This site is for you! If you use an earlier version of Word, visit our WordTips site focusing on the menu interface.
Visit the WordTips channel on YouTube

FREE SERVICE: Get tips like this every week in WordTips, a free productivity newsletter. Enter your address and click "Subscribe."
Copyright © 2026 Sharon Parq Associates, Inc.
Comments