Written by Allen Wyatt (last updated February 8, 2020)
This tip applies to Word 2007, 2010, 2013, 2016, 2019, and 2021
When Don opens a document on which he previously worked, Word puts a message somewhere along the right side that says "Welcome back! Would you like to pick up where you left off?" Don never uses this feature and was wondering if it was possible to turn it off.
The only way to disable this feature is to make an adjustment in the Windows Registry. (There is no way to do it within Word itself.) So, the first step is to get out of Word completely.
Next, go ahead and start the Registry Editor. (You can do this by pressing Windows+R, typing regedit, and then pressing Enter.) As you probably already know, editing the Registry should be done carefully, as one misstep could result in an unusable system. (If you are a bit squeamish about editing the Registry, you may want to do a Registry backup or set a system restore point on your system. Both are beyond the scope of this tip, but you should not have trouble in tracking down how to do it.)
Within the Registry Editor, you want to use the controls at the left side of the screen to navigate to the following data key:
HKEY_CURRENT_USER\Software\Microsoft\Office\16.0\Word\Reading Locations
This data key is for Word 2016 and later versions. If you are using an older version of Word, then the "16.0" portion will be something different. (Word 2007 is "12.0," Word 2010 is "14.0," and Word 2013 is "15.0.") This key contains the data necessary to display the message to which Don objects. If the key doesn't exist on your system, then you are either using a brand-new installation of Word or you are using a version that doesn't support this feature.
You could, if you desire, simply delete the entire Reading Locations key. That won't really solve the problem, though, because Word, seeing it is missing, will simply recreate it the next time you save and close a document. Instead you need to modify the advanced permissions on the key, in this manner:
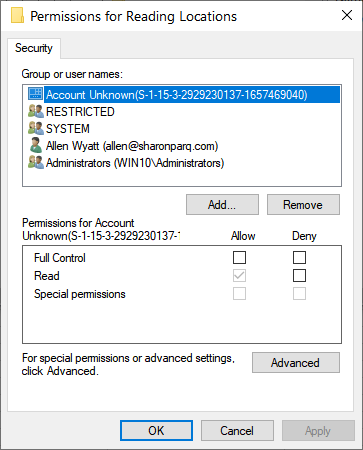
Figure 1. The Permissions dialog box.
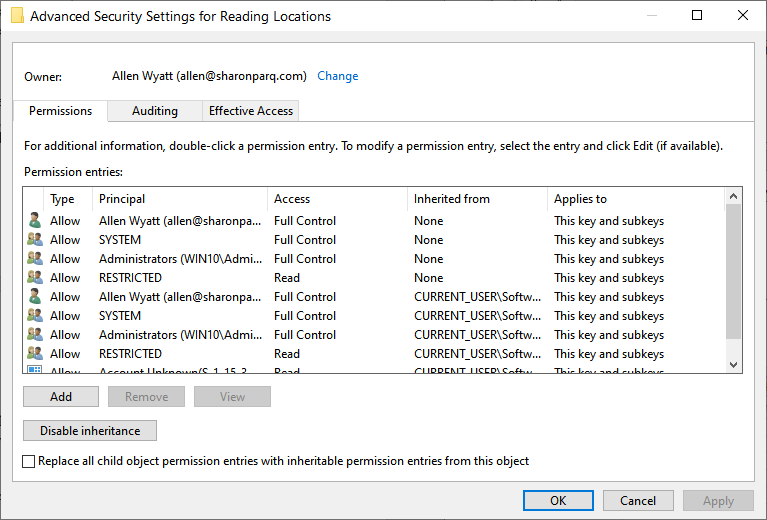
Figure 2. The Advanced Security Settings dialog box.
You can, if you want, restart Windows, but it shouldn't be necessary. (Some people like to restart Windows whenever they make a change to the Registry.) The next time you start Word and open a document, the offending message should be gone.
If, for some reason, it is not gone, then you need to get a bit more aggressive in your Registry edit. Pull up the Registry Editor again and, once more, locate and select the Reading Locations data key. Then follow these steps:
Restart Word and all should now be better. This approach makes the Reading Locations data key read-only, which stops Word from being able to write to it.
WordTips is your source for cost-effective Microsoft Word training. (Microsoft Word is the most popular word processing software in the world.) This tip (13735) applies to Microsoft Word 2007, 2010, 2013, 2016, 2019, and 2021.

The First and Last Word on Word! Bestselling For Dummies author Dan Gookin puts his usual fun and friendly candor back to work to show you how to navigate Word 2013. Spend more time working and less time trying to figure it all out! Check out Word 2013 For Dummies today!
When you first start Word, it displays the Home tab of the ribbon. If you want to display a different ribbon tab by ...
Discover MoreDisplaying graphics in a document requires a great deal more computer processing than displaying simple text. A document ...
Discover MoreIf you are viewing a document and your text runs off the right side of the document window, it can be a real bother to ...
Discover MoreFREE SERVICE: Get tips like this every week in WordTips, a free productivity newsletter. Enter your address and click "Subscribe."
2023-05-23 00:00:04
Charles Kenyon
Allew, I do not see any changes being made in the Registry Editor, which may be why the Apply button is not active in your screenshot.
2023-03-07 13:44:08
Esbie
Thanks for your instructions for editing the Registry to get rid of the Welcome Back messages when reopening a Word doc, but for Windows 11 Home, it did not work. I'm using Office 2010 Pro. Even after a restart, I'm still getting the childish Welcome Back message.
Esbie
2021-11-15 05:48:54
Rachelle Avital
I did everything here - a few times - and I have still not been able to get rid of the Welcome Back
2021-10-17 19:56:36
Doug Couch
Followed all procedures, including the aggressive portion. Deny is checked, even rebooted and checked again...Deny is checked. No effect. Seems they have already prevented this fix from working.
2021-08-23 19:43:38
George Carrard
In Fig 2, the Apply button is greyed out. It is also greyed out for me. Yet Allen says “Click the Apply button. …” That is not possible.
If I press the Auditing tab, then the Apply is not greyed out. Should I press the Auditing tab?
2020-10-30 10:57:06
Conrad
First of all, as pointed out in the comments below by Louis Burkhardt, it seems like the article is missing a step between 3 and 4 in the first set of instructions -- why bring up the dialog if we don't need to change anything? Anyway, I followed those instructions, and the second set of instructions, and the instructions below by JC. And I had Word closed, and I even rebooted, but the annoying Welcome Back message still comes up (and the reason it is so annoying is that I can't hit a key like CTRL+END until I get rid of that stupid Welcome Back dialog).
How are other people able to prevent that dialog but I can't?
I'm on Windows 10.0.18362 on a Surface Pro 6, with an updated Office 365 as of this posting.
2020-06-30 09:59:43
Beth
Thanks, Fran. Unfortunately, that shift F5 doesn't work for me. I get a small image, sort of a rectangle standing on its end with a bar in the middle, which looks like perhaps it represents the righthand edge of my document, but my cursor doesn't move and I am still at the top of the document.
2020-06-30 03:55:44
fran
@Beth
When you open a document you can immediately use the shortcut [Shift][F5] to go back to the location you last edited in the document.
(sorry, there was a typo, of course it should be F5 and not only 5)
Hope this helps.
2020-06-29 10:34:30
Beth
I like the "Welcome back" feature (I am perhaps the only person who does), but it keeps disappearing!
I find it useful when editing a very long document, but I am also just annoyed that it is inconsistent.
Any idea as to how to get it back? It doesn't seem to matter whether I have shut down Word, restarted, rebooted, etc. -- sometimes it's just not there when I open my long document. Then it will be there for a few days. Then it will disappear again.
2020-06-03 04:11:26
fran
JC, many thanks!
Your instruction is very good and the result is perfect for me - I finally got rid of that annoying message. :-)
2020-06-02 16:23:38
JC
Thank you for the detailed instructions!
However, to successfully disable this feature on my machine I had to...
Remove/clean-up all previously stored Reading Locations:
1. Right-click on each existing sub-key under the Reading Locations data key and select Delete.
Update permissions to prevent the "Current User" from creating/storing new Reading Locations:
1. Right-click the Reading Locations data key. Windows displays a Context menu.
2. Choose the Permissions option from the Context menu. Windows displays the Permissions dialog box for the data key.
3. At the top of the dialog box, click/select the 'Your User Name' user (i.e. the Current User).
4. In the Permissions area, lower in the dialog box, click the Deny check box at the right side of the Full Control line.
5. Click the Apply button.
6. Close the Permissions dialog box.
7. Close the Registry Editor.
Note: Denying access to the SYSTEM user had no impact on my machine so I chose to leave its access intact.
I hope others find this additional info helpful.
2020-04-17 12:11:19
elizabeth
What about Mac users? Are we just stuck with it?
2020-04-09 05:44:36
fran
Unfortunately, this does not work for me, even the "Deny" for the "SYSTEM" user does not stop the annoying "Welcome back" message to disappear.
2020-04-06 11:54:41
Louis Burkhardt
First, thank you for all the helpful information you provide!
Second, on this page:
https://wordribbon.tips.net/T013735_Turning_Off_the_Welcome_Back_Notice.html
it seems to me a step is missing (I've read the instructions 2x).
In the first set of numbered steps, #3 (At the bottom-right corner of the dialog box, click the Advanced button) is followed by #4 (At the bottom of the dialog box, make sure the Replace All Child Object Permission Entries check box is not selected)--but no other action is suggested. Isn't there a missing step #3.5 where one should remove or alter a user in the permission list?
Thank you. Louis
Got a version of Word that uses the ribbon interface (Word 2007 or later)? This site is for you! If you use an earlier version of Word, visit our WordTips site focusing on the menu interface.
Visit the WordTips channel on YouTube

FREE SERVICE: Get tips like this every week in WordTips, a free productivity newsletter. Enter your address and click "Subscribe."
Copyright © 2025 Sharon Parq Associates, Inc.
Comments