Written by Allen Wyatt (last updated October 23, 2021)
This tip applies to Word 2007, 2010, 2013, 2016, 2019, and Word in Microsoft 365
Yossi notes that when he is working in a table, he can click on a horizontal row border and, when he starts to drag the border, he can see the height of the row. He wonders if there is a quick way to see a row's height without the need to start dragging a border.
It is unclear which version of Word Yossi is using, but in the latest version dragging a border does not, by default, display the height of the row. (It does happen in Excel, but not in Word.) Even if it did, however, dragging a border to see the height runs the risk of messing up your table. (I can't tell you the number of times I've dragged the row border, ever so slightly, and then tried to move it back to where it was. That often ends in disappointment as I can never seem to get it back to what it was before.)
A better approach is to use the tools on the Layout tab of the ribbon. There are actually two Layout tabs, and the one I'm referring to is the one that appears when you place the insertion point in a cell of your table. If you want to know a row's height, just click within a cell in the desired row (to place the insertion point there) and then display the Layout tab. (See Figure 1.)
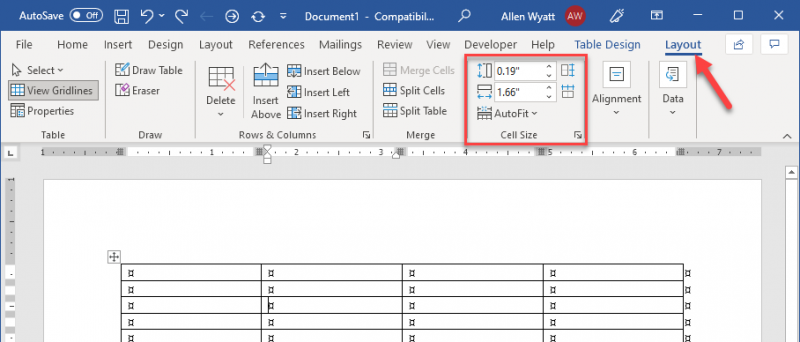
Figure 1. This Layout tab of the ribbon (marked by the arrow) is visible when working within a table.
Note the controls in the Cell Size group. Among those you can see both row height and column width, out to 2 decimal places. In addition, you can change the values, using these same controls, to set the precise height (or width) you need. While dragging a border using the mouse can be convenient, the controls on the Layout tab can provide you with the desired information faster and allow you to change the settings more precisely.
WordTips is your source for cost-effective Microsoft Word training. (Microsoft Word is the most popular word processing software in the world.) This tip (11875) applies to Microsoft Word 2007, 2010, 2013, 2016, 2019, and Word in Microsoft 365.

Create Custom Apps with VBA! Discover how to extend the capabilities of Office 2013 (Word, Excel, PowerPoint, Outlook, and Access) with VBA programming, using it for writing macros, automating Office applications, and creating custom applications. Check out Mastering VBA for Office 2013 today!
Need to make a copy of every single table in a document? There's a quick and easy way to do it using the macro in this tip.
Discover MoreWhen you press the Tab key while entering info into a table, Word dutifully moves to the next table cell. If you don't ...
Discover MoreTables are a great way to organize the information in a document. If your table gets quite long, you may not want to ...
Discover MoreFREE SERVICE: Get tips like this every week in WordTips, a free productivity newsletter. Enter your address and click "Subscribe."
2021-10-23 08:23:01
Tomek
Dragging a border ***does*** display the height of the row, but only if you are pressing the Alt key at the same time. It worked that way in earlier versions of Word, and it still works in MS365.
Using the tools described in this tip is still much better for this purpose.
Got a version of Word that uses the ribbon interface (Word 2007 or later)? This site is for you! If you use an earlier version of Word, visit our WordTips site focusing on the menu interface.
Visit the WordTips channel on YouTube

FREE SERVICE: Get tips like this every week in WordTips, a free productivity newsletter. Enter your address and click "Subscribe."
Copyright © 2024 Sharon Parq Associates, Inc.
Comments