Please Note: This article is written for users of the following Microsoft Word versions: 2007, 2010, 2013, 2016, 2019, and 2021. If you are using an earlier version (Word 2003 or earlier), this tip may not work for you. For a version of this tip written specifically for earlier versions of Word, click here: Selecting a Paper Source.
Word supports any printer supported by Windows. This is because Word uses the features offered by Windows to print documents. Many of the features associated with formatting your document and printing are related to the type of printer you have installed and selected. For instance, some laser printers have different bins for different paper. Windows (and thus Word) can instruct the printer to select paper from any of the available paper bins.
If your printer supports multiple paper sources and you want to change the paper source used for your document (for instance, you have a bin that contains letterhead and you want to print on it), you should follow these steps if you are using Word 2007:
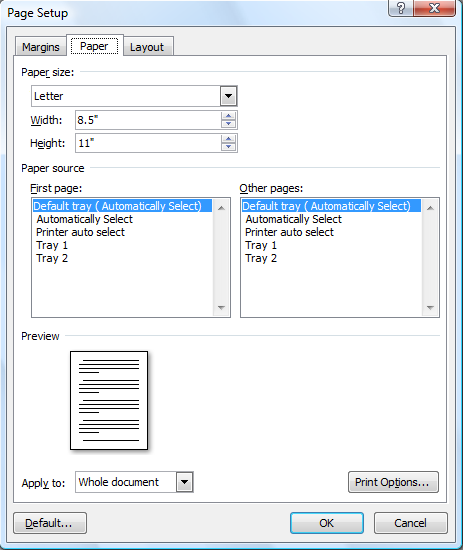
Figure 1. The Paper tab of the Page Setup dialog box.
If you are using Word 2010 or a later version, the steps to check which printer is selected are slightly different. Instead of steps 1 through 3, press Ctrl+P to display the Print options on the File tab. Use the Printer drop-down list to specify which printer you want to use. You can then press Esc (to get back to your document) and follow steps 4 through 9 as indicated.
If, in step 7, you don't see different options for paper sources, then your printer (or printer driver) does not support multiple sources. Once you have specified different sources for your paper, the information is saved with the document. This means that every time you print the document, it will select paper as you directed. This also applies to using the print-merging feature of Word. For instance, the first page of each document merged and printed can be selected from a different bin than each subsequent page.
WordTips is your source for cost-effective Microsoft Word training. (Microsoft Word is the most popular word processing software in the world.) This tip (8798) applies to Microsoft Word 2007, 2010, 2013, 2016, 2019, and 2021. You can find a version of this tip for the older menu interface of Word here: Selecting a Paper Source.

Do More in Less Time! An easy-to-understand guide to the more advanced features available in the Microsoft 365 version of Word. Enhance the quality of your documents and boost productivity in any field with this in-depth resource. Complete your Word-related tasks more efficiently as you unlock lesser-known tools and learn to quickly access the features you need. Check out Microsoft 365 Word For Professionals For Dummies today!
If you need to print more than one copy of your document, you need to become familiar with the printing options made ...
Discover MoreWord maintains quite a bit of information about a document in a special collection of items called "properties." You can ...
Discover MoreWe click the button to print our document and seldom think of what is happening behind the scenes. Word prints documents, ...
Discover MoreFREE SERVICE: Get tips like this every week in WordTips, a free productivity newsletter. Enter your address and click "Subscribe."
There are currently no comments for this tip. (Be the first to leave your comment—just use the simple form above!)
Got a version of Word that uses the ribbon interface (Word 2007 or later)? This site is for you! If you use an earlier version of Word, visit our WordTips site focusing on the menu interface.
Visit the WordTips channel on YouTube

FREE SERVICE: Get tips like this every week in WordTips, a free productivity newsletter. Enter your address and click "Subscribe."
Copyright © 2026 Sharon Parq Associates, Inc.
 Please Note:
This article is written for users of the following Microsoft Word versions: 2007, 2010, 2013, 2016, 2019, and 2021. If you are using an earlier version (Word 2003 or earlier), this tip may not work for you. For a version of this tip written specifically for earlier versions of Word, click here:
Please Note:
This article is written for users of the following Microsoft Word versions: 2007, 2010, 2013, 2016, 2019, and 2021. If you are using an earlier version (Word 2003 or earlier), this tip may not work for you. For a version of this tip written specifically for earlier versions of Word, click here:
Comments