Please Note: This article is written for users of the following Microsoft Word versions: 2007, 2010, 2013, 2016, 2019, 2021, and Word in Microsoft 365. If you are using an earlier version (Word 2003 or earlier), this tip may not work for you. For a version of this tip written specifically for earlier versions of Word, click here: Editing Wrap Points.
Written by Allen Wyatt (last updated October 21, 2023)
This tip applies to Word 2007, 2010, 2013, 2016, 2019, 2021, and Word in Microsoft 365
When you insert a picture in Word, it defines a series of "wrap points" around the picture. By default there are four wrap points that surround the perimeter of the picture, forming a rectangle. When you wrap text around the picture, the wrap points define how close the text can come to the picture. (If the image you insert in the document actually has a transparent background, there may be many more than four wrap points around it.)
If you want, you can create custom wrapping of text by editing the wrap points so they more closely reflect exactly what you want. Simply follow these steps:
You should note that you will only be able to edit the wrap points of an image if you've set the wrapping for the image to the Tight or Through settings. If set to some other type of wrapping, the Edit Wrap Points option will be "grayed out."
Finally, remember that when you work on an image in this way (by adjusting its properties) that image is typically in the foreground, meaning that it is layered in front of text. This isn't a big deal if your image is rectangular and the wrap points reflect that—there will be no conflict between the image and the text that wraps around the image. If, however, you adjust the wrap points so they are toward the center of the image, then the reflowed text will occupy the same space as the image. This can cause visual problems, but you might be able to alleviate those problems if you simply move the image behind the text. This should cause the text to "overlay" the image, and it may give you the effect you seek.
How you change other wrapping and layering settings has been covered extensively in other issues of WordTips. If you would like to learn a bit more about wrap points and adjusting them, you may like this page on Microsoft's support site:
https://support.microsoft.com/en-gb/office/22f1940e-3abb-43fd-a4fb-0900a39b7cf5
WordTips is your source for cost-effective Microsoft Word training. (Microsoft Word is the most popular word processing software in the world.) This tip (6065) applies to Microsoft Word 2007, 2010, 2013, 2016, 2019, 2021, and Word in Microsoft 365. You can find a version of this tip for the older menu interface of Word here: Editing Wrap Points.

Discover the Power of Microsoft Office This beginner-friendly guide reveals the expert tips and strategies you need to skyrocket your productivity and use Office 365 like a pro. Mastering software like Word, Excel, and PowerPoint is essential to be more efficient and advance your career. Simple lessons guide you through every step, providing the knowledge you need to get started. Check out Microsoft Office 365 For Beginners today!
When you insert pictures into a document, the first folder that Word opens up is normally the My Pictures folder. You can ...
Discover MoreRotating a graphic using the mouse is rather easy. Rotating a graphic using the keyboard is a bit trickier. This tip ...
Discover MoreNeed your hide some of the outside edges of a graphic? You can instruct Word to crop (or hide) those outside edges by ...
Discover MoreFREE SERVICE: Get tips like this every week in WordTips, a free productivity newsletter. Enter your address and click "Subscribe."
2024-04-24 09:19:52
Paul Stregevsky
Linlee,
You need to use the Selection Pane:
1. Display the Selection pane, in one of two ways:
- Add the Select dropdown menu to your Quick Access Toolbar, and then select Selection Pane.
or
- Select any graphic on the page, then select the Picture Format main menu, and then select Selection Pane.
2. Locate the hidden graphic; then select it; and then edit its wrap points.
Here are some screenshots. (see Figure 1 below) (see Figure 2 below) (see Figure 3 below)

Figure 1. Add the Select dropdown menu to your toolbar; select Selection Pane.

Figure 2. In Picture Format, select Selection Pane, then Bring Forward.
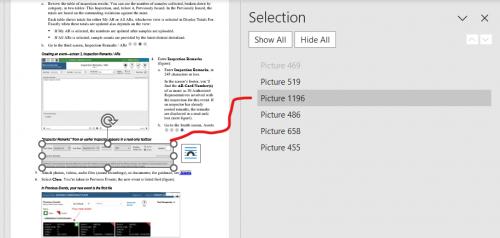
Figure 3. Selecting a graphic, textbox, or autoshape in the Selection Pane.
2024-04-23 19:15:18
Linlee Nelson
I cannot get behind the layout box to move the wrap points. Is there a trick for this?
2023-10-21 10:21:11
Barbie
I wrap the text closely around images that have a white background. However, I've found that I must set the white background as transparent, or when I print it, the text is hidden by the background.
Got a version of Word that uses the ribbon interface (Word 2007 or later)? This site is for you! If you use an earlier version of Word, visit our WordTips site focusing on the menu interface.
Visit the WordTips channel on YouTube

FREE SERVICE: Get tips like this every week in WordTips, a free productivity newsletter. Enter your address and click "Subscribe."
Copyright © 2026 Sharon Parq Associates, Inc.
 Please Note:
This article is written for users of the following Microsoft Word versions: 2007, 2010, 2013, 2016, 2019, 2021, and Word in Microsoft 365. If you are using an earlier version (Word 2003 or earlier), this tip may not work for you. For a version of this tip written specifically for earlier versions of Word, click here:
Please Note:
This article is written for users of the following Microsoft Word versions: 2007, 2010, 2013, 2016, 2019, 2021, and Word in Microsoft 365. If you are using an earlier version (Word 2003 or earlier), this tip may not work for you. For a version of this tip written specifically for earlier versions of Word, click here:
Comments