Written by Allen Wyatt (last updated August 17, 2019)
This tip applies to Word 2007, 2010, 2013, 2016, 2019, and Word in Microsoft 365
Gina created three new styles that she uses for headings in her documents. (These are not the built-in heading styles provided by Word.) She wonders how to get Word to recognize these as heading styles and display them in the Navigation pane.
There are two ways you can go about this—the best way and the easy way. Let's look at the latter way (the easy way) first. This involves basing your custom heading styles on the existing heading styles. Here's how you create a new style, emphasizing the setting you need to make:
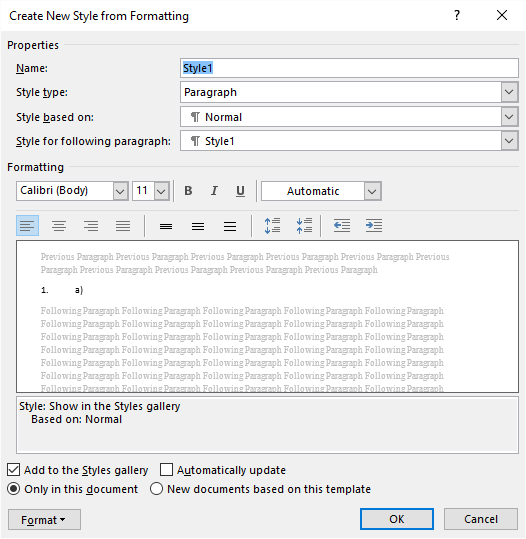
Figure 1. The Create New Style from Formatting dialog box.
That's it; the custom style should now appear in the Navigation pane just fine. The drawback to this (of course) is that the new style is based on the built-in heading style, and if Microsoft does anything to change that heading style, or if a user changes the Theme for the document which ends up in changing the built-in heading style, that could have negative consequences for your custom style.
The best approach is to follow these steps when you create the style:
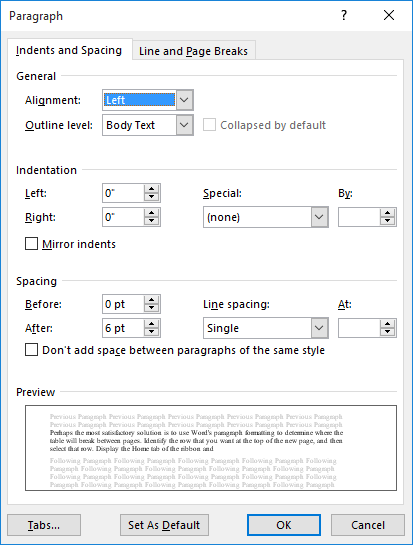
Figure 2. The Paragraph dialog box.
In these steps, step 4 is not strictly necessary, but taking that step will ensure that nobody will mess up your custom style by changing any style on which that custom style is based. The key is step 7, where you specify an outline level for the paragraph. The default level (Body Style) is used for regular text. You just need to make sure your headings have an outline level suitable for their position in your outline hierarchy. They will then look as you expect in the Navigation pane.
In addition, you can modify any existing custom styles by adapting these same steps to the Modify Style dialog box instead of the Create New Style from Formatting dialog box.
WordTips is your source for cost-effective Microsoft Word training. (Microsoft Word is the most popular word processing software in the world.) This tip (13662) applies to Microsoft Word 2007, 2010, 2013, 2016, 2019, and Word in Microsoft 365.

Comprehensive VBA Guide Visual Basic for Applications (VBA) is the language used for writing macros in all Office programs. This complete guide shows both professionals and novices how to master VBA in order to customize the entire Office suite for their needs. Check out Mastering VBA for Office 2010 today!
Smart quotes can be helpful in making a great-looking document, but at times, they can be a real pain. Wouldn’t it be ...
Discover MoreWord always relies on styles to define how text appears in your document. If you don't understand how Word applies ...
Discover MoreYou can add any number of styles to your document in order to define how you want your text to appear. If you later want ...
Discover MoreFREE SERVICE: Get tips like this every week in WordTips, a free productivity newsletter. Enter your address and click "Subscribe."
2022-02-13 17:21:45
Jami Borman
Excellent explanation. Quick to deploy
2022-02-03 04:41:18
Richard Curtis
@Sarah When you change the Outline Level from Body Text to Level 1, your custom heading appears in the Nav Pane at the same indented position as Heading 1 style.
Clicking Options in the Table of Contents dialog allows you to set a level number for your custom style.
You are able to link to any numbered heading by selecting 'Numbered item' reference type in the cross-reference dialog.
2022-02-02 13:27:04
Sarah
Thanks for thurough explanation - the only issue I have run into with creating a new style from blank, using the level for outline view is that the headings do not appear as options when i try and link to them (insert > Link > select place in this document). Any "heading 1" styles appear, but not my custom created style. Where do I update the style so that it appears on navigation and I can link to it as a heading and is part of TOC?
2022-02-01 19:42:14
PJR
I believe that the best method without requiring to link to a preset heading style (affecting the user's style formatting and style numbering) is the method well described in 2013 by StarKeeper in answers.microsoft.com:
"In Word 2010 (applies to later versions as well):
1. Open up the "Styles" menu so that it on the right side of your window.
2. Find the heading style that you are using for your headers and right click on it to open up the options menu. Then select "Modify." This opens a "Modify Style" menu box.
3. Click on the "Format" button in the lower left corner.
4. Select "Paragraph."
5. In the "Outline level" selection list, make sure that "Level 1" is selected. (Or whichever level you want this header to be. If the selection box says "Body Text," then nothing will appear in the Navigation Pane.)
6. Select "OK"
You should now see the headers of this style in the selection pane. Any subheads based off of this header should now also be showing up in the correct nesting configuration."
2021-10-07 06:47:24
Bruce B Thill
Thank you for such good solutions. Your instructions are clear, concise, and complete. I am a Word Perfect user from the early 1990's and hate Word. You take some of the sting out of using Microsoft. I shouldn't have to google most of these issues.
2020-10-12 20:13:00
Paul
Thank you so much, I've been struggling with this problem for ages. Excellent, clear instructions. Thank you.
2020-07-23 17:34:22
Friend, you solved my problem. Why can't all Internet help be this clearly written? Thank you!
2020-05-07 12:33:53
Manju
Hi,
Thanks for this, but I have an additional question this doesn't cover. I use the chapter number in captions and have a different numbering method for the appendix with the words "Appendix #" as the numbering scheme. I want my cation to include the "Appendix A.seq" instead of the sequencing from the last chapter of the main body. I've turned in the last papers by adding a chapter number to the Appendix title bc I couldn't figure out how to get word to recognize they should use the appendix header. I would also me happy if the caption wrote A.#, but that doesn't seem to be happening either. Do you know how to solve this issue? The format for the captions is the generic {Styleref 1 \s}.{SEQ Figure \* ARABIC \s 1}
I would like it so I can keep the same code regardless of where the Figure, Table, Equation is.
2020-04-21 09:50:21
Richard Curtis
Today (in Word 365) I applied level 1 instead of Body Text to the Caption style and the Nav pane was duly updated. Unfortunately this had the undesired effect of inserting all the captions into the Table of Contents. There are already separate lists of figures & tables and I don't want these mixed up with the paragraph headings. If my ToC uses levels 1-3 is it best to use level 4+ for the captions?
When I did this in Word 2013 I don't remember this difficulty.
2020-03-06 12:59:31
Sam
Excellent, just hat I needed. thanks.
2019-10-29 09:29:35
Richard Curtis
In the paragraph dialog for one of my custom headings the Outline level control is greyed out. What might be the cause of this?
2019-10-21 09:12:50
Richard Curtis
Thanks for this great tip. The only setting choice I had not made was to the Outline level in the Paragraph dialog. As my custom style headings appear under level 3 headings I chose level 4. However, some of the custom headings also appear under level 4 headings so I might need to change the Outlione level so that level 4 headings and custom headings are distinguished in the Nav pane view.
Got a version of Word that uses the ribbon interface (Word 2007 or later)? This site is for you! If you use an earlier version of Word, visit our WordTips site focusing on the menu interface.
Visit the WordTips channel on YouTube

FREE SERVICE: Get tips like this every week in WordTips, a free productivity newsletter. Enter your address and click "Subscribe."
Copyright © 2024 Sharon Parq Associates, Inc.
Comments