Please Note: This article is written for users of the following Microsoft Word versions: 2007, 2010, 2013, 2016, 2019, and Word in Microsoft 365. If you are using an earlier version (Word 2003 or earlier), this tip may not work for you. For a version of this tip written specifically for earlier versions of Word, click here: Copying Found Items to a New Document.
Written by Allen Wyatt (last updated August 26, 2022)
This tip applies to Word 2007, 2010, 2013, 2016, 2019, and Word in Microsoft 365
Robert notes that Word allows him to locate and highlight all the instances of an item that he enters in the Find dialog box. He wonders if, from that point, there is some way he can select all the highlighted instances so that he can copy and paste them into a new document.
Copying individual items that are found is easy—all you need to do is have the source and target documents open, find what you want in the source document, copy it to the Clipboard, and then paste it into the target document. Copying a bunch of found items at once is a bit trickier, however. Here's how to do it:
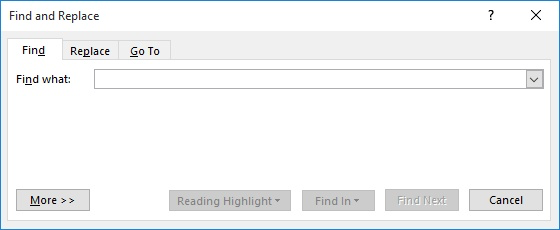
Figure 1. The Find tab of the Find and Replace dialog box.
WordTips is your source for cost-effective Microsoft Word training. (Microsoft Word is the most popular word processing software in the world.) This tip (12391) applies to Microsoft Word 2007, 2010, 2013, 2016, 2019, and Word in Microsoft 365. You can find a version of this tip for the older menu interface of Word here: Copying Found Items to a New Document.
Learning Made Easy! Quickly teach yourself how to format, publish, and share your content using Word 2013. With Step by Step, you set the pace, building and practicing the skills you need, just when you need them! Check out Microsoft Word 2013 Step by Step today!
Word allows you to search for specific ASCII codes in a document. If you use codes to search for alphabetic characters, ...
Discover MoreIn order to provide a finishing touch to your document, you may want to replace mundane X marks with fancier check marks. ...
Discover MoreHidden text is a great boon if you want to make sure something doesn't show up on the screen or on a printout. If you ...
Discover MoreFREE SERVICE: Get tips like this every week in WordTips, a free productivity newsletter. Enter your address and click "Subscribe."
2023-09-09 08:35:47
Roy
Works beautifully.
Anyone who has the horrid Word with the Find monster that opens to the right (a "Task Pane"???), can overcome that in a fairly easy way: Press Ctrl-H to open the Find and Replace box and ignore that it opens on that tab, and click on the Find tab to get the old champion.
That loser new thing won't, for example, let you select more than one item at a time.
And for those who think I'm an old man living out my string getting nothing from life: "Get off my grass!!!"
You can also press Ctrl-F to get the horrid beast, then its little settings button and click the only choice, which it presciently or by their own use experience pushes them to, calls "Advanced Find." Should call it "Useful Find" but compared to the horrid thing, it truly is Advanced Find. But I find that harder than the route I mentined above. Others may not.
2018-10-22 05:52:52
Richard Price
Subscriber @Galen posted a question about this article, but it was attached to a different one (https://wordribbon.tips.net/T006054_Pulling_Tables_Back_Into_View.html). The question was how to add Advanced Find to the Quick Access Toolbar. I believe the answer is as follows:
In the "Customize the Quick Access Toolbar" dialogue, change the "Choose commands from" dropdown to select "All Commands". Scroll down and you will see three commands all called Find (plus three more starting with Find). You have to hover your cursor over these to find out which is which, but the one reported as "Home Tab | Editing | Find (FindDialog)" is probably the one you want.
Got a version of Word that uses the ribbon interface (Word 2007 or later)? This site is for you! If you use an earlier version of Word, visit our WordTips site focusing on the menu interface.
Visit the WordTips channel on YouTube

FREE SERVICE: Get tips like this every week in WordTips, a free productivity newsletter. Enter your address and click "Subscribe."
Copyright © 2024 Sharon Parq Associates, Inc.
 Please Note:
This article is written for users of the following Microsoft Word versions: 2007, 2010, 2013, 2016, 2019, and Word in Microsoft 365. If you are using an earlier version (Word 2003 or earlier), this tip may not work for you. For a version of this tip written specifically for earlier versions of Word, click here:
Please Note:
This article is written for users of the following Microsoft Word versions: 2007, 2010, 2013, 2016, 2019, and Word in Microsoft 365. If you are using an earlier version (Word 2003 or earlier), this tip may not work for you. For a version of this tip written specifically for earlier versions of Word, click here:
Comments