Written by Allen Wyatt (last updated March 27, 2021)
This tip applies to Word 2007, 2010, 2013, 2016, 2019, and Word in Microsoft 365
Alexis has this problem with placing borders around a paragraph. Instead of placing the borders around the whole paragraph, Word places borders around each line of the paragraph. It's as if Word reads each line as a different paragraph, so to speak. Alexis wonders why Word behaves like this.
Word behaves differently in how it adds borders based on what you've selected when you apply the borders. The key here is whether the end-of-paragraph marker is selected when the borders are applied. If it is not selected, then Word puts borders around the individual lines of the paragraph. If it is selected, then Word puts the border around the entire paragraph.
The easiest way to see this effect is to make sure that you have non-printing characters displayed in your document. Display the Home tab of the ribbon and click the Show/Hide tool in the Paragraph group. (The tool looks like a backwards P, or pilcrow.) You should see the non-printing characters appear throughout your document. (See Figure 1.)
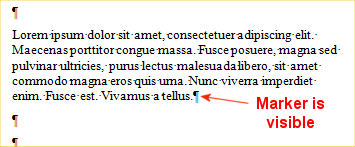
Figure 1. The non-printing characters visible in a document.
Select everything in the paragraph except the end-of-paragraph marker. (See Figure 2.)
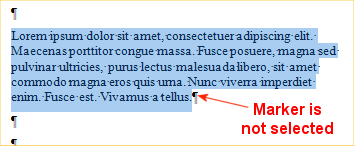
Figure 2. Everything is selected except the marker.
When you use the Borders tool (in the Paragraph group on the Home tab of the ribbon) to apply a border to the outside of the selection, Word dutifully applies the border, but it won't be to the entire paragraph because you haven't selected the entire paragraph. Instead, the border appears around individual lines in the paragraph. (See Figure 3.)
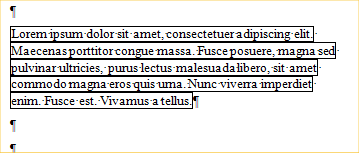
Figure 3. Word borders the individual characters and words in the paragraph.
In reality you've instructed Word to add the border to the text selection, and Word does that—it applies the border to the individual characters and words in the paragraph. It looks like each line is bordered because the borders between characters and words are automatically suppressed by Word.
Press Ctrl+Z to undo the adding of the border. Then, reselect the paragraph, but this time make sure that you include the end-of-paragraph marker. (The easiest way to do this is to simply triple click your mouse within the paragraph's text.) When you apply the border again, it should appear around the outside of the entire paragraph. (See Figure 4.)
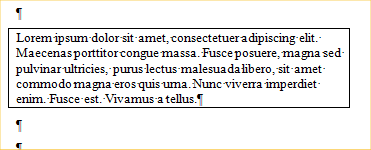
Figure 4. Word borders the entire paragraph.
Interestingly enough, you don't really need to select the entire paragraph before adding the border. If you simply place the insertion point somewhere within the paragraph and then use the Border tool to apply an outside border, Word assumes you want it applied to the entire paragraph.
Finally, you should note that if you really, really want to make sure that your border applies to the entire paragraph, you can use the Borders and Shading dialog box. If you select what you want to place a border on and then display the dialog box (click the down-arrow next to the Borders tool and choose Borders and Shading), Word indicates on the Borders tab exactly what it will apply the border to. (See Figure 5.)
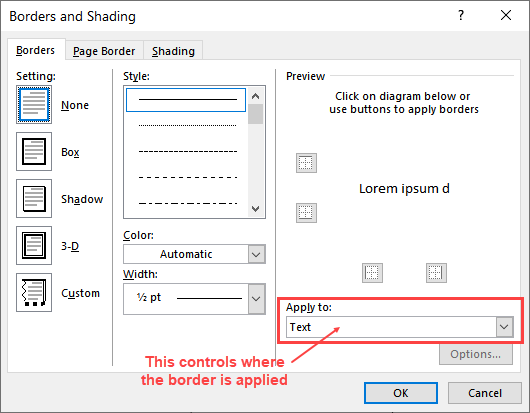
Figure 5. The Borders tab of the Borders and Shading dialog box.
Use the Applies To drop-down list to modify whether the border applies to the text in the paragraph (Text) or the entire paragraph itself (Paragraph).
WordTips is your source for cost-effective Microsoft Word training. (Microsoft Word is the most popular word processing software in the world.) This tip (13281) applies to Microsoft Word 2007, 2010, 2013, 2016, 2019, and Word in Microsoft 365.
The First and Last Word on Word! Bestselling For Dummies author Dan Gookin puts his usual fun and friendly candor back to work to show you how to navigate Word 2013. Spend more time working and less time trying to figure it all out! Check out Word 2013 For Dummies today!
Does it appear that the margins on your document aren't staying where you want them? It could have to do with the ...
Discover MoreParagraphs can be aligned in four different ways. This tip examines those alignment methods.
Discover MoreYou can use the tools on the ribbon to adjust the indent applied to a paragraph. If you want to format a hanging indent, ...
Discover MoreFREE SERVICE: Get tips like this every week in WordTips, a free productivity newsletter. Enter your address and click "Subscribe."
2021-09-06 11:13:20
Sarah F
Your tutorials are so uniformly and often singularly helpful! I need to remember to always visit your site first!
2021-05-24 03:05:36
pu
I want a top border to appear above every level 1 TOC.
But when I have 2x level 1 TOC in a row, the border on only appear in the first instance.
Got a version of Word that uses the ribbon interface (Word 2007 or later)? This site is for you! If you use an earlier version of Word, visit our WordTips site focusing on the menu interface.
Visit the WordTips channel on YouTube

FREE SERVICE: Get tips like this every week in WordTips, a free productivity newsletter. Enter your address and click "Subscribe."
Copyright © 2024 Sharon Parq Associates, Inc.
Comments