Please Note: This article is written for users of the following Microsoft Word versions: 2007, 2010, 2013, 2016, 2019, and Word in Microsoft 365. If you are using an earlier version (Word 2003 or earlier), this tip may not work for you. For a version of this tip written specifically for earlier versions of Word, click here: Adding Horizontal Lines at the Sides of a Word.
Written by Allen Wyatt (last updated June 13, 2020)
This tip applies to Word 2007, 2010, 2013, 2016, 2019, and Word in Microsoft 365
Word allows you to easily add all sorts of flourishes to the text in your document. For instance, you might want to create a page title by adding horizontal lines at the left and right of a word. Getting those lines to be vertically centered relative to the word can be a challenge, however. As with many tasks in Word there are several different approaches you can take to the problem.
One way is to use formatted tab stops to add the horizontal lines. Follow these general steps:
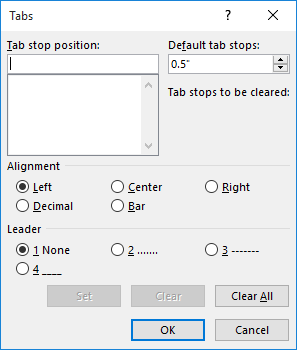
Figure 1. The Tabs dialog box.
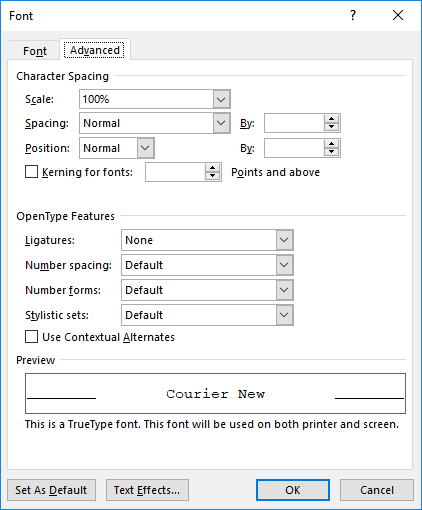
Figure 2. The Advanced tab of the Font dialog box.
It can be intimidating to set tab stops in this manner, but you can get some great-looking results. If you prefer, you could try the following general steps instead:
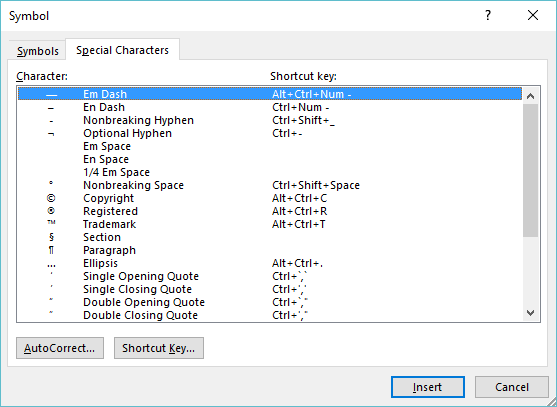
Figure 3. The Special Characters tab of the Symbol dialog box.
These steps work fairly well; for most fonts the em-dash is centered vertically by default.
The strikethrough feature can also be used to add the horizontal lines. For instance, type ten spaces both before and after your word. Select the first eight spaces and apply strikethrough formatting. Then, select the last eight spaces and do the same. Since the strikethrough goes through spaces, it looks just like a horizontal line. It should be fairly close to center of the text (vertically), as well.
Another approach is to use tables to position your text and lines. Insert a single-row, three-cell table. In the outermost cells of the table insert horizontal lines. (In the Borders and Shading dialog box, click the Horizontal Line button and select the line you want used. You can also display the Design tab of the ribbon, click Borders, and then choose Horizontal Line.) In the center cell type the word you desire. You can then adjust the various formatting settings with the table (including cell size and table positioning) to get exactly the look you want.
Another idea is to again use a table, but this time create a table that is two cells high by three cells wide. In the first and third columns, format the cells so that the only borders visible are those between the first and second rows. Then, select and merge the cells in the center column. You now have two rows in the first column, one row in the second column, and two rows in the third column. Format the single cell in the second column so that it has no borders and that whatever you type in it is both vertically and horizontally centered. Type your word in the cell and adjust the second column's width to provide the desired amount of white space at both sides of the word.
Finally, you could create the desired lines by simply drawing a single horizontal line that extends from the leftmost part of the left line to the rightmost part of the right line. Then, place your word in a text box and format the text box so it has a white background and no borders surrounding it. You should then adjust the text box so that whatever it contains is centered both vertically and horizontally. Position the text box so it is directly over the line and make sure it is aligned both horizontally and vertically with the line. Group the line and the text box so that they are treated as a single unit.
WordTips is your source for cost-effective Microsoft Word training. (Microsoft Word is the most popular word processing software in the world.) This tip (13202) applies to Microsoft Word 2007, 2010, 2013, 2016, 2019, and Word in Microsoft 365. You can find a version of this tip for the older menu interface of Word here: Adding Horizontal Lines at the Sides of a Word.
The First and Last Word on Word! Bestselling For Dummies author Dan Gookin puts his usual fun and friendly candor back to work to show you how to navigate Word 2013. Spend more time working and less time trying to figure it all out! Check out Word 2013 For Dummies today!
Want your company name to always appear in a particular formatted manner? Word provides two ways you can approach the ...
Discover MoreYou can rotate a page of text by using the Far East language support built into Word. This tip shows how easy it is to ...
Discover MoreNeed to have a great looking fraction in a document? It's relatively easy to do if you apply the formatting techniques ...
Discover MoreFREE SERVICE: Get tips like this every week in WordTips, a free productivity newsletter. Enter your address and click "Subscribe."
There are currently no comments for this tip. (Be the first to leave your comment—just use the simple form above!)
Got a version of Word that uses the ribbon interface (Word 2007 or later)? This site is for you! If you use an earlier version of Word, visit our WordTips site focusing on the menu interface.
Visit the WordTips channel on YouTube

FREE SERVICE: Get tips like this every week in WordTips, a free productivity newsletter. Enter your address and click "Subscribe."
Copyright © 2024 Sharon Parq Associates, Inc.
 Please Note:
This article is written for users of the following Microsoft Word versions: 2007, 2010, 2013, 2016, 2019, and Word in Microsoft 365. If you are using an earlier version (Word 2003 or earlier), this tip may not work for you. For a version of this tip written specifically for earlier versions of Word, click here:
Please Note:
This article is written for users of the following Microsoft Word versions: 2007, 2010, 2013, 2016, 2019, and Word in Microsoft 365. If you are using an earlier version (Word 2003 or earlier), this tip may not work for you. For a version of this tip written specifically for earlier versions of Word, click here:
Comments