Written by Allen Wyatt (last updated March 16, 2024)
This tip applies to Word 2007, 2010, 2013, 2016, 2019, Word in Microsoft 365, and 2021
Tom routinely sets up a document to print an envelope. There is no letter or anything else to go with the envelope; he just needs to print the envelope each month. Word is inserting a blank page below the envelope that Tom cannot figure out how to delete or keep from printing. Telling the printer to only print a specific page didn't work. He wonders how to delete that blank page or keep it from printing?
Let's look at both things that Tom wants to do, starting first with keeping the blank page from printing. The easiest way to do this is to remember that you can specify, in the Print settings, exactly what you want to print. Tom, it seems, is trying to tell Word to print the first page, however Word doesn't consider Tom's document to have two pages. Instead, the document contains two sections, each one page long. So, if you print "page 1" you end up with both the envelope and blank page printed because they are both page 1.
Instead, print just the envelope in this manner:
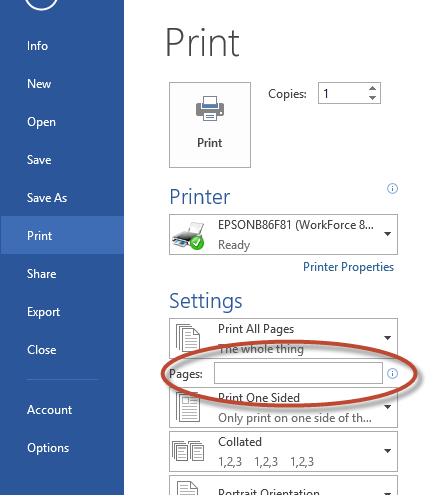
Figure 1. The Print options.
Now, let's take a look at how you can actually delete that blank page. The key to doing this is to remember that when you first added the envelope to the document, Word added it as a new section at the beginning of the document. That means there is a section break (as already discussed) between the envelope and the blank page that follows the envelope. In order to see this section break, you need to display the Home tab of the ribbon and click the Show/Hide tool. (This looks like a backwards P character and is in the Paragraph group of the ribbon.)
Once you see the section break, it is an easy matter to select it and delete it. The problem, though, is that doing so will get rid of the page formatting necessary for the envelope. What you are then left with is the page formatting for the document, and you effectively have deleted the envelope.
To get around this, follow these steps:
Now you can save your envelope and it will be just the envelope—no trailing blank page.
WordTips is your source for cost-effective Microsoft Word training. (Microsoft Word is the most popular word processing software in the world.) This tip (13028) applies to Microsoft Word 2007, 2010, 2013, 2016, 2019, Word in Microsoft 365, and 2021.
Learning Made Easy! Quickly teach yourself how to format, publish, and share your content using Word 2013. With Step by Step, you set the pace, building and practicing the skills you need, just when you need them! Check out Microsoft Word 2013 Step by Step today!
You can easily use Word to print envelopes for your letters. What happens, however, if your printer insists on pushing ...
Discover MoreText boxes can be a great design feature to use in laying out a document. You may want to add one to an envelope, ...
Discover MoreWord includes a feature that allows you to easily create and print envelopes, based on the addresses you insert in your ...
Discover MoreFREE SERVICE: Get tips like this every week in WordTips, a free productivity newsletter. Enter your address and click "Subscribe."
2024-03-18 18:48:26
Tomek
@Chris Finn, UK
Putting an envelope and regular sheets in the same tray may be asking for trouble, as the envelope may not be properly guided, or (on my printer) properly centred. You can put several envelopes, or have a dedicated envelope tray on more advanced printers. On simple printers I would just put a single envelope in, print (make sure it is not set for reverse order). The printer will run out of paper and you will be able to cancel the rest of the print, and reload the regular paper. I would do that if it is an occasional task, but for a repetitive one I would create an envelope-only document.
Re: Somehow that way of printing only an envelope is a lot to do each time:
If you need to print the same envelope over and over again, once you create it, there is no more work needed. Even if you need to change the delivery or return address, they can be simply replaced in the ready document (save under new name to be reused).
And yes, it can be done by macro, but isn't it even more work?
2024-03-18 18:29:12
@Tom Santi:
If you followed step 1 - 7 you should have the document that has two pages, **both the size of the envelope**. If not, removing the section break will reformat the resulting single page to the format of the second page.
Make sure you clicked on the OK button, **not Cancel, nor Esc** in step 4. Although you are not changing anything there, it creates an action that can be repeated in step 7 by pressing F4 (or Ctrl+Y, or clicking on redo/repeat button). Sometimes you may get a message about narrow margins, it's best to select Fix.
Once you have the two envelope-sized/formatted pages, make sure to delete **only** the section break.
Let me know if it still does not work.
2024-03-17 13:09:13
Ken Gelnick
I have Word 2019. In "printing just the envelope," steps 2 & 3 did not show the little arrow in the bottom right of the page setup box and steps 6 & seven didn't work either. What am I doing wrong?
2024-03-16 19:03:17
Sheryl
I typically append an envelope to a letter I create, which includes the mailing address and return address, by clicking the Mailings tab, then the Envelopes icon on the leftmost side of the Ribbon and click Add to Document at the bottom of the Envelopes and Labels menu. The envelope does, as noted, appear as the "first page" of the document.
To print the envelope only, use the mouse to select both the return address and the mailing address. Then click Print Preview and Print, choose the Printer you'll use (not forgetting to load an envelope in the tray) and in Settings, choose Print Selection. Then click the Print button, and only the envelope will print.
2024-03-16 08:38:19
Tom Santi
The steps to delete the blank page did not work. They left a one page document no longer formatted as an envelope. Any ideas on what I might be doing wrong? I'll try the print option described next time I need the envelope.
Thanks for all your tips. I find them super helpful.
2024-03-16 07:03:25
Somehow that way of printing only an envelope is a lot to do each time. Can it be made into a macro?
Otherwise it seems easier just to take the empty "printed" sheet and just put it back in the clean paper stack.
Thanks for all you do. We do appreciate it. CF.
Got a version of Word that uses the ribbon interface (Word 2007 or later)? This site is for you! If you use an earlier version of Word, visit our WordTips site focusing on the menu interface.
Visit the WordTips channel on YouTube

FREE SERVICE: Get tips like this every week in WordTips, a free productivity newsletter. Enter your address and click "Subscribe."
Copyright © 2024 Sharon Parq Associates, Inc.
Comments