Please Note: This article is written for users of the following Microsoft Word versions: 2007, 2010, 2013, 2016, 2019, and Word in Microsoft 365. If you are using an earlier version (Word 2003 or earlier), this tip may not work for you. For a version of this tip written specifically for earlier versions of Word, click here: Creating an Index Entry.
Written by Allen Wyatt (last updated April 3, 2024)
This tip applies to Word 2007, 2010, 2013, 2016, 2019, and Word in Microsoft 365
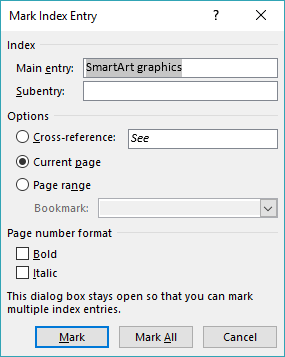
Word includes a feature that allows you to automatically create an index for your document. How you create the actual index is explained in a different tip, but first you must insert index entries throughout your document. These entries are used by Word to pull together the information that is placed in the index. To create an index entry, follow these steps:

Figure 1. The Mark Index Entry dialog box.
Word also allows you to create index subentries. These are index entries that are subordinate to other index entries, and generally appear indented under the main index entry. To insert an index subentry, follow these steps:
WordTips is your source for cost-effective Microsoft Word training. (Microsoft Word is the most popular word processing software in the world.) This tip (12617) applies to Microsoft Word 2007, 2010, 2013, 2016, 2019, and Word in Microsoft 365. You can find a version of this tip for the older menu interface of Word here: Creating an Index Entry.

Create Custom Apps with VBA! Discover how to extend the capabilities of Office 2013 (Word, Excel, PowerPoint, Outlook, and Access) with VBA programming, using it for writing macros, automating Office applications, and creating custom applications. Check out Mastering VBA for Office 2013 today!
After you get your document ready for indexing by inserting index fields throughout it, you may want to index only a ...
Discover MoreWhen you insert an index in a document, Word automatically takes care of formatting that index. What if the index levels ...
Discover MoreThere are several ways you can create an index in Word, but the first step is always to figure out what should go in the ...
Discover MoreFREE SERVICE: Get tips like this every week in WordTips, a free productivity newsletter. Enter your address and click "Subscribe."
There are currently no comments for this tip. (Be the first to leave your comment—just use the simple form above!)
Got a version of Word that uses the ribbon interface (Word 2007 or later)? This site is for you! If you use an earlier version of Word, visit our WordTips site focusing on the menu interface.
Visit the WordTips channel on YouTube
FREE SERVICE: Get tips like this every week in WordTips, a free productivity newsletter. Enter your address and click "Subscribe."
Copyright © 2024 Sharon Parq Associates, Inc.
Comments