Please Note: This article is written for users of the following Microsoft Word versions: 2007, 2010, 2013, 2016, 2019, Word in Microsoft 365, and 2021. If you are using an earlier version (Word 2003 or earlier), this tip may not work for you. For a version of this tip written specifically for earlier versions of Word, click here: One Change Affects Everything.
Written by Allen Wyatt (last updated March 16, 2024)
This tip applies to Word 2007, 2010, 2013, 2016, 2019, Word in Microsoft 365, and 2021
Perhaps you've had this happen to you: You are typing along, and you decide you need to make a formatting change in your document. In this particular case, you want to format a particular paragraph as bold face. You select the paragraph, click on the Bold tool on the Home tab of the ribbon, and all the paragraphs in your document change to bold—not just the one you selected.
Or, you decide you want to add a bullet to the start of one paragraph. You select the paragraph, click the Bullets tool, and bullets appear in front of all the paragraphs in the document—not just the one you selected. What is going on, and how can this be corrected?
When this type of change occurs, you can press Ctrl+Z right away (the Undo shortcut) and Word reverses its action. Continually pressing Ctrl+Z is a pain, however. It is much better to understand the cause of the problem, then you can make the changes you need.
Formatting in Word is based on styles. Even if you don't know what styles are or have made a conscious decision to never use styles, they are still there, working in the background. Every paragraph in your document is based on an underlying style that defines how that paragraph appears on the page. With this tidbit firmly understood, the next time you get a "global change" when you only wanted to affect a single paragraph, follow these four steps to greater enlightenment:
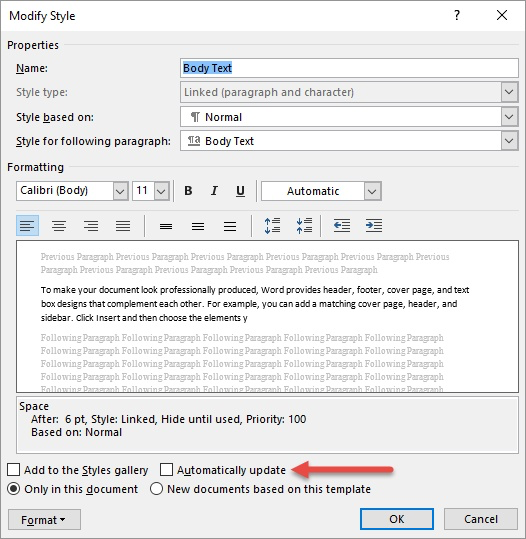
Figure 1. The Modify Style dialog box.
Take a good look at the dialog box. At the bottom is a check box labeled Automatically Update. If this check box is selected, it means that whenever you make changes to the paragraph, in your document, those changes are automatically made to the style that is assigned to the paragraph. Once the change is made, then every other paragraph in your document that is formatted using the same style is automatically changed.
If you are a person that ignores styles completely or who thinks you don't need to worry about them, this is where you can get into trouble. In most cases, Word uses the Normal style as the default style for paragraphs in a document. Fortunately, Word doesn't provide an Automatically Update check box for the Normal style. But if your document is using some other style for the basis style for all paragraphs and the Automatically Update check box is selected, it is guaranteed that you will experience the problems described at the beginning of this tip.
To solve this problem, follow these steps:
WordTips is your source for cost-effective Microsoft Word training. (Microsoft Word is the most popular word processing software in the world.) This tip (11326) applies to Microsoft Word 2007, 2010, 2013, 2016, 2019, Word in Microsoft 365, and 2021. You can find a version of this tip for the older menu interface of Word here: One Change Affects Everything.
Learning Made Easy! Quickly teach yourself how to format, publish, and share your content using Word 2013. With Step by Step, you set the pace, building and practicing the skills you need, just when you need them! Check out Microsoft Word 2013 Step by Step today!
Word is very flexible in what it allows you to search for. One thing it can't do, however, is allow you to search for ...
Discover MoreStyles are a fantastic way to format your documents easily and consistently. At some point you may want to print out a ...
Discover MoreHave you ever created a template only to have the styles within it changed as they were used within a document? Here are ...
Discover MoreFREE SERVICE: Get tips like this every week in WordTips, a free productivity newsletter. Enter your address and click "Subscribe."
There are currently no comments for this tip. (Be the first to leave your comment—just use the simple form above!)
Got a version of Word that uses the ribbon interface (Word 2007 or later)? This site is for you! If you use an earlier version of Word, visit our WordTips site focusing on the menu interface.
Visit the WordTips channel on YouTube

FREE SERVICE: Get tips like this every week in WordTips, a free productivity newsletter. Enter your address and click "Subscribe."
Copyright © 2024 Sharon Parq Associates, Inc.
 Please Note:
This article is written for users of the following Microsoft Word versions: 2007, 2010, 2013, 2016, 2019, Word in Microsoft 365, and 2021. If you are using an earlier version (Word 2003 or earlier), this tip may not work for you. For a version of this tip written specifically for earlier versions of Word, click here:
Please Note:
This article is written for users of the following Microsoft Word versions: 2007, 2010, 2013, 2016, 2019, Word in Microsoft 365, and 2021. If you are using an earlier version (Word 2003 or earlier), this tip may not work for you. For a version of this tip written specifically for earlier versions of Word, click here:
Comments