Please Note: This article is written for users of the following Microsoft Word versions: 2007, 2010, 2013, 2016, 2019, Word in Microsoft 365, and 2021. If you are using an earlier version (Word 2003 or earlier), this tip may not work for you. For a version of this tip written specifically for earlier versions of Word, click here: Best Quality for High Resolution Graphics.
Written by Allen Wyatt (last updated November 5, 2022)
This tip applies to Word 2007, 2010, 2013, 2016, 2019, Word in Microsoft 365, and 2021
Nina is creating a letterhead, and she wants to use a graphic for the address portion of the letterhead. She saved the text portion out as an EPS vector file, thinking this would provide the best resolution when she inserted the graphic into Word. When she did that, however, the EPS file is treated in Word as if it is 72 dpi. This makes the original size of the graphic (according to Word) huge, something like 69 inches. Word automatically fits the image to the available space, which means it is resized to 11% of its original. The resulting graphic looks terrible in Word; the text in graphic format doesn't appear as crisp or sharp as the original text version of the address. Nina wonders what the best way is to embed a high-resolution graphic in her letterhead so that it appears with the crispness and clarity she expects.
There are several issues at play here. First of all, you may want to strongly consider not using EPS for your high-resolution graphics that will end up in a Word document. EPS is a vector format, meaning that a graphic file consists of many separate "objects" that are mathematically defined. Most programs, including Word, do not decode the math to the screen, but instead rely upon a low-resolution "preview" of the image. This preview is generated by the program that created the EPS file and it is typically at a low resolution, such as 72 dpi.
When you use Word to print the EPS file, what you see on the printout depends on the type of printer you are using. If you are using a PostScript printer (and the correct printer driver), then the EPS graphic will be printed correctly because PostScript is able to decode the EPS files correctly. If you are using a different type of printer—one that doesn't understand PostScript—or if you are using a non-PostScript printer driver with a PostScript printer, then what you see will be what you see on the screen—the low-resolution preview image for the EPS.
Since there are so many things that have to be "just right" in order for EPS files to work properly with Word, it is best to not rely on them unless you have to. You could try using a different type of vector format, such as EMF or WMF, but (again) there are typically a lot of parts that have to be set just right to make vector files—any vector files—work correctly in Word.
If you are looking for a different approach, create your images in a high-resolution TIF or PNG format. Normally, for most printers, either 300 dpi or 600 dpi is much more than adequate. The resulting image file will be rather large as these are considered "lossless" image file formats, but it will be just as crisp and clear as you expect once placed in your Word document. The reason is that Word can work with TIF and PNG files and scale them to whatever size you need. Even so, you should consider using a graphics program to resize the graphic to whatever final size you need in the Word document.
Another thing you will want to do is to configure Word so that it doesn't compress images. Word allows you to do this in Word 2010 and later versions:
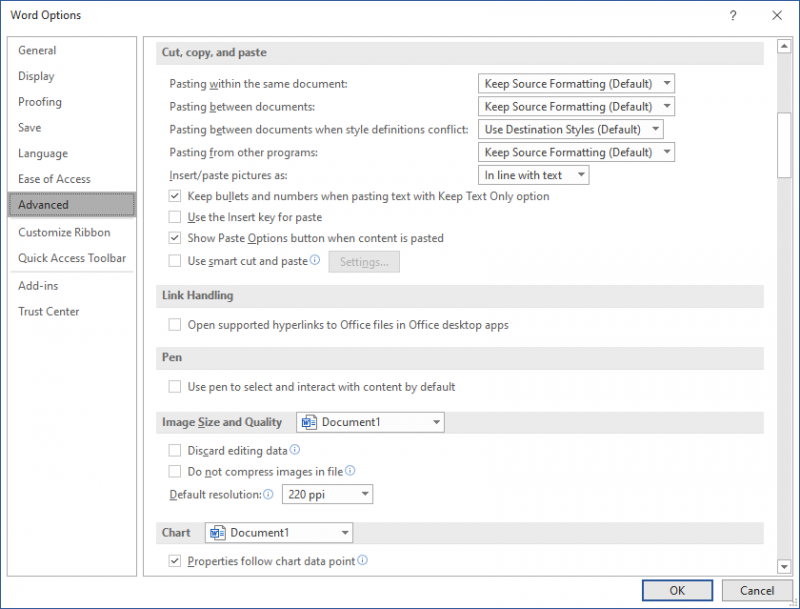
Figure 1. The image settings in the Word Options dialog box.
When you perform these steps, Word converts any high-resolution images to the resolution you specified in step 4. If 220 dpi is not sufficiently high-res for your needs, then you should (in step 4) click the Do Not Compress Images check box. When set, this causes Word to ignore whatever you have specified in the Default Resolution control and, instead, include any pasted images at their original resolution. This results in the highest resolution (provided your images are higher resolution than 220 dpi), but it also results in the largest document file sizes.
There are two things to keep in mind with these settings—they affect only the current document and they affect only images that are placed in the document after the settings have been changed. If you change the settings and your document already has images within it, then those images won't be affected if they had already been converted, by Word, to a lower resolution. Instead, after changing the settings you'll need to delete those images and place new ones.
This brings up a side note—you cannot expect Word to create something good looking if your original image isn't of a sufficiently high quality. For instance, let's say that you change the settings in Word to use 220 dpi images. That's great if your original image, created outside of Word, is at a higher resolution, such as 300 dpi or 600 dpi. If, however, your original image is a lower resolution—perhaps 96 dpi or even 72 dpi—then Word won't "up sample" the image to make it 220 dpi. The setting only affects images of a higher resolution than what you specify in the setting. The bottom line is that you need to make sure your original images are high resolution before you try to place them in your Word document.
Finally, whatever format you decide upon for your graphics, you'll want to use the Picture tool on the Insert tab of the ribbon to actually insert the image into your document. If you paste the image (using Ctrl+V) instead of inserting it, Word may convert the image to a bitmap version that is not the greatest for some purposes.
WordTips is your source for cost-effective Microsoft Word training. (Microsoft Word is the most popular word processing software in the world.) This tip (10218) applies to Microsoft Word 2007, 2010, 2013, 2016, 2019, Word in Microsoft 365, and 2021. You can find a version of this tip for the older menu interface of Word here: Best Quality for High Resolution Graphics.

Comprehensive VBA Guide Visual Basic for Applications (VBA) is the language used for writing macros in all Office programs. This complete guide shows both professionals and novices how to master VBA in order to customize the entire Office suite for their needs. Check out Mastering VBA for Office 2010 today!
Do you have documents that contain objects? Understanding how Word handles objects and the way they are anchored can make ...
Discover MoreIf you insert a large picture in your document and your text jumps all around and the picture seems to disappear, don't ...
Discover MoreUnderstanding how Word handles wrapping text around a graphic or other object is critical to getting the best page layout ...
Discover MoreFREE SERVICE: Get tips like this every week in WordTips, a free productivity newsletter. Enter your address and click "Subscribe."
2022-11-07 11:29:46
Paul Stregevsky
Thank you, David Bookbinder, for informing us of the compression bug. Another bug affects .PNG files. If you use the Insert menu to insert a PNG into a drawing canvas, you might see one of two unwelcome results:
1. The file might be downsampled. For example, instead of coming in at 720 by 1280, it will come it at 140 by 256, losing most of its detail.
2. The image might be inserted at a postage-stamp size. When you open the image properties to expand it, you'll find that it was pasted in at, say, 11 percent. Sometimes expanding to 100 percent restores the detail; other times, it doesn't.
For these reasons, i prefer to paste my PNG images into the canvas, using the Windows clipboard.
2022-11-07 11:23:54
RC
WMF and EMF are vector graphic formats and can produce sharp output in PDFs from Word. Embedded Visio drawings seem to produce the same result as EMF. Simple Adobe Illustrator drawings (line drawings) can be inserted as EMF. Some Illustrator features within drawings can cause problems (for example, I've found that Illustrator's dashed lines cause inserted EMFs to appear bitmapped). A benefit of a vector format is that text within the drawing is searchable in PDFs that are output from Word. Visio works for certain things and is not for everybody; it's not like you can sit down and easily draw whatever you want. Illustrator EMF output will probalby have a lot of limtations and require expermenting and workarounds.
2022-11-07 03:52:14
Graham Booth
To emphasize the advice in this article - do not use "lossy" file formats - e.g. JPEG (.jpg) files. These are OK for photos and the like, but the compression mechanism used tends to convert same-colored areas into multiple colors, and to also make the edges fuzzy. This does not make for clean, crisp graphics and logos. Many users do not realize this and I see it time and time again due to people's association with the use of JPEGs for "picture" files. However graphics and logos come to you, ensure they are in PNG or TIFF format wherever possible.
2022-11-05 12:20:34
David Bookbinder
There's an additional caveat here, at least in versions of Word up to 2019, which is the latest I have. Even if you use a raster format like PNG and even if you tell Word not to compress images and/or set a high DPI, Word will still downsample to 200dpi when you save to PDF. To get resolutions higher than d00dpi in a PDF (for example, in a book file with images), you have to print the file to a PDF driver. If your destination page size is 8.5"x11" you can use the PDF driver built into Windows, you can use that. If you need a different page size, such as 6"x9" for a book, you need a third-party PDF printer such as doPDF or NovaPDF.
Got a version of Word that uses the ribbon interface (Word 2007 or later)? This site is for you! If you use an earlier version of Word, visit our WordTips site focusing on the menu interface.
Visit the WordTips channel on YouTube

FREE SERVICE: Get tips like this every week in WordTips, a free productivity newsletter. Enter your address and click "Subscribe."
Copyright © 2024 Sharon Parq Associates, Inc.
 Please Note:
This article is written for users of the following Microsoft Word versions: 2007, 2010, 2013, 2016, 2019, Word in Microsoft 365, and 2021. If you are using an earlier version (Word 2003 or earlier), this tip may not work for you. For a version of this tip written specifically for earlier versions of Word, click here:
Please Note:
This article is written for users of the following Microsoft Word versions: 2007, 2010, 2013, 2016, 2019, Word in Microsoft 365, and 2021. If you are using an earlier version (Word 2003 or earlier), this tip may not work for you. For a version of this tip written specifically for earlier versions of Word, click here:
Comments