Please Note: This article is written for users of the following Microsoft Word versions: 2007, 2010, 2013, 2016, 2019, Word in Microsoft 365, and 2021. If you are using an earlier version (Word 2003 or earlier), this tip may not work for you. For a version of this tip written specifically for earlier versions of Word, click here: Removing Author Information.
Written by Allen Wyatt (last updated November 19, 2022)
This tip applies to Word 2007, 2010, 2013, 2016, 2019, Word in Microsoft 365, and 2021
As you write a document in Word, there is a lot of information that is stored with the document that can identify you as the author. Your name is stored in comments, properties, tracked changes, and any number of other places. Collectively, this information is often referred to as metadata, although the term can apply to far more than just information that identifies the author. (Metadata can include any non-document related information that is stored with the document itself.)
There are several ways you can try removing identifying information from a document. Perhaps the most successful method is to convert your document to a plain text file, and then load it back into Word. The huge drawback to this suggestion, of course, is that you not only lose the metadata, but you lose all formatting in the document.
Another possibility is to convert your document to RTF format. RTF (rich text format) is a file format that allows you to maintain most formatting, but all of the document attributes are stripped out. Another benefit is that the RTF file can be loaded by almost any other word processor besides Word, which means that the document becomes more portable than the original Word document. A drawback is that RTF doesn't handle files well if they are complex in nature, such as containing complicated tables and Word-peculiar formatting, such as having double borders or double underlines.
Word includes a feature called the Document Inspector that allows you to examine the metadata in a document and delete any of it that you want to delete. If you're using Word 2007, display the Document Inspector by clicking the Office button, Prepare, and then Inspect Document. If you're using Word 2010 or a later version, display the File tab of the ribbon, click on Check for Issues, and then select Inspect Document from the drop-down menu. (See Figure 1.)
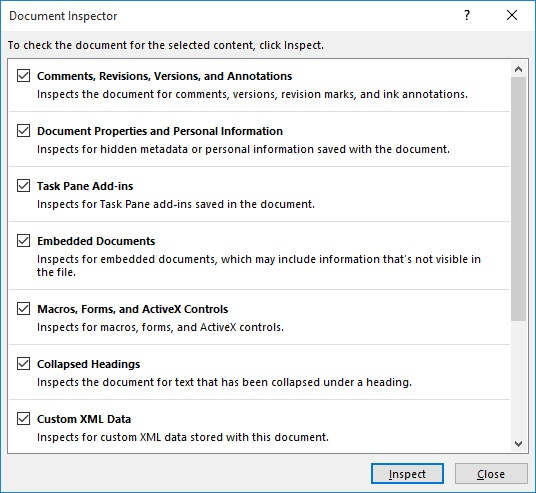
Figure 1. The Document Inspector.
The Document Inspector can check out different areas of your document for metadata. (How many areas it can check varies depending on the version of Word you are using.) Make sure that the checkboxes in the Document Inspector reflect the areas you want checked, then click Inspect Document. Those areas are checked and the Document Inspector shows you what it found. You can then remove any of the metadata in each of the inspected areas.
WordTips is your source for cost-effective Microsoft Word training. (Microsoft Word is the most popular word processing software in the world.) This tip (8231) applies to Microsoft Word 2007, 2010, 2013, 2016, 2019, Word in Microsoft 365, and 2021. You can find a version of this tip for the older menu interface of Word here: Removing Author Information.
Learning Made Easy! Quickly teach yourself how to format, publish, and share your content using Word 2013. With Step by Step, you set the pace, building and practicing the skills you need, just when you need them! Check out Microsoft Word 2013 Step by Step today!
Word includes tons of internal commands that you can access as you customize your system. One of these is the Normalize ...
Discover MoreIf you hear a sound when you start Word, it is because of some settings within Windows itself. You can use the Control ...
Discover MoreWhat do you do if you open a document, only to find that the arrow keys don't work the way that they should? The first ...
Discover MoreFREE SERVICE: Get tips like this every week in WordTips, a free productivity newsletter. Enter your address and click "Subscribe."
There are currently no comments for this tip. (Be the first to leave your comment—just use the simple form above!)
Got a version of Word that uses the ribbon interface (Word 2007 or later)? This site is for you! If you use an earlier version of Word, visit our WordTips site focusing on the menu interface.
Visit the WordTips channel on YouTube

FREE SERVICE: Get tips like this every week in WordTips, a free productivity newsletter. Enter your address and click "Subscribe."
Copyright © 2024 Sharon Parq Associates, Inc.
 Please Note:
This article is written for users of the following Microsoft Word versions: 2007, 2010, 2013, 2016, 2019, Word in Microsoft 365, and 2021. If you are using an earlier version (Word 2003 or earlier), this tip may not work for you. For a version of this tip written specifically for earlier versions of Word, click here:
Please Note:
This article is written for users of the following Microsoft Word versions: 2007, 2010, 2013, 2016, 2019, Word in Microsoft 365, and 2021. If you are using an earlier version (Word 2003 or earlier), this tip may not work for you. For a version of this tip written specifically for earlier versions of Word, click here:
Comments