Please Note: This article is written for users of the following Microsoft Word versions: 2007, 2010, 2013, 2016, 2019, and Word in Microsoft 365. If you are using an earlier version (Word 2003 or earlier), this tip may not work for you. For a version of this tip written specifically for earlier versions of Word, click here: Endnotes by Chapter.
Written by Allen Wyatt (last updated May 18, 2023)
This tip applies to Word 2007, 2010, 2013, 2016, 2019, and Word in Microsoft 365
David has a book manuscript that consists of twenty chapters. Each chapter is in its own document file, and each chapter has its own endnotes. He would like to create one large, single document file for the manuscript, with the endnotes properly separated by chapter at the end, and renumbered from 1-X in each endnote section, as they are now.
This can be done rather easily, as Word allows you to specify that endnotes should appear at one of two places in a document: either the end of each section or at the end of the document itself. Follow these general steps:
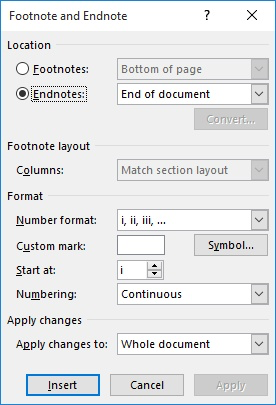
Figure 1. The Footnote and Endnote dialog box.
What you end up with is each chapter divided by sections breaks, with the endnotes configured to appear at the end of each section. Numbering of the endnotes will begin at 1 in each section.
The only time this approach will present a problem is if you have section breaks within a chapter. For instance, if you switch from a one-column to a two-column layout within a chapter, then the layout change requires the insertion of a section break. Since endnotes are configured to appear at the end of each section, that means you may have endnotes that appear at the end of your one-column layout and then at the end of the section that marks the end of the chapter. This is probably not what you want.
You can suppress the endnotes for some sections in your document (such as the first part of the chapter, before the layout change), but that presents additional problems with numbering. Since numbering is designed to start at 1 for each section, you may end up with two (or more) endnotes numbered "1" in a single chapter. You can get around this by applying continuous endnote numbering for the entire document, instead of restarting the number in each section.
WordTips is your source for cost-effective Microsoft Word training. (Microsoft Word is the most popular word processing software in the world.) This tip (6099) applies to Microsoft Word 2007, 2010, 2013, 2016, 2019, and Word in Microsoft 365. You can find a version of this tip for the older menu interface of Word here: Endnotes by Chapter.

Do More in Less Time! Are you ready to harness the full power of Word 2013 to create professional documents? In this comprehensive guide you'll learn the skills and techniques for efficiently building the documents you need for your professional and your personal life. Check out Word 2013 In Depth today!
Endnotes appear at the end of the document, right? Not always, as Word provides a way that you can actually add as much ...
Discover MoreEndnotes are indispensable in some types of writing. You may want to create endnotes, however, that don't follow the ...
Discover MoreEndnotes are often used in documents to document citations and sources. You can jump from endnote to endnote using the ...
Discover MoreFREE SERVICE: Get tips like this every week in WordTips, a free productivity newsletter. Enter your address and click "Subscribe."
2023-04-08 01:46:26
mike reitsma
Allen, Your instructions for "endnotes by chapter" saved my life. Mike Reitsma
2021-11-10 11:01:18
David Gaylin
Placing endnotes at the end of respective chapters is a simple thing to do; however no one seems to know how to place endnotes at the end of a document and then divide them into chapters with respective numbering. I have been weeks online and can find no one that knows how to do this.
2020-11-27 14:23:38
Doc
Hello: Is there a way to make end notes continuous in the sense that they are lumped together instead of 1 end note per line in Word 2013?
2019-07-26 19:08:24
FAVOUR
Thank you very much Allen Wyatt. Your article was very helpful and a thoughtprovoking piece. Many Thanks Allen.
2019-02-24 10:16:01
E O'Donovan
Hello, your explanation of how to group endnotes by chapter was really helpful... thank you!
Got a version of Word that uses the ribbon interface (Word 2007 or later)? This site is for you! If you use an earlier version of Word, visit our WordTips site focusing on the menu interface.
Visit the WordTips channel on YouTube

FREE SERVICE: Get tips like this every week in WordTips, a free productivity newsletter. Enter your address and click "Subscribe."
Copyright © 2024 Sharon Parq Associates, Inc.
 Please Note:
This article is written for users of the following Microsoft Word versions: 2007, 2010, 2013, 2016, 2019, and Word in Microsoft 365. If you are using an earlier version (Word 2003 or earlier), this tip may not work for you. For a version of this tip written specifically for earlier versions of Word, click here:
Please Note:
This article is written for users of the following Microsoft Word versions: 2007, 2010, 2013, 2016, 2019, and Word in Microsoft 365. If you are using an earlier version (Word 2003 or earlier), this tip may not work for you. For a version of this tip written specifically for earlier versions of Word, click here:
Comments